

How to Enable HTTPS on Your UGREEN NAS at Home
Use your UGREEN NAS’s built-in HTTPS address, check certificate name and trust, and keep a local recovery route while configuring UGOS Pro.
Eugene Gavrilov
9 min read- NAS & storage
Open your UGREEN NAS over HTTPS on your home network using its built-in web connection settings. First find the right address and port, then check what your browser says about the certificate. To finish with a warning-free login, you will also need a certificate your browser trusts and an address that matches it. Keep your working local login available while you make the change. You do not need Docker, a reverse proxy or router port forwarding for this local task.
UGREEN documents built-in HTTP and HTTPS as already enabled, so this task is mainly about using the HTTPS address and checking its certificate. A warning-free connection may also require a certificate and local hostname setup; changing a port alone does not provide those. UGREEN portal documentation, UGREEN certificate guidance.
This guide covers the UGOS Pro administration interface. UGREEN’s current Device Connection instructions apply to firmware 1.9.0.0062 and later, and acknowledge that the interface may vary. The steps follow official documentation; they have not been tested on a physical NAS for this article. Device Connection.
Understand the address you will open
A NAS stores and serves your files. Its local IP address identifies it inside your home network. A hostname is a readable name that must resolve to the right IP address. The port tells the browser which service to contact at that address. Your router connects your home devices and connects the home network to the internet; opening a local HTTPS address does not by itself create access from outside your home.
Here is an illustrative address, not an address to copy unchanged:
https://192.168.1.50:9443
The https:// part selects HTTPS. 192.168.1.50 stands for your NAS’s local IP, and :9443 specifies the HTTPS port. UGREEN documents 9999 for HTTP and 9443 for HTTPS as defaults. Your NAS may use different values, so read its settings before entering the address. Portal settings, UGREEN firewall guidance.
HTTPS encrypts the browser-to-NAS connection. The certificate lets the browser separately check the server’s identity: does the address match, and does the browser trust the certificate? Seeing https:// in the address alone is not proof that those checks passed. Certificates, UGREEN certificate guidance.
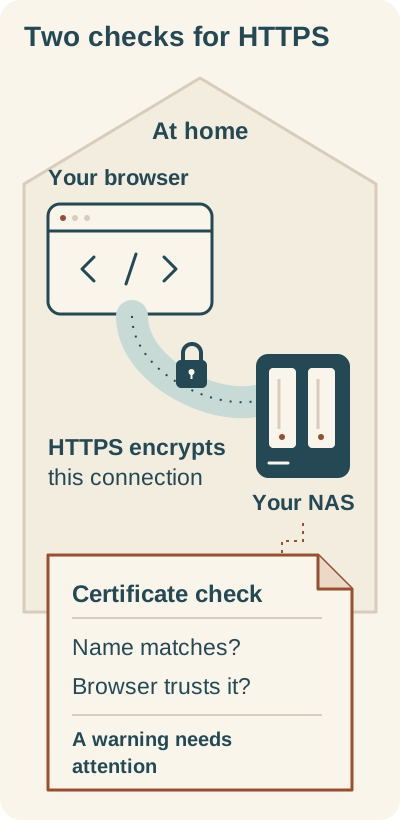
Local HTTPS encrypts the connection. The browser checks the certificate separately.
On your home network, HTTPS encrypts the browser-to-NAS connection. Separately, check the certificate’s name and whether your browser trusts it. Read and resolve a certificate warning before relying on the connection.
Before changing anything, record your working address and settings
Connect to your home network and open the NAS using the address you already use to log in. Keep that session open, and record:
- The NAS’s local IP and complete working browser address, including its port.
- The HTTP and HTTPS ports shown under Control Panel → Device Connection → Portal setting.
- Whether automatic HTTP-to-HTTPS redirection is enabled.
- The certificate currently assigned to the web service under Control Panel → Security → Certificates → Configuration. Record the actual service name shown in your interface.
These notes give you settings to return to if the new connection fails. Keeping a session open is a precaution, not a guarantee that it will survive every settings change. The controls are documented in Device Connection and Certificates; this recovery preparation is an editorial recommendation.
Keep your normal backups in place. This task concerns browser access settings: do not initialize disks, recreate volumes, delete shares or reset the NAS to fix an HTTPS problem. No storage changes are part of these steps, and no data-preservation or restore test is claimed here.
1. Open the built-in HTTPS address
In your working session, open Control Panel → Device Connection → Portal setting. Find the web service’s HTTPS port and use the value already configured. There is no need to change it just to try HTTPS. Leave the redirection setting as it is for now. Device Connection, Portal settings.
In another browser tab, enter an address in this form, substituting your actual values:
https://YOUR-NAS-IP:YOUR-HTTPS-PORT
For example, if your NAS’s local IP really is 192.168.1.50 and its HTTPS port is 9443, you would use https://192.168.1.50:9443. Keep the original tab open while checking the new one.
If the browser shows a certificate warning, stop before entering your password. Read the warning and inspect the certificate details. A warning page means the browser needs a certificate issue resolved; it is not a completed, trusted HTTPS login. UGREEN certificate guidance.
2. Check the certificate before relying on HTTPS
Certificate errors can have different causes: the issuer may be untrusted, the certificate may have expired, or its name may not match the address you entered. A certificate covering the illustrative hostname nas.example.com, for instance, does not automatically cover a local IP address. UGREEN certificate guidance.
For a warning-free local hostname connection, both of these need to be in place:
- A certificate covering that hostname which your browser accepts as valid and trusted.
- Local name resolution that sends the hostname to your NAS’s local IP.
A router, local DNS server or hosts-file entry can supply local name resolution—the mapping from your chosen hostname to the NAS’s local IP address. Buying a domain alone does not configure it. If you do not already have a suitable certificate and local name resolution, pause here and arrange those before making HTTPS your regular login route. Do not disable browser certificate checks to make the warning disappear. UGREEN certificate guidance. Its examples concern WebDAV; the name and trust principles also apply here, while its service ports are not used in this guide.
Import and assign a suitable certificate
This guide covers importing a certificate you already have; it does not cover obtaining one or setting up local name resolution. Continue only when those prerequisites are ready and you have the certificate and its matching private key. UGREEN accepts X.509 certificates in PEM or DER format and RSA or ECC private keys without passphrase protection. Keep the private key private. Certificates.
- Open Control Panel → Security → Certificates.
- Choose Import Certificate, then Next.
- Follow the wizard to supply the private key, certificate and any intermediate certificate provided by the issuer.
- Open Configuration. Find the web service whose current certificate you recorded earlier, select the imported certificate for that service, and choose Save.
These are UGREEN’s documented import and assignment controls. Change only the intended service’s assignment; do not delete certificates or change unrelated services. Certificates.
UGREEN also describes explicitly trusting a NAS certificate after verifying its origin. Trust-store instructions depend on your device and are outside this guide. A warning alone is not a reason to trust an unfamiliar certificate. UGREEN certificate guidance.
3. Check your local HTTPS login
Continue here once the certificate and local name resolution are ready. While still on your home network, open a fresh tab with the hostname covered by your certificate and the configured HTTPS port. For example, https://nas.example.com:9443 illustrates the format; use your own hostname and port.
Before relying on this address, check that:
- The address is the intended NAS hostname and HTTPS port.
- The browser reports a trusted connection without a certificate warning.
- You can log in and the expected UGOS desktop opens.
A certificate protects and identifies the connection only within its valid name and trust conditions. These are checks for you to perform, not results observed by this article’s author. Certificates, UGREEN certificate guidance.
Optional: redirect HTTP to HTTPS
Once your trusted HTTPS login works, you can return to Portal setting and enable the option that redirects desktop HTTP connections to HTTPS. Save or apply it using the control shown in your interface; exact English wording can vary. Then open your recorded HTTP address and check that it leads to the intended HTTPS address without a certificate warning. If it does not, restore the recorded redirection setting from your working session. Device Connection, Portal settings.
If the connection does not work
| What you see | What to check |
|---|---|
| Connection refused or a timeout | Compare the local IP and HTTPS port with the values in your working session. Confirm that your device is on the home network. If firewall rules were already configured, check whether they permit your device to reach that port; a timeout alone does not identify the cause. |
| The hostname cannot be found | Check local name resolution. Importing a certificate does not create a DNS record. |
| A certificate name, expiry or trust error | Inspect the certificate and compare its covered name with the typed hostname. Resolve the reported cause before logging in. |
| The menus look different | Check your installed UGOS Pro version against UGREEN’s documented version scope and ask UGREEN for guidance with that version and the exact error. |
The relevant references are UGREEN’s firewall guidance, certificate guidance and Device Connection instructions. Do not turn off the firewall or add broad access rules just to troubleshoot this login.
Go back without changing your files
If a check fails, use the local session you kept open to restore the redirection setting you recorded. If you changed a web port, restore its previous value as well. Under Certificates → Configuration, you can select the previously recorded certificate for the web service and save it. These reversals use the documented controls; they are recovery recommendations, not a hardware-tested restore procedure. Device Connection, Certificates.
Restoring the previous certificate may bring back its previous warning. It restores the assignment, not certificate trust. Check that your recorded local login works before closing the original session.
If neither a working session nor a known local address is available, stop changing settings and use UGREEN’s Knowledge Center for help. Record your model, UGOS Pro version, previous address and exact browser error. Keep passwords and private keys out of support screenshots. Do not reset the NAS or alter disks, volumes or shares to troubleshoot HTTPS.
Local HTTPS is complete without remote access
Your success check is a trusted HTTPS login from your home network. A private local IP is not an away-from-home address, and local HTTPS does not require publishing the administration portal.
If you later need remote access, UGREEN documents UGREENlink as a separate route with its own subdomain and SSL certificate. That does not fix the certificate on your local IP address. Treat remote access as a separate setup decision; no router port-forwarding changes are part of this guide. UGREENlink documentation.