

How to Install Dockge on Your Synology NAS
Install Dockge with Synology Container Manager, map its saved folders, open it locally, and check your account after a restart.
Eugene Gavrilov
10 min read- NAS & storage
Dockge gives you a browser interface for managing applications defined in Compose files. This guide installs it through Synology Container Manager, opens the dashboard on your home network, and walks you through checking that its saved account survives a restart.
This documentation-based procedure has not been tested on a physical Synology NAS. It installs Dockge and checks its saved account. Add your first app using a separate, supported Compose guide; keep existing apps in their current manager while you complete this setup.
Check that your NAS can follow this guide
In DSM, open Package Center → All Packages, find Container Manager, and install it. Open Container Manager and confirm that Project is available. Package availability depends on your exact NAS model and DSM version. Check the official Container Manager package page, including its Applied Models information for your DSM version. This guide requires a compatible installation with the Project interface.
Dockge’s official installation requirements include Docker 20 or later. This guide uses the supported Container Manager route above; it does not provide a verified DSM graphical method to inspect the Docker engine version. The package version is not an independent engine-version check. If installation reports a version incompatibility, stop and consult Synology’s package release notes or support and Dockge’s help before continuing. Do not replace the engine as a workaround for this guide.
Use an administrator account for setup and a computer on your trusted home network. The configuration below connects Dockge to the Docker socket, the interface through which it controls Docker. This grants powerful authority over containers and potentially the NAS filesystem. Give dashboard access only to trusted administrators. The configuration does not require adding privileged: true.
Understand the files you are about to create
An image is the packaged application; a container is a running instance of it. A Compose file records the settings used to run an application’s services. Dockge manages these as stacks; Synology’s Container Manager calls its Compose-based groups projects. Dockge itself will be one Container Manager project.
A container has its own filesystem. A bind mount connects a NAS folder to a path inside that container so saved files live on the NAS. A Docker-managed volume is a different storage mechanism. This installation uses bind mounts for Dockge’s data and its stack definitions. Applications you later manage may have their own folders or volumes; Dockge’s data folder does not automatically hold their data.
1. Create the saved folders
In File Station, look for your docker shared folder. If it is missing, follow Synology’s shared-folder creation instructions: open Control Panel → Shared Folder → Create → Create Shared Folder, name it docker, choose the intended storage volume, and follow the prompts. Give your setup administrator read/write access. Wizard options vary with DSM and your filesystem. Return to File Station when the share is ready.
Inside docker, create a folder named dockge, then create data and stacks inside it. Use the actual resulting NAS path. The example paths in this guide are:
/volume1/docker/dockge/
├── data/       Dockge’s saved manager data
└── stacks/     Compose stack directories
Use the actual volume and folder path on your NAS. For example, if your folders are on /volume2, replace /volume1 in every relevant configuration path below with /volume2. The paths must refer to the folders you actually created.
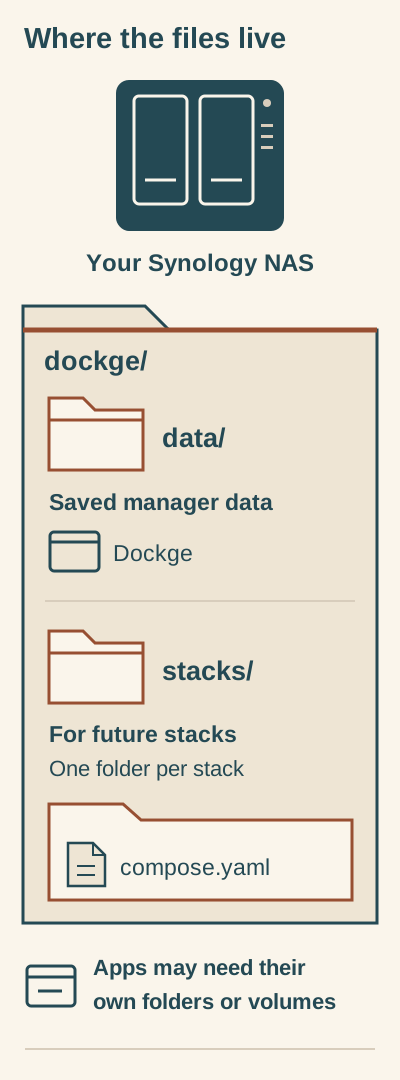
Dockge’s saved manager data and stack definitions live in separate folders. Applications may need additional storage.
The storage hierarchy is:
/volume1/docker/dockgeis the project folder you will select in Container Manager./volume1/docker/dockge/dataconnects to/app/datainside Dockge and keeps its saved manager data./volume1/docker/dockge/stacksholds stack definitions. Each stack has its own directory containing acompose.yamlfile.- Applications managed by those definitions may need additional saved folders or Docker volumes.
Check: in File Station, locate both data and stacks under the dockge folder before continuing.
2. Create the Dockge project
Open Container Manager → Project → Create. Set the project name to dockge and the project path to the dockge folder you prepared. Under Source, choose the option to create the Compose configuration in the editor. Interface wording can vary with your installed version.
Paste the following configuration, preserving its indentation. Change the NAS paths first if yours differ from the example.
services:
  dockge:
    image: louislam/dockge:1
    restart: unless-stopped
    ports:
      - "5571:5001"
    volumes:
      - /var/run/docker.sock:/var/run/docker.sock
      - /volume1/docker/dockge/data:/app/data
      - /volume1/docker/dockge/stacks:/volume1/docker/dockge/stacks
    environment:
      - DOCKGE_STACKS_DIR=/volume1/docker/dockge/stacks
This adapts the upstream configuration with Synology folder paths and NAS port 5571. Here is what you are setting:
| Setting | Purpose |
|---|---|
louislam/dockge:1 | Selects Dockge’s image using the upstream example’s 1 tag. That tag can change; it is not an immutable version pin. |
restart: unless-stopped | Sets the container’s restart policy. A deliberate stop remains your way to pause the installation. |
5571:5001 | Sends connections to NAS port 5571 to Dockge’s port 5001 inside its container. |
/var/run/docker.sock:/var/run/docker.sock | Gives Dockge access to the Docker control interface described above. |
…/data:/app/data | Stores Dockge’s own saved data in the NAS folder. |
…/stacks:…/stacks | Makes stack directories available at the same absolute path inside and outside Dockge. |
DOCKGE_STACKS_DIR=… | An environment variable—a configuration setting—telling Dockge which stack directory to use. |
A port identifies a service at a network address. The left number in 5571:5001 belongs to the NAS; the right number belongs to the container. DSM uses port 5001 for HTTPS by default, so this guide selects 5571 for the NAS side. If starting the project reports “port is already allocated” or “address is already in use” for 5571, another service is using that requested port. Choose a different NAS-side port, change only the left number, and try again. Use the new number later in your browser; keep the right number as 5001. These errors identify a port conflict; a browser connection failure alone does not establish whether a port is free.
Check the stack path carefully: both sides of its mount must be the same absolute path, and DOCKGE_STACKS_DIR must match them. Upstream’s /opt/stacks is a default, not a requirement to create that location on your NAS. Do not change only the container side to /opt/stacks.
Leave the optional Web Station portal disabled. Finish the wizard with Done, choosing to start the project.
Check: confirm that the dockge project is running. If it does not start, use the checks below before changing the configuration further.
3. Open Dockge on your home network
An IP address identifies a device on the network; the port identifies the service at that address. Find your NAS’s local IP address in DSM’s network interface settings or your router’s device list. The address 192.168.1.50 below is illustrative—replace it with your NAS’s address.
You do not need a domain name, DNS configuration or certificate for this direct-IP connection. A domain is a readable name, and DNS translates names to addresses. The http:// connection used here is unencrypted; HTTPS and its certificate are a separate setup.
In a browser on your computer, open:
http://192.168.1.50:5571
If you selected a different NAS-side port, use it instead of 5571. Do not use localhost in your computer’s browser: that refers to your computer, not the NAS.
Keep access on a trusted network. Do not add a router port-forward, public hostname or remote-access portal for this walkthrough. Publishing 5571:5001 can make Dockge reachable through all NAS addresses; the mapping itself does not restrict access to your home network.
The first setup asks for Username, Password and Repeat Password. Create the administrator account with Create, and keep a unique password in your password manager. These are Dockge credentials, separate from your DSM login.
Check: you can enter the dashboard with the account you just created. This establishes that you can open Dockge; the next step checks its saved state.
4. Check that your account survives a restart
Before adding applications, make this small check:
- In Container Manager, select the
dockgeproject and choose Action → Restart. - Reopen its local dashboard address.
- Confirm that your existing account still works and you are not asked to create an account again.
- In File Station, confirm that the
dataandstacksfolders are still present at the paths you configured.
A restart keeps the same container, so this is a basic account check rather than proof that recovery or container recreation will preserve your data.
This checks Dockge’s saved account and folder setup. Another application’s database or files need their own persistence and backup checks.
If account setup appears again, stop and check the mount ending in /app/data before creating another account or deleting files. The NAS-side folder must be your original data folder.
Do not copy an existing application’s Compose file into Dockge and start it simply to make it appear in the dashboard. The documented migration involves stopping the stack, relocating its Compose definition and scanning the stacks folder; its data paths and project identity require a separate review. This guide does not walk through migration.
If something goes wrong
| What you see | What to check next |
|---|---|
| Container Manager or Project is unavailable | Check the exact NAS model and DSM version against Synology’s package compatibility information. Stop here if the required interface is unavailable. |
| The Dockge project will not start | Recheck YAML indentation and actual NAS folder paths. If the error says “port is already allocated” or “address is already in use,” follow the port-change instructions in section 2. Keep the container-side port as 5001. |
| The dashboard does not open | Confirm that the project is running, use the NAS IP and http://, and use the NAS-side port from your configuration. Check network and firewall access without globally disabling protection. |
| Account setup returns after a restart | Check the original data folder and its /app/data mapping before creating another account. |
| An existing application is absent from Dockge | Leave it in its current manager. Do not deploy a duplicate as a discovery method; migration needs its own stop, path and stack-definition review. |
For interface operations, consult Synology’s Project help. For Dockge questions, use Dockge discussions. Remove passwords, tokens and private information from configuration or error details before sharing them.
Back up before updating
Stop the Dockge project, then copy its project configuration, data folder and stacks folder to a separate backup destination. Resume the project afterwards. This is a precaution based on the configured saved locations, not a verified restore recipe.
Those copies cover Dockge’s files and stack definitions. Applications managed through Dockge may store files elsewhere or use Docker volumes, and databases need application-specific backup procedures. Do not treat a copy of Dockge’s folders as a backup of all managed applications.
Update the Dockge installation
The example’s :1 tag can change as releases arrive. Record the image version you currently use and retain a matching backup before an update. If you need a reproducible version, select an available documented release tag or image digest; no digest is supplied or verified here.
Prepare the backup first and read each confirmation before accepting it. The following sequence combines the documented image-update and project-recreation operations.
- In Container Manager, open Image, select the Dockge image, and choose Action → Update, or Update available where offered.
- Select the Dockge project and use Build, followed by Start.
- Open the dashboard and repeat the account persistence check.
A restart alone does not recreate a container with the replacement image. Use the documented project recreation procedure for the update. This guide does not promise a successful downgrade or restore.
Stop or undo without deleting your saved files
For a reversible first undo, select the Dockge project and choose Action → Stop. Leave its project configuration and saved folders intact so you can resume. Stopping Dockge, removing the manager and deleting an application’s stored data are different decisions.
Do not use Clean or Delete as substitutes for Stop. Synology documents destructive behavior for those operations; do not assume a confirmation will preserve every bind-mounted folder. Before any permanent removal, make the backup described above, read the exact confirmation, and identify which files belong to Dockge and which belong to applications you still need. This walkthrough ends with Stop as its data-preserving undo.
Your finished setup
You have completed this installation when you can open Dockge locally, identify its data and stacks folders, and sign in with the same account after the described restart.
For your next application, use a separately supported Compose configuration and understand its own ports and saved-data locations before starting it. Keep existing applications in their current manager until you have a supported migration procedure for their paths and project identity.