

How to install FileRun on your Synology NAS
Install licensed FileRun with Synology Container Manager, map application, database and upload folders, and check a sample file after restarting the project.
Eugene Gavrilov
10 min read- NAS & storage
Start with a small FileRun installation: open it on your home network, upload a disposable file, then check that the file survives a restart. You will also know which NAS folders hold the application, database and uploads before adding your own library.
You need a commercial FileRun license. The old free-edition installation recipe is deprecated, so check that you can obtain the licensed download before creating any containers.
The steps below adapt two official FileRun guides: the current generic Docker configuration and the Synology instructions, which include extracting a licensed ZIP. Those guides differ in their installation and permissions methods. This walkthrough uses licensed ZIP staging with the generic configuration’s numeric user IDs; it is an editorial adaptation based on documentation, not a vendor-certified recipe or a physical NAS test.
Check the current FileRun requirements
Before starting, have:
- A Synology NAS that offers Container Manager in Package Center, and DSM administrator access.
- An Intel/AMD processor compatible with the official FileRun image’s listed
linux/amd64architecture. Container Manager being available does not establish that an ARM NAS can run this image. - A commercial license and access to its installation ZIP in Your Licenses.
- Confirmation of which address your purchased license permits. Before creating folders, settle any hostname requirement with FileRun. The local IP example in step 5 explains an address; it does not confirm eligibility for license activation. If your license requires a registered hostname and you do not know how to use it locally, resolve that prerequisite with FileRun support before continuing.
- Storage for the installation and uploads, plus somewhere to keep a backup.
Check your model’s eligibility before proceeding; this guide does not establish a model list or memory requirement. If the required package, compatible image or licensed download is unavailable, resolve that prerequisite through Synology or FileRun before continuing.
An image is the downloaded software template. A container is a running copy of it. A Container Manager Project uses a Compose configuration to start FileRun and its separate database together. We will connect both containers to folders on your NAS so their data has a home outside the containers.
1. Know where the data will live
In File Station, first check that you have a shared folder named docker. If it is missing, create it using Synology’s Create a Shared Folder instructions, then return here; do not assume the example path already exists. Open that shared folder and create a folder named filerun. Inside it, create db, html and user-files.
This guide uses /volume1/docker/filerun as its example location. If your shared folder is on another volume, use its actual path everywhere in the configuration.
| NAS folder in this example | What belongs there |
|---|---|
/volume1/docker/filerun/db | Database storage |
/volume1/docker/filerun/html | FileRun application files |
/volume1/docker/filerun/user-files | Files you upload to FileRun |
Begin with these new folders. Connect your existing photo or document library only after completing the sample-file check.
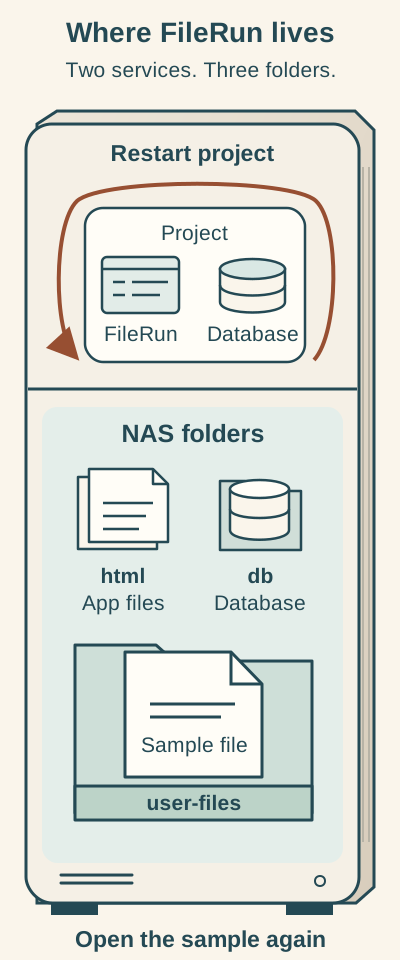
Restart the project, then reopen your sample file. The application, database and user files live in three mapped NAS folders; this diagram is not a completed test.
Text alternative: The Project runs FileRun and its database. The mapped NAS folders hold application files in html, database storage in db, and uploads in user-files. After restarting the project, check that you can open the same disposable file again. This persistence check does not test backup recovery.
2. Give FileRun permission to write
Follow the account and permissions section in the official Synology guide. In DSM Control Panel, create a dedicated group called docker and a user called docker belonging to it. If either already exists, inspect the existing account and group before making changes. In File Station’s Permissions panel, give that group read/write access to html and user-files.
The configuration needs the account’s numeric user ID and group ID, not just its name. SSH provides a text connection to your NAS. Open the official Synology installation guide’s account/SSH instructions and follow its linked connection instructions as a separate subtask. Return here once you have connected as your DSM administrator and can enter commands at the NAS command prompt. Then run:
id docker
This command reads account details. Note the number after uid= and the main number after gid=. For example, if your output contains uid=1034 and gid=65537, you would use "1034:65537" in the configuration. Those are examples: copy the numbers returned by your own NAS. Disable SSH afterwards if you enabled it only for this step.
Use this numeric-user method throughout the configuration below. Do not add the older Synology guide’s APACHE_RUN_* settings to it.
3. Put the licensed download in place
Download the installation ZIP from Your Licenses. Upload it to the html folder and extract it there using File Station. Check that the application files are directly inside html, rather than inside another enclosing download folder. This is the licensed-download step from FileRun’s Synology instructions.
4. Create the FileRun project
Open Container Manager → Project → Create. Enter filerun as the project name, select your docker/filerun working folder, and choose to create docker-compose.yml with the editor. You do not need the optional Web Station portal for this direct-port setup.
Paste the complete configuration below, then make these replacements before starting it:
- Replace
REPLACE_ROOT_PASSWORDwith a generated database administrator password. - Replace both copies of
REPLACE_APP_PASSWORDwith the same, different generated password. This is how FileRun signs in to its database. - Replace
YOUR_UID:YOUR_GIDwith your actual numeric IDs from step 2. - Replace
/volume1/docker/filerunin all three folder mappings if your NAS uses a different path.
Use long passwords containing letters and numbers for these fields, and save them in your password manager. They are database credentials; you will set the FileRun administrator password separately.
services:
  db:
    image: mariadb:12.2
    environment:
      MARIADB_ROOT_PASSWORD: "REPLACE_ROOT_PASSWORD"
      MYSQL_USER: filerun
      MYSQL_PASSWORD: "REPLACE_APP_PASSWORD"
      MYSQL_DATABASE: filerun
      MARIADB_AUTO_UPGRADE: "1"
    volumes:
      - /volume1/docker/filerun/db:/var/lib/mysql

  web:
    image: filerun/filerun
    user: "YOUR_UID:YOUR_GID"
    environment:
      FR_DB_HOST: db
      FR_DB_PORT: 3306
      FR_DB_NAME: filerun
      FR_DB_USER: filerun
      FR_DB_PASS: "REPLACE_APP_PASSWORD"
    depends_on:
      - db
    ports:
      - "8430:80"
    volumes:
      - /volume1/docker/filerun/html:/var/www/html
      - /volume1/docker/filerun/user-files:/user-files
The db service runs MariaDB; web runs FileRun. The FR_DB_* fields tell FileRun how to reach that database. Leave host db, port 3306, and database/user filerun as shown; db names the other service inside this project, not your NAS. No database port is published to your network.
Each folder mapping has a NAS path on the left and a container path on the right. For example, FileRun sees /user-files, while you see the same storage in File Station as docker/filerun/user-files.
The mapping 8430:80 sends NAS port 8430 to the web container’s port 80. If another application already uses 8430, choose an unused host port, change only the left-hand number, and use that number when opening FileRun.
Review the wizard summary, select Done, and choose to start the project. If it fails to start, inspect its containers and logs before proceeding.
5. Understand the address, then connect
For the first check, use a computer on your trusted home network. You do not need router port forwarding or public access for this step.
Four address terms matter here:
| Term | What to use for this installation |
|---|---|
| Local IP address | Your NAS’s address on your home network; use the one you already use to reach DSM. 192.168.1.50 below is only an example. |
| Hostname | A name used to reach your NAS instead of its numeric address. A hostname used here must resolve to the NAS from your computer. |
| Domain name | A named address that may be associated with your purchased FileRun license. Check the license’s hostname requirements before activation. |
| Port | The number selecting this application on your NAS: 8430 in the configuration above. |
The browser address has the form http:// + your NAS address + : + the host port. For example, if your NAS is at 192.168.1.50 and you kept port 8430, open:
http://192.168.1.50:8430
Substitute your own address. This example establishes how to reach the local service; it does not establish that your license can activate on an IP address. If the purchased license requires a registered hostname, follow FileRun’s instructions for using that hostname with local resolution. Resolve that requirement with FileRun support if it is unclear.
Plain HTTP is for this initial trusted-network check. Configure HTTPS before routine use or entering private data, following FileRun’s security guidance. A local-port setup alone does not provide HTTPS.
6. Finish the browser setup
Follow the browser installer and resolve any failed requirements checks before continuing. If it asks for database details, enter these values from your configuration:
| Installer value | Enter |
|---|---|
| Database host | db |
| Database port | 3306 |
| Database name | filerun |
| Database user | filerun |
| Database password | The password you substituted for REPLACE_APP_PASSWORD |
Record the administrator credentials supplied during setup; do not assume an old tutorial’s default password applies. Set a unique, strong FileRun administrator password. In FileRun account administration, set the Superuser’s home folder to /user-files.
7. Check a sample file after a restart
Perform the completion check:
- Upload a small disposable text file through FileRun.
- Confirm you can open it in FileRun, then find it in File Station under
docker/filerun/user-files. - In Container Manager, select the project and choose Action → Restart.
- Reopen FileRun and confirm the sample is still readable.
Passing this check demonstrates basic persistence on your installation. It does not test backup recovery.
If a step does not work
No licensed download or compatible package
Resolve the license/download with FileRun, or model/package eligibility with Synology, before deploying.
The project will not start
Inspect Container → Details → Log. Check for an already-used host port.
The page will not open
Confirm both containers are running; check your NAS address and the host port on the left of 8430:80. Inspect the container log.
Database setup fails
Compare both copies of the application password and the database name/user. Inspect the database log; starting it first does not establish that it is immediately ready for connections.
Uploads fail with permission errors
Recheck the actual numeric IDs and the dedicated group’s read/write access to html and user-files. Do not fix this by granting everyone access or running the web container as root.
The sample is missing after restart
Recheck the user-files mapping and the Superuser home path /user-files before adding real files.
Back up, update or stop
A FileRun backup needs its database, application files and user files. Copying only user-files leaves out application state, settings and metadata. Follow the official backup procedure, including its database export instructions, and keep the Compose configuration and credentials with your recovery records. A raw copy of a running db folder is not an established recovery procedure here. Verify recovery before relying on the installation.
Back up before updating. FileRun application updates run through its own control panel; pulling a new Docker image updates the server environment and does not necessarily update the application stored in html. Keep a copy of the configuration you used. The filerun/filerun image line above does not select a specific version. Before later recreating or updating the installation, use the official image tags and FileRun support to resolve how to record and select the version you intend to keep. This guide supplies no tested fixed image reference or beginner version-pinning procedure. Do not treat pulling the image again as a controlled rollback, and do not blindly downgrade a changed database. See FileRun’s update instructions.
To pause the installation, choose Project → Action → Stop and retain the folders. Before deleting anything, export or back up the data you want to keep. Synology describes Delete as removing containers and project data, so do not use it as a data-preserving rollback button. Removing the NAS folders is a separate data-deletion decision.
Your first milestone is complete when FileRun opens, the sample survives a restart, and you can locate its storage in File Station. Finish your HTTPS and backup arrangements before bringing in private files.