

Install Fireshare on a Synology NAS and share a video at home
Install Fireshare with Synology Container Manager, map persistent folders, open it on your home network, and check a sample video after restart.
Eugene Gavrilov
13 min read- NAS & storage
Start with one short video: put a copy on your NAS, open it in Fireshare, and try its link from another device on your home network. Then restart Fireshare and check that the video is still available before adding more media.
The result is a local installation. A link containing your NAS's local address does not make a video available to someone outside your home network.
This guide follows the Fireshare Docker instructions and Synology Container Manager Project documentation retrieved on November 4, 2026. It has not been tested on a physical NAS. It uses the upstream latest-lite image, a moving reference rather than a fixed version. The release page lists v1.9.0, but its corresponding Docker tag was not independently verified.
Understand the address and saved folders
An image is the downloaded application package. A container is a running instance of that package. A Container Manager Project holds the configuration used to create the container. Folder mappings connect locations inside the container to folders you keep on your NAS. Fireshare documents four separate persistent locations for its database, generated files, videos, and images.
You will reach Fireshare through your NAS's local IP address and a port. The address identifies the NAS; the port directs the browser to Fireshare. For example, http://192.168.1.50:5738 uses an illustrative NAS address and the port chosen for this guide. Replace the address with yours. If you change the port during installation, use that port in the browser too.
The route is: a browser on your home network → your NAS address and configured port → the Fireshare container → its mapped NAS folders. After adding the sample, you will restart the container and locate the saved files yourself.
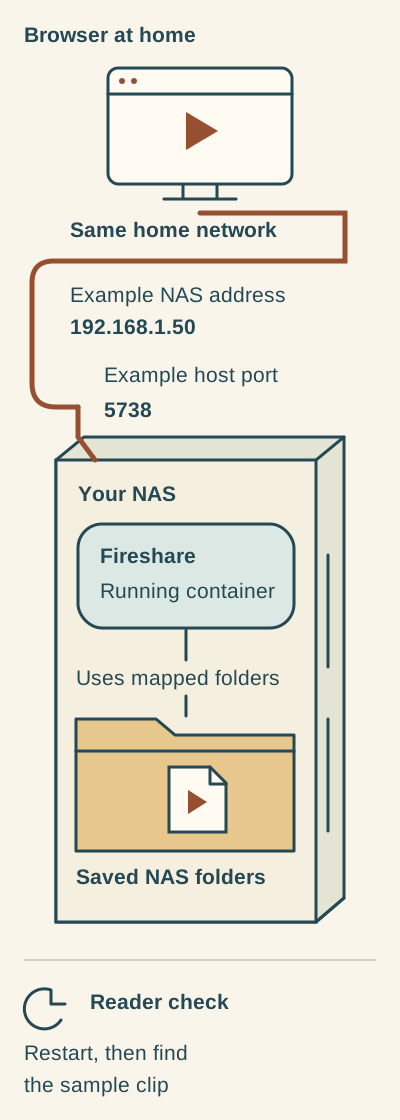
A local browser reaches Fireshare through your NAS address and configured port. Mapped folders keep saved files on the NAS.
Diagram text alternative: On a device on your home network, open the NAS LAN address with the host port you configured. For example, http://192.168.1.50:5738 uses an illustrative address and port; replace both as needed. Fireshare runs in a container and uses mapped folders on the NAS. After adding a disposable clip, restart the container and check that the clip is still available and that you can locate its saved files.
No domain name, router forwarding, reverse proxy, or certificate is needed for this initial local workflow. HTTP is unencrypted, so keep this setup on a trusted home network and choose a password unique to Fireshare. These are the deployment boundaries of this guide, not a claim that a link provides privacy.
Check that your NAS has the required interface
In DSM, check whether Package Center offers Container Manager for your NAS. Install it if necessary, then confirm it has a Project section. This guide uses that interface. If it is unavailable, stop here: the instructions below do not cover the older Docker package or establish compatibility for your NAS model.
You need a DSM administrator account, a computer on the same home network, internet access to download the image, and space for a disposable video and generated files. Package availability does not itself verify that the Fireshare image supports your NAS's processor. If the download or startup reports an architecture error, stop and check upstream support before continuing.
Record your NAS's local address
In DSM, open Control Panel → Info Center → Network. Record the NAS IP address associated with your home LAN, not the DNS server or gateway address. If several interfaces are listed and you cannot identify the right address, ask your NAS administrator which one your computer should use. This is a read-only check; do not change network settings.
Use that recorded address in both the SSH command and the Fireshare browser address below. A QuickConnect URL or other remote-access name is not the numeric LAN address required by these examples. Keep the address separate from DSM's own web port: Fireshare will use the host port you configure.
Prepare four dedicated folders and one sample
In File Station, choose an existing shared folder you control; it does not need to be named docker. Create a fireshare folder there, then create the four subfolders below inside it. The NAS paths in the table are examples, not values to assume for your NAS.
| Example NAS folder | Location inside Fireshare | Purpose |
|---|---|---|
/volume1/docker/fireshare/data | /data | Database and application state |
/volume1/docker/fireshare/processed | /processed | Generated posters and metadata |
/volume1/docker/fireshare/videos | /videos | Source videos |
/volume1/docker/fireshare/images | /images | Source images |
Keep these locations separate. To obtain each actual full path, right-click that subfolder in File Station, open Properties → General, and copy Location. Record the paths for data, processed, videos, and images. If Location does not show a full NAS path, ask the administrator to confirm it before continuing; do not guess a volume number.
For example, only if the recorded Location for videos is /volume2/media/fireshare/videos, its mapping will be /volume2/media/fireshare/videos:/videos. The full NAS path goes on the left of the colon; the container location /videos stays on the right. Apply the same rule to the other three mappings.
Use dedicated folders for this first installation. Copy one short MP4 containing H.264 video into videos and keep its original elsewhere. Upstream recommends this format for broad browser compatibility; it is not a promise that every file will play. In File Station, confirm that the videos folder whose Location you recorded contains that disposable copy.
Identify the account that can use the folders
Fireshare's PUID and PGID settings identify the NAS user and primary group whose permissions it should use. They are numbers, not a username and password. Use values matching the account that can read and write your Fireshare folders.
SSH is a terminal connection to the NAS. The installation uses Container Manager, but finding these numbers requires this brief connection. If someone manages the NAS for you, ask them for the account's user ID and primary group ID instead. Otherwise:
- In DSM, open Control Panel → Terminal & SNMP → Terminal, enable SSH, and apply the change. Note the SSH port; the example below uses
22. Synology requires an account in the local administrators group for this login. - Open Terminal on macOS or PowerShell on Windows. Enter
ssh YOUR-DSM-ADMIN@YOUR-NAS-IP -p 22, replacing the administrator name, NAS address, and port. If you are unsure how to verify a first-connection prompt, ask the NAS administrator to verify it before accepting. Stop on an unexpected changed-host warning and ask the administrator to check it. Enter the DSM account password when prompted, then press Enter. - Run
id YOUR-FOLDER-OWNER, replacing the name with the DSM account you chose for the folders. In an illustrative result such asuid=1030(...) gid=100(...), record1030as PUID and100as PGID. Use your own result, not these example numbers or the supplementary group IDs. - Enter
exit. If you enabled SSH only for this lookup, disable it again in DSM. Keep it enabled if an existing backup task requires it.
The account named in id YOUR-FOLDER-OWNER must be the same account granted read and write access to all four Fireshare folders and their contents. In File Station, their Properties show the owner under General and access rules under Permission.
Before creating the project, ask your NAS administrator to confirm effective read/write access for that same account across the four folder trees, including access through their parent directory. Have them review existing deny rules and keep changes limited to Fireshare. Continue only with that confirmation, the account's UID and primary GID, and all four absolute paths recorded.
Create the Fireshare Project
Open Container Manager → Project → Create. Name the project fireshare, select the existing fireshare folder as its working path, and choose the source option that creates a docker-compose.yml in the editor. The working path is selected in the wizard; the four full folder paths are entered separately in the YAML below. This file describes the image, network port, account settings, and saved-folder mappings.
Paste the following configuration. Before starting the project, replace every YOUR_… value and all four example NAS paths with your own values. The capitalized values are editing instructions, not working defaults.
services:
  fireshare:
    image: shaneisrael/fireshare:latest-lite
    ports:
      - '5738:80'
    environment:
      PUID: 'YOUR_UID'
      PGID: 'YOUR_GID'
      ADMIN_USERNAME: 'YOUR_FIRESHARE_USERNAME'
      ADMIN_PASSWORD: 'YOUR_UNIQUE_FIRESHARE_PASSWORD'
    volumes:
      - /volume1/docker/fireshare/data:/data
      - /volume1/docker/fireshare/processed:/processed
      - /volume1/docker/fireshare/videos:/videos
      - /volume1/docker/fireshare/images:/images
Check each part before continuing:
- Image:
shaneisrael/fireshare:latest-litefollows the current upstream example. Record this reference with your installation notes; it can change over time. - Ports:
5738:80means NAS port5738connects to container port80. If the NAS port is occupied, choose an unused NAS port, change only the number on the left, and use that new number in your browser address. This port mapping listens on the NAS network interfaces; have the administrator confirm it is reachable only from the intended trusted network. Docker port-publishing documentation - PUID and PGID: replace the two values with the numbers you recorded.
- Administrator account: choose and save a Fireshare username and a unique password. For this pasted configuration, generate a long password using letters, digits, and hyphens to avoid quote or dollar-sign handling problems. Keep the quotation marks. The file contains the password, so restrict access to it and its backups. Fireshare reapplies these administrator values at startup; keep the configuration consistent when changing the account.
- Volumes: check all four actual NAS paths on the left. Keep
/data,/processed,/videos, and/imageson the right.
Leave the optional Web Station portal disabled for this local setup. Review the summary, finish the wizard, and choose to start the project. Wait for the image download and startup to finish. If the project fails, read the reported error before retrying.
Open Fireshare and play the sample
On your computer, open http://YOUR-NAS-IP:5738, using your actual address and configured port. Sign in with the Fireshare account you saved, rather than your DSM account.
Allow the library scan to find the sample. Upstream documents a default scan interval of five minutes. The earlier installation source also describes a Scan Library control, but its current position has not been independently verified; the automatic scan avoids relying on that placement.
When the sample appears, play it. Use the sample video's share-link icon and take the viewing link it provides, rather than copying your browser's administration-page address. This action is supported by the earlier installation source; the icon's current location and any dialog labels have not been independently verified. If you cannot identify it, stop this link check and ask the administrator to locate the control for your installed version.
Open that provided link in a private browser window on a second device connected to the same home network. Check that the intended sample opens and plays without your existing administrator session. Fireshare describes its private feeds as link-only: do not assume administrator sign-in protects every viewing link. Treat a link as something a recipient could forward.
If the link uses a local NAS address, someone outside the network will not gain access merely by receiving it. Finish the local checks before considering a separate remote-access setup.
Restart and check where the files live
Perform this check yourself before adding valuable media:
- In File Station, find the copied sample in your
fireshare/videosfolder. - In Container Manager, select the project and use Action → Restart.
- Reopen the local Fireshare address. Sign in if necessary, then check that the sample is still listed and plays.
- Inspect
dataandprocessedin File Station for the database state and generated files. These folders are part of the installation's persistent storage, alongside the source-media folders.
If Fireshare appears empty after the restart, stop adding media. Recheck the folder mappings, actual NAS paths, and the selected account's permissions; inspect the container logs for a relevant error. The steps above are a reader verification procedure, not a report that this installation passed a NAS test.
Recover by symptom
Use the first check that matches what you see. Reachability, login, and playback are separate checks; changing router settings is not part of diagnosing this local installation.
| Symptom | Next check |
|---|---|
| Container Manager has no Project section | Stop; this guide does not cover that installation interface. |
| Project creation or startup fails | Read the reported error; check YAML indentation, edited values, actual NAS paths, and folder permissions. |
| The NAS port is already allocated | Change the left side of the port mapping and use the same new port in the browser. |
| The browser cannot connect | Confirm that the project is running and the device is on the same home network; recheck the NAS address and configured port. |
| Login fails | Compare the saved credentials with the configuration. Do not enable secure-only cookies for this plain HTTP setup. |
| The sample does not appear | Allow time for the scan, then check the /videos mapping and folder permissions. |
| The video is listed but will not play | Try the short H.264 MP4 sample and another browser before changing playback settings. |
| The library appears empty after restart | Recheck the same persistent mappings and permissions before adding more files. |
To inspect the app's logs, open Container Manager → Container, select the container belonging to your Fireshare project, then open Details → Log. Note the error text and the time of the failed start or scan so you can connect the message to the action you tried. This is the individual container's log, rather than the top-level activity log.
Consult the official Fireshare troubleshooting guide for the reported error. Remove passwords and private filenames before sharing logs. These are bounded troubleshooting checks, not diagnoses proven on your NAS.
Back up before changing the installation
As a conservative backup step, use Action → Stop to stop the project, then copy the entire fireshare folder—including all four subfolders and its Compose configuration—to a separate backup destination. Protect the configuration because it contains the administrator password. Start the project again after the copy. A second copy on the same disk does not protect against losing that disk.
Keep the backup with your saved configuration and credentials. This file-copy approach is not a tested application restore procedure; check your own restore process before relying on it for valuable media.
Hand off updates or remove the installation
Before updating the moving latest-lite image, give your NAS administrator your configuration, paths, backup, and the official release notes. Ask them to export the installed image, record its identity, preserve matching stopped-data/configuration backups, verify the target image reference, and establish recovery. Do not update until they confirm these prerequisites.
The Compose text alone does not preserve the downloaded image; an image export alone does not preserve mapped data. This guide ends update instructions at the administrator handoff because a complete Project restore has not been established.
After an administrator completes an update, repeat the sample playback and restart checks before adding more media. If a change fails, stop the project and return to the administrator with the preserved image and matching backup. Do not assume an older image can use a database changed by a newer release. No downgrade or restore outcome has been tested for this guide.
To pause or abandon the installation, stop the project first and retain its NAS folders. Synology describes Delete as removing all containers and data of the project, so do not use it as a pause button. Before removing the project, keep a separate backup of wanted files and inspect the deletion dialog carefully.
Deleting the saved NAS folders is a separate, deliberate decision. Keep them if you want the media or application state; remove them only after preserving everything you intend to keep.