

Install FlexGet on Synology and Open Its Web UI
Install FlexGet with Synology Container Manager, open its local Web UI, and check the mapped configuration folder after a restart.
Eugene Gavrilov
12 min read- NAS & storage
Run FlexGet on your Synology NAS, reach its Web UI from a computer on your home network, then check the files it keeps after a container restart. The two checkpoints are a local login and a visible storage check—not a working download workflow. FlexGet automates media tasks, but a useful task needs its own configuration.
Before you begin, know that FlexGet calls Web UI v2 experimental and does not recommend it for new users. This guide still explains the installation for readers who want that interface. It does not assume that the dashboard can configure your automation for you. (FlexGet Web UI documentation)
Check that your NAS has the required tools
Open Package Center and check whether your NAS offers Container Manager. Open that package and look for Project. This guide uses a Container Manager project; if that option is unavailable, stop here. It does not establish compatibility for every Synology model or older Docker package. The selected image documents x86-64 and arm64 support.
You will also use File Station to prepare folders and DSM Task Scheduler to read your account's numeric identifiers. The account check uses a disabled task that you run once; no SSH session or terminal application is needed. The procedure is assembled from the documented DSM controls and image requirements; it has not been run on a physical NAS for this guide.
Keep this installation on a trusted private network. Do not add router port forwarding or publish it through a reverse proxy as part of these steps. The port mapping below does not enforce a LAN-only boundary by itself.
Prepare a home for FlexGet's files
An image packages the application. A container runs it. We will connect folders on the NAS to folders inside the container so the application can write its files outside the running container. That connection is called a mount; it is not a backup.
In File Station, create a new flexget folder in your chosen shared folder, then create these two subfolders:
| Folder | Purpose |
|---|---|
config | FlexGet configuration and state; connected to /config inside the container. |
data | Files used by your later tasks; connected to /data inside the container. |
For this guide, the example project folder is /volume1/docker/flexget. That example assumes an existing docker share on volume1; creating a similarly named folder elsewhere does not give it this path. Check your actual shared-folder and volume path before using it. Your folders might live elsewhere. To get each full path, right-click the config folder in File Station, choose Properties → General, and copy Location. Repeat for data and record both results. The deployment must use those exact paths. (Synology folder-path instructions)
Find the account identifiers
The image uses PUID and PGID to identify the NAS user and primary group that should access its files. They are numeric identifiers, not universal Synology defaults. Do not copy another person's numbers.
-
In DSM, open Control Panel → Task Scheduler. Create a Scheduled Task → User-defined script. Give it a descriptive name such as
Read FlexGet account IDs. -
In General, choose the DSM user you intend FlexGet to use, and leave the task disabled. Do not select root. In Task Settings, put this single command in the script field:
id -
Use Task Scheduler's Settings → Save output results control to save the output in a folder that this user can access. Save the task, select it, and choose Run once. Read the saved result or use Action → View Result.
-
Record the number after
uid=as your PUID and the number aftergid=as your PGID. Do not use a number from the supplementarygroups=list instead. Keep the task disabled afterward.
In File Station, open Properties for the new FlexGet folders. Choose that user as Owner on the General tab. Under Permission, create or edit an entry allowing that user Read/Write, applying it to the new folders and their contents. Keep these changes confined to the FlexGet folders. If inherited permissions or deny rules prevent access, resolve those for the selected account; do not grant Everyone access or change unrelated shares. (Synology folder permissions)
Create the Container Manager project
Compose is the configuration that tells Container Manager which image, folders, ports and settings to use. An environment variable is a named setting passed to the application; these appear under environment below.
Before starting the project, prepare these values:
- Your PUID and PGID from the account check.
- The two full folder paths you recorded.
- A unique Web UI password. Generate at least 24 random letters and digits for this recipe. Restricting it to those characters avoids Compose's special handling of dollar signs and keeps the quoted YAML value straightforward.
- A port for the browser connection. A port selects a service at a network address; host means your NAS here. In
8650:5050, the left number is the browser-facing NAS port and the right number is FlexGet's port inside the container. Start with 8650 on the NAS and leave the internal 5050 unchanged. If startup reports that the NAS port is already in use, choose another unused left-side number and use that number in the browser address too. Apply that change with the saved-project procedure under “Correct the saved project settings” below.
Open Container Manager → Project → Create. Enter flexget as the project name and select the new FlexGet project folder as Path. Under Source, choose the option to create docker-compose.yml with the editor. A Web Station portal is optional; it is not needed for the direct local address used here.
Paste this complete configuration into the editor. Before you finish the wizard, replace the example PUID 1026 and PGID 100 with your own numbers, replace the entire password field, and correct both host folder paths. The printed IDs are examples, not findings about your account. Keep the quotes and indentation. Do not start the project with the printed password field.
services:
  flexget:
    image: lscr.io/linuxserver/flexget:latest
    environment:
      PUID: "1026"
      PGID: "100"
      TZ: "Etc/UTC"
      FG_CONFIG_FILE: "/config/.flexget/config.yml"
      FG_LOG_FILE: "/config/flexget.log"
      FG_LOG_LEVEL: "info"
      FG_WEBUI_PASSWORD: "REPLACE_WITH_YOUR_OWN_RANDOM_PASSWORD"
    volumes:
      - /volume1/docker/flexget/config:/config
      - /volume1/docker/flexget/data:/data
    ports:
      - "8650:5050"
    restart: unless-stopped
The paths after the colons in volumes belong to the image: keep /config and /data. The paths before the colons belong to your NAS: change them to match the folders you created. TZ: "Etc/UTC" uses UTC; replace it only if you want your own valid time-zone identifier. The image's documented configuration and log paths are already supplied.
A tag is a named image reference that can move. The latest tag follows a changing image, so this file does not pin a particular release.
Review your replacements, choose Done, and start the project. The image initializes a default configuration if none exists and starts the FlexGet daemon. Leave the bundled example feed task alone: it is not a useful configured workflow to run. (Image settings, Synology projects)
Open the local Web UI
Use the NAS's LAN IP address, followed by a colon and the NAS port you chose. If you open DSM at an address such as https://192.168.1.50:5001, its IP portion is 192.168.1.50; use your real address. The IP identifies your NAS on the network; the port selects this service.
For example, only if your NAS address is 192.168.1.50, open:
http://192.168.1.50:8650
If the root address does not show the interface, try the same address with /v2 at the end. Replace the example IP and port with your own values.
This is an HTTP address, so the connection is not encrypted. You do not need to buy a domain, create a DNS record or obtain an HTTPS certificate for this local task. Use the trusted private network boundary described above.
Log in with username flexget and the password you set in FG_WEBUI_PASSWORD. Reaching the interface after login is the first checkpoint. If the browser cannot connect or login fails, use the checks below before changing the configuration.
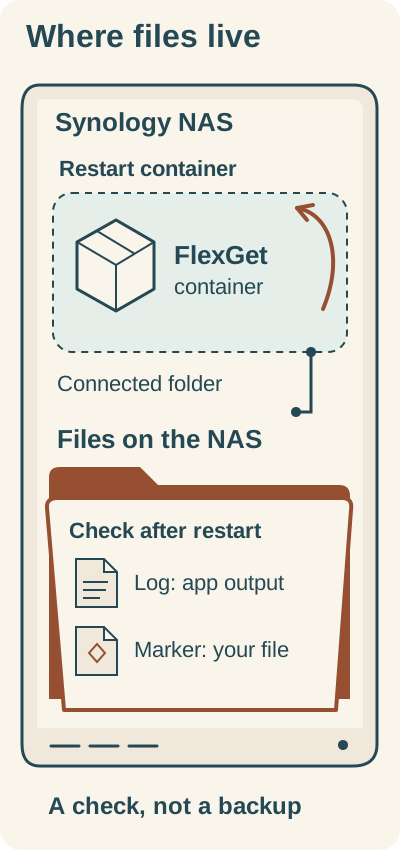
The connected NAS folder holds the application log and your uploaded marker. After restarting the project, inspect both in that same folder. This limited check is not a backup.
Text alternative: FlexGet runs in a container. Its mapped config folder is on the NAS, outside that container. After the project restart, inspect application output in flexget.log and read your uploaded storage-check.txt in the same folder. This checks application writes and retention of your marker across that restart; it does not test task-database restoration or replace a backup.
Original Huncode illustration. Factual basis: LinuxServer FlexGet image documentation, Synology Project documentation and Docker bind mounts. No third-party artwork or screenshots used.
Check the files after a restart
The application runs in a container; its persistent files belong in the connected NAS folder. This check looks at both an application-written log and a harmless file you supply. It does not run a feed or download task.
- Inspect the folder. In File Station, open your FlexGet
configfolder. Look forflexget.log, which is the log path configured above. Open or download it and confirm it contains application output. Then create a plain text file on your computer namedstorage-check.txt, containingFlexGet storage check, and upload it into that same NASconfigfolder. - Restart the project. In Container Manager → Project, select
flexgetand choose Action → Restart. Do not choose Clean or Delete. - Inspect the same location again. Reopen the local Web UI. Return to the exact same File Station folder, read
storage-check.txtand inspectflexget.logagain for application output from startup. If the log is missing, empty or shows a startup error, treat the check as unfinished and investigate.
The marker establishes that your uploaded file remained in the host folder across this restart. The log shows that FlexGet can write to the mapped location; inspect its contents rather than treating the filename alone as success. Neither check proves that a real task's database was restored, that a container recreation will work, or that you have a usable backup.
Stop, remove, back up and update
Stop when you need to pause it. Select the project and choose Action → Stop, retaining its folders. This is the simplest undo for the installation.
Treat removal as a separate decision. Project Clean/Delete actions can remove resources or data. Read the displayed scope before confirming them. Container/project removal and deliberate deletion of your NAS folders are separate decisions; do not assume a Delete action preserves your files. Keep the folders unless you intend to erase their contents.
Back up before changing the installation. Stop the project, then copy the entire config and data folders to a separate backup location, including hidden contents such as .flexget. Save the Compose configuration too; it contains your password, so protect that copy. A live mounted folder is not a second copy of your data.
Prepare recovery before updating. Preserve the current image through Container Manager's image export, or record a real, recoverable image tag or digest, an identifier for the image content. Recreation means making a new container from the chosen image and project settings. LinuxServer's update process pulls a new image and recreates the container; restarting the existing container alone does not apply a new image. Follow the image and Container Manager update instructions, then repeat the login and storage checks. (LinuxServer update instructions, Synology image actions)
For a rollback, keep the old image and its matching pre-update data together. An older application may not work with a newer database. If you cannot recover the exact prior image, stop and preserve the data rather than guessing at a downgrade tag. No restore or downgrade has been tested for this guide.
If a checkpoint fails
Container Manager or Project is unavailable
Check Package Center and the installed package's available controls. This route requires Project support; do not proceed by assuming a different package has the same wizard.
The project does not start
Open Container Manager → Container, select the FlexGet container, then choose Action → Details → Log. If you need to identify which container belongs to the project, open the project's Details → Containers list first. This selected-container log is the place to check startup failures; the flexget.log in File Station may not exist yet.
Recheck the image name, indentation, replacement fields and port assignment against your saved configuration. If the log reports a password-setting failure, supply a stronger password using the correction procedure below: initialization can stop at that failure. If it reports a port conflict, change only the left side of 8650:5050 to an unused NAS port and use the new port in your browser URL.
Correct the saved project settings
Open Container Manager → Project, select flexget, then choose Action → Details → YAML Configurations. Edit the password or host-port value in the saved Compose configuration. Use that editor's deployment control to deploy the changed settings; merely restarting the existing container does not apply changed environment values. Keep both folder mappings unchanged, and do not use Clean/Delete for this correction.
Follow the official Project details and YAML configuration procedure for the deployment confirmation shown by your DSM version. After deployment, inspect the selected container's Log again and retry the local login. This is a documentation-based recovery procedure, not a restore tested on a NAS.
FlexGet cannot write its files
Recheck PUID against uid= and PGID against the primary gid= from the chosen user's result. Inspect that user's Read/Write permission on both new folders, including inherited deny rules. Correct the account or folder permissions within that scope.
The browser cannot connect
Check that you used the NAS's LAN IP and the host port on the left side of the mapping, then try /v2. Open the selected container's Action → Details → Log, as described above, for startup errors before changing networking or adding public access.
Login is rejected
Use flexget as the username and your own configured password. Open the selected container's Action → Details → Log for a password initialization failure; the image uses FG_WEBUI_PASSWORD to set or reset the password during initialization. If you need to change it, follow “Correct the saved project settings” above.
The storage check does not match
Compare the actual File Station folder with the host path on the left side of the /config mapping. Inspect the app log and marker in that same folder, and recheck write permissions. Do not delete folders to resolve a missing-file problem.
After both checkpoints pass on your NAS, you have a local FlexGet installation and a limited check of its mapped storage. Defining a useful automation task is the next job; use the FlexGet configuration documentation and keep the Web UI's experimental status in mind.