

How to install Homebox on your Synology NAS
Install Homebox with Synology Container Manager, create your first inventory item, check persistence, and back up or restore the full data folder.
Eugene Gavrilov
13 min read- NAS & storage
Set up a home inventory you can open from your home network, then save one sample item and check that it survives a container restart. You will also record where the inventory lives, make a stopped backup, and learn how to undo the installation without casually deleting its data.
This guide uses Synology Container Manager's graphical Project workflow and pins Homebox to 0.27.1, the release identified during research on November 4, 2026. The procedure is based on project and Synology documentation; no physical NAS installation, image pull, attachment-persistence check or restore test was performed for this guide. See the release tag.
Check the NAS and understand the connection
You need administrator access to a NAS running DSM 7.2 or later, with the Container Manager package and its Project feature available. Check your exact model against Synology's official Container Manager package list, then install the package through Package Center. A NAS offering only the older Docker interface is outside this walkthrough. You also need free storage, an existing docker shared folder, an available host port 3100, and a computer on the same trusted home network. Check supported Container Manager models.
An image is the packaged application. A container is a running instance of that image. A data folder on the NAS will hold Homebox's inventory files separately from its running container. The connection between that folder and the container is called a bind mount. An environment variable is a named setting supplied to the application.
Your NAS's local IP address identifies it on your home network. A port number selects a service on that device: this guide publishes Homebox on 3100, while Homebox uses 7745 inside its container. Use the NAS's local address, rather than a container address or DSM's management port. A domain name is optional, and a name alone does not encrypt a connection.
This setup uses unencrypted HTTP on a trusted network. The port mapping can listen across the NAS's network interfaces; it does not enforce a LAN-only access boundary. Keep this installation off the public internet and do not add router port forwarding to make it work. See Docker’s published-port exposure.
Create separate configuration and data folders
In File Station, open the existing docker shared folder and create two folders beside each other:
homebox-projectholds the Container Manager project configuration.homebox-dataholds Homebox's stored inventory.
Inspect the folders' properties to find their full paths, and record both. The examples below assume /volume1/docker/homebox-project and /volume1/docker/homebox-data; your volume may differ. Use the paths you actually find. Keep the data folder beside the project folder, rather than inside it. See Docker bind mounts.
The mount will make your NAS's homebox-data folder available to Homebox as /data. Restarting the application should leave that separately stored data available, which you will check yourself before entering real inventory. Keeping these folders separate does not create a backup.
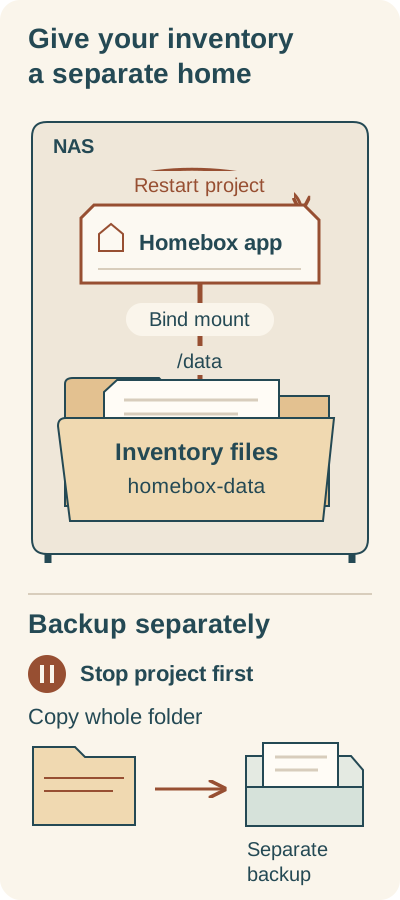
The bind mount connects Homebox to its NAS data folder. A backup is a separate copy made while the app is stopped.
Homebox sees the NAS homebox-data folder as /data. After restarting the project, check that your sample item is still present. For a backup, stop the project, wait until it has stopped, and copy the entire folder to a separate protected location while leaving the original in place. The storage relationship itself is not a backup.
Create the Homebox project
First, use your password manager's random generator to make a private, 64-character secret containing ASCII letters and digits. Save it in the password manager. Homebox requires an API-key hashing secret, called a pepper, of at least 32 bytes; this suggested format supplies 64 bytes. It is separate from your account password. Keep it unchanged across restarts and updates: changing it invalidates existing API keys. See the versioned Homebox configuration reference.
- Open Container Manager → Project → Create.
- Enter
homeboxfor Project Name. - For Path, select the
homebox-projectfolder you created. - For Source, choose the editor option for
docker-compose.yml.
Paste the following configuration into the editor. Before continuing, replace REPLACE_WITH_YOUR_PRIVATE_64_CHARACTER_RANDOM_SECRET with your saved secret, and replace /volume1/docker/homebox-data with the actual full data-folder path you recorded. The uppercase marker is an instruction to substitute your own value; do not deploy it as a secret. Keep the YAML indentation and quotation marks.
services:
  homebox:
    image: ghcr.io/sysadminsmedia/homebox:0.27.1
    restart: unless-stopped
    ports:
      - "3100:7745"
    environment:
      HBOX_LOG_LEVEL: "info"
      HBOX_LOG_FORMAT: "text"
      HBOX_OPTIONS_ALLOW_ANALYTICS: "false"
      HBOX_OPTIONS_ALLOW_REGISTRATION: "true"
      HBOX_AUTH_API_KEY_PEPPER: "REPLACE_WITH_YOUR_PRIVATE_64_CHARACTER_RANDOM_SECRET"
    volumes:
      - "/volume1/docker/homebox-data:/data"
This is an adaptation of the official image and Compose examples. These are the settings you are choosing:
-
image— Selects the standard Homebox image at version0.27.1. The tag chooses this release, but it does not permanently identify the exact image contents. -
restart: unless-stopped— Allows ordinary restart recovery while respecting a manual stop. -
3100:7745— Connects port3100on the NAS to Homebox's internal port7745. -
infoandtext— Keep the documented logging defaults. -
HBOX_OPTIONS_ALLOW_ANALYTICS: "false"— Disables analytics. -
HBOX_OPTIONS_ALLOW_REGISTRATION: "true"— Allows you to create the first account. You will close registration afterward. -
HBOX_AUTH_API_KEY_PEPPER— Supplies your private, saved API-key secret. -
The entry ending in
:/data— Connects your actual NAS data folder to Homebox's storage directory.
Keep the quoted "true" and "false" values: these are environment-setting strings in this file. Keep the configuration private because it contains your secret.
Continue through the wizard, leave the optional Web Station portal off, check the summary, and select Done. Choose to start the project after the wizard. Inspect the project and container details for errors; a first indication of Running alone does not establish that Homebox is ready. The image includes a healthcheck, and opening the application is your next readiness check. See Synology Project controls and the image healthcheck.
Open Homebox and create your account
First find the NAS address in DSM: open Control Panel → Network → Network Interface. Read the private IPv4 address of the connected interface serving the same home network as your computer. It may be named LAN 1 or Bond. If needed, select the interface and inspect Edit → IPv4, then close without changing any settings. See Synology’s private-IP instructions.
Copy the interface's own address, not its gateway or DNS server. If several interfaces are connected and you cannot identify the home-network one, identify the interface already used for local DSM access before continuing; do not change network settings to guess.
In a browser on that same home network, enter:
http://NAS_LAN_IP:3100
Replace NAS_LAN_IP with the NAS's local IPv4 address you just found. For example, http://192.168.1.50:3100 is an illustrative address: 192.168.1.50 identifies the NAS and 3100 selects Homebox. Use your own address, including http:// and the port number.
Register your first account using the form's required name or username, email and password fields. Then log in with that account, following the displayed login labels. There is no default account you need to retrieve for this fresh setup. Official guides differ in how they describe the login identifier, so use the field shown in your installation. See Homebox first-user setup.
Once the intended accounts exist, close registration:
- Select the Homebox project in Container Manager, choose Action → Stop, and wait until it stops.
- Open Details → YAML Configurations. Change
HBOX_OPTIONS_ALLOW_REGISTRATIONfrom"true"to"false". Keep your pepper, image and data mount unchanged. - Apply the edit with the rebuild procedure below, then check that your existing account still logs in and new registration is no longer offered or allowed.
Apply a configuration change
Use this same procedure after closing registration and when changing the image version later:
- Save the edited YAML using the editor's save control. Its exact caption and the following deployment dialog vary by Container Manager version. If prompted, choose the option that rebuilds the project.
- If the editor only saved the file, return to the project list, select
homebox, and choose Action → Build. Wait for the build to finish successfully. This creates or recreates the project containers from the changed configuration without starting them. - If the project remains stopped, choose Action → Start. Wait for Homebox to become ready, then open it and verify the intended change. If the build fails, inspect its errors before proceeding.
A rebuild applies the changed configuration while retaining the mounted storage; keep the data mount and pepper unchanged. Restart alone does not apply edited environment values. Do not choose Clean or Delete to apply a change. Application updates may still modify the database, which is why the update procedure requires a backup. See Compose recreation and restart limitations.
Save one item, restart, and find it again
Use a small illustrative record first. The following controls are documented for Homebox 0.27.1; follow any displayed required fields if your interface is localized. See the location and item instructions.
- From the dashboard, choose Create → Location, enter
Study shelf, and save with Create. - Choose Create → Item, select
Study shelf, name the itemTest torch, enter a quantity of1, and save with Create. - Reopen the saved item and confirm you can find it.
Now perform the persistence check:
- In Container Manager, select the Homebox project and choose Action → Restart. This restarts the project; do not delete it or reboot the whole NAS for this check.
- Wait for Homebox to become ready, refresh the browser, and find the same
Test torchrecord. - In File Station, open the
homebox-datafolder you recorded so you can locate the installation's stored files.
If the item is missing, stop entering inventory and inspect the bind-mount path before doing anything else. Do not create another account or delete folders to get past an unexpectedly empty installation. Finding the item after a restart is a useful check, but it is not a backup or restore test.
Make a stopped backup before relying on the inventory
Homebox's data includes its SQLite database, related files and stored attachments. Copy the entire homebox-data directory, including all files and subfolders; copying only homebox.db is insufficient for this procedure. Also retain the project YAML, installed image version and unchanged pepper privately. See the release storage configuration and SQLite’s copy precautions.
- In Container Manager, select the project and use Action → Stop. Wait until it has stopped.
- Copy the complete
homebox-datafolder to a separate, protected backup location, leaving the original in place. Keep a copy outside the project and its data folders; before permanent removal, retain an external backup. - Wait for the copy to finish. Confirm the backup contains the copied files and subfolders, and save the configuration and secret with appropriate privacy.
- Start the project and check that your sample item is still present.
A completed folder copy does not demonstrate a successful restore. Retain the pre-update copy when making a version change, so recovery can use the data and application version that belong together.
Update deliberately
Read the target release's notes before updating, then make the stopped backup above and stop the project again before editing. In Details → YAML Configurations, change only the image's version tag to a different, exact release tag you have chosen. Leave the data mount and pepper fixed. Use Apply a configuration change above to save, build and start the project.
Check that the build output finishes obtaining the selected image and creating the containers successfully; an image already present may not need downloading. If the build fails, stop and retain the backup. After Homebox opens, confirm the project/container details show the selected image version, then inspect the saved item and any attachments you have added. This procedure covers a different release tag, not forcing a fresh download of an unchanged tag.
Restore a backup or recover from a failed update
Keep the project stopped throughout preparation. Do not start the newer container against the restored backup. Start alone runs existing containers; it does not apply restored YAML.
- Stop the project and wait until it is stopped. Preserve the failed data directory separately, and retain the original backup unchanged.
- Restore a complete copy of the saved backup directory at the exact host path used by the mount.
- Open Details → YAML Configurations and restore the backup's matching image tag, configuration and pepper. Keep the mount pointed at that exact restored folder.
- Follow Apply a configuration change above to save the restored YAML and rebuild the containers. If the editor only saves the file, use Action → Build and wait for success. Verify that the recreated container uses the matching backed-up image version before choosing Action → Start; do not simply start the existing newer container.
- Once the matching installation has started, inspect the inventory and attachments.
Do not merge backup files into a live database or run two containers writing to the same data folder. If an update migrated the database, recovery means restoring the pre-update full backup with its matching old image, not pointing an older image at the migrated database.
Undo the installation
For a reversible undo, use Action → Stop. This retains the stopped installation so you can start it again.
Treat Clean and Delete as destructive operations. Synology's Project Delete documentation includes project data, so do not assume it will preserve your inventory folder. Before permanent removal, make and check an external backup, inspect the actual deletion choices, and cancel if data retention is unclear. Delete homebox-data only when you deliberately intend to erase that stored inventory, and keep your external backup until you no longer need it. See Synology’s Project deletion warning.
If a step fails
- Container Manager or Project is unavailable: recheck your exact NAS model and installed DSM version against the package's supported scope.
- The YAML is rejected: check indentation and quotation marks, especially around your substituted path and secret.
- The image cannot be pulled or reports a platform error: stop and confirm the image tag and NAS processor type, also called its architecture. The release publishing workflow targets processor families named
amd64andarm64; check your model against the official support material rather than assuming all NAS models are compatible. - Port
3100is already in use: change only the host side to"3101:7745", redeploy, and use:3101in the browser. Keep the internal port7745. - The container exits immediately: inspect its startup error in the project/container details. Check the pepper's minimum length and the exact bind path. Remove secrets before sharing logs.
- The page does not open: check that the project is ready, the NAS address is correct, both devices are on the same LAN, and you typed HTTP with the selected host port. Then inspect any targeted NAS firewall policy. Router forwarding is not a fix for this local setup.
- You see a permission error: check the exact mount path, read/write access, standard image selection and permissions on that specific application folder. If ownership is unclear, stop and obtain help; do not grant Everyone write access or change permissions across the NAS.
- You cannot log in: use the account you registered and the identifier requested by the displayed field. This configuration does not set up SMTP, so do not rely on an emailed password reset.
- The inventory is empty after a restart: stop further data entry and inspect the bind path for an accidental empty directory. Preserve the existing folders while investigating.
Once you can reopen the sample item after restarting and have made the stopped backup, add your next real household item. Keep the installed version, folder paths, account details and pepper somewhere you can find them when maintenance is needed.