

How to Install Immich on a UGREEN NAS
Install Immich on a Docker-capable UGREEN NAS using official Compose files. Check a sample upload, preserve your data, and plan an independent backup.
Eugene Gavrilov
14 min read- NAS & storage
Start with one photo. Set up Immich, open it on your home network, and check that your first upload survives an app restart. Keep your existing photo copies while you learn where this installation stores its media and database.
This guide uses SSH and terminal commands to run the official Docker Compose configuration for Immich v3.3.5, checked against primary documentation on 4 November 2026. It is a documented installation procedure, not a report of a physical UGREEN NAS test.
This terminal route requires Docker Compose, wget and nano on the NAS. Their availability is checked below; if a required tool is missing, this walkthrough stops until a supported setup is available. It does not install or replace UGOS packages.
1. Check your NAS and install Docker
Check these requirements before creating folders:
- Your model officially supports Docker in UGOS. UGREEN lists DH4300 Plus and covered DXP models as Docker-capable; DH2300 is excluded.
- At least 6GB RAM and two CPU cores are available; Immich recommends 8GB RAM. This guide retains machine learning, so it does not use the separate 4GB workaround.
- The system uses 64-bit amd64 or arm64. On amd64, Immich v3 machine learning also requires the x86-64-v2 CPU instruction level.
- You have enough free local storage for your photos, videos and database. The database cannot use a network share.
- Before relying on Immich, you have a configured independent backup task that can copy selected NAS folders to external storage, report completion and let you retrieve a saved file. Set up and trial that task using UGREEN's external-drive backup instructions. Confirm a trial finishes successfully and retrieve/open a saved sample before using it for the Immich backup in step 8. The linked UI instructions target UGOS firmware 1.21.0.0133 and may vary on your system.
Docker support alone does not establish full Immich compatibility. Compare your model specifications with Immich's requirements and UGREEN's Docker guidance. Stop if you cannot confirm the hardware requirements.
In App Center find Docker, install it on a storage space with enough free capacity, then open Docker. Its shared directory is the starting location for the project. Have your UGOS administrator credentials and a computer on the same trusted local network ready.
An image is the downloadable software package. A container runs that software. Compose reads one configuration describing several containers together. Immich's official files define its server, machine learning, cache service and database. A mapped NAS folder keeps data outside a container so replacing the container need not erase it.
2. Find the NAS address
Find the NAS address under Control Panel > Network > Network connection. A local IP is the numeric address used to reach the NAS on your home network. A hostname is a name that your network must resolve to an address; use the IP for this first check. You do not need to purchase a domain.
Illustrative address only—replace 192.168.1.50 with your NAS address:
http://192.168.1.50:2283
- http:// is the connection scheme used for this local installation.
- 192.168.1.50 is the illustrative local IP address.
- :2283 selects Immich's port rather than the NAS administration service. The SSH port used below is a separate service.
Use http for this local installation. HTTPS adds encrypted browser transport and needs its own certificate/proxy configuration. Leave router port forwarding untouched and complete the first installation on your trusted LAN. A port mapping alone does not limit who can connect; keep the NAS network access restricted to trusted devices.
3. Create a persistent project folder
- In UGOS open Files, then open the Docker shared directory.
- Use New folder to create immich-app.
- Right-click immich-app and open Properties.
- Find Location and click its Copy icon. Save this full filesystem path in your installation notes.
Use the path from your NAS; another owner's /volume1 example may refer to a different disk layout.
The official defaults create two persistent folders beneath your recorded project directory:
| Folder | Purpose |
|---|---|
immich-app/library | Upload root: photo/video files, generated media and the backups subfolder containing database dumps. |
immich-app/postgres | Live database: the users, metadata and file paths that make the library usable. |
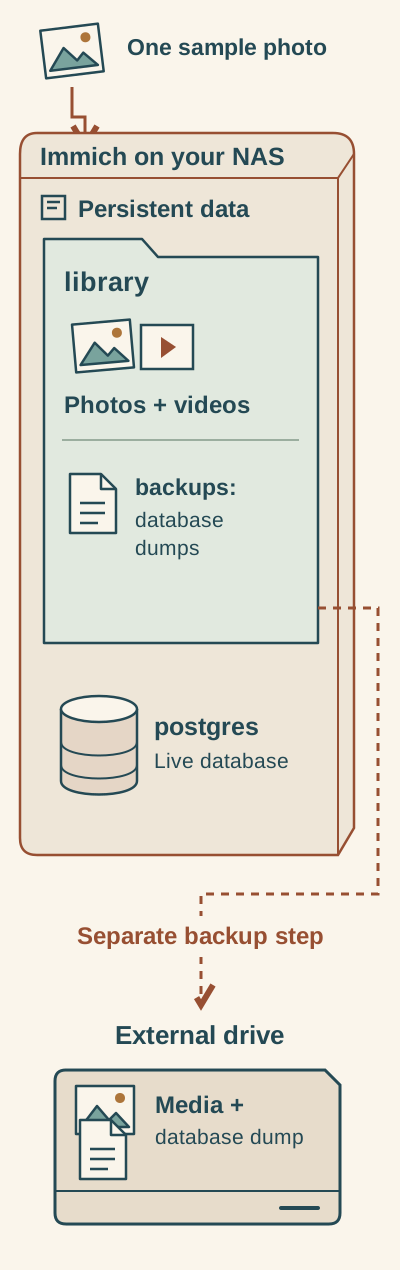
Conceptual storage map: the library contains media and database dumps; the live database is separate. Copying the library to an external drive is a separate backup step.
The default library folder holds photos, videos and a backups subfolder for database dumps. The postgres folder holds the live database. For step 8, pause changes before creating the dump, wait for it to finish, stop the services, then copy the entire library and private settings to external storage. Check the copy before restarting and resuming changes. Copying a running postgres folder is not a substitute for the dump.
Keeping photos alone is not a complete Immich backup. Back up the upload root and its database dump as described in step 8. The live database must use local NAS storage with Unix permissions, never an SMB/NFS network mount; local SSD is preferred.
4. Connect to the NAS and check Compose
SSH lets your computer send commands to the NAS. In UGOS open Control Panel > Terminal, enable SSH, record the selected port, retain High security, restrict access to the local network where offered and choose an automatic disable timeout. Apply.
Windows: open Command Prompt. macOS: open Applications > Utilities > Terminal. Type the following after replacing all three uppercase fields with your own values; these are placeholders, not literal commands to paste unchanged.
ssh ADMIN_USERNAME@NAS_IP -p SSH_PORT
On the first connection, SSH may show a host-key fingerprint and ask whether to continue. Compare that fingerprint with the NAS key obtained through an independent, already trusted administrator access method. The OpenSSH instructions show how an administrator can read it on the server; use the same key algorithm shown in your prompt. If you have no trusted way to obtain it, stop and ask your NAS administrator or UGREEN support rather than approving an unknown key. Do not bypass an unexpected changed-key warning.
When prompted for the administrator password, type it normally and press Enter. SSH may display no characters, dots or asterisks as you type. Once login succeeds, commands in this session run on the NAS.
Replace PASTE_YOUR_COPIED_PROJECT_PATH_HERE in the next command with the full path saved in step 3. Keep the quotation marks. Do not type that placeholder literally. cd means “change directory.”
cd "PASTE_YOUR_COPIED_PROJECT_PATH_HERE"
pwd
For example only, a NAS whose copied project path is /volume2/docker/immich-app would use cd "/volume2/docker/immich-app". Check that pwd prints your own recorded path. If cd fails or the path differs, stop and correct it before continuing.
Then check the Docker Compose plugin:
sudo docker compose version
sudo may request your NAS administrator password. Continue only if the Docker Compose plugin returns a version. If the command is unavailable, stop and resolve the Docker app/Compose support with UGREEN; do not apply Ubuntu package replacement instructions to UGOS. The required command is docker compose with a space.
5. Download and edit the official files on the NAS
This route edits the configuration directly in the NAS terminal, avoiding desktop rich-text formats and hidden-file upload dialogs. First check the two required tools:
command -v wget
nano --version
The first should print a path to wget; the second should print a nano version. Stop if either is unavailable. This guide does not assume your UGOS installation bundles them or prescribe appliance package changes. Ask UGREEN how to provide a supported download/editor workflow for your system.
In the confirmed immich-app directory, download the two matching v3.3.5 assets. These commands are for a new installation: they write the named files and overwrite existing settings. Do not run them over a configured installation.
wget -O docker-compose.yml https://github.com/immich-app/immich/releases/download/v3.3.5/docker-compose.yml
wget -O .env https://github.com/immich-app/immich/releases/download/v3.3.5/example.env
The links retrieve the official Compose file and official environment example, saving the latter under the required name .env.
Open the settings file:
nano .env
The environment file is a list of named settings read by Compose. Preserve its supplied structure and change these values:
| Setting | What to enter |
|---|---|
| UPLOAD_LOCATION | Keep ./library for the persistent media folder beneath this project. |
| DB_DATA_LOCATION | Keep ./postgres for the separate local live database. |
| IMMICH_VERSION | Change v3 to v3.3.5, keeping this installation pinned to the retrieved release. |
| DB_PASSWORD | Replace postgres with a long randomly generated password using only A–Z, a–z and 0–9. Store it securely. |
| TZ | Optional: remove the leading # and use your timezone identifier; leave commented if unsure. |
| DB_USERNAME / DB_DATABASE_NAME | Retain the supplied values. |
The database password connects the services; it is separate from the Immich web account you will create. Leave the supplied database username and database name unchanged.
Use the arrow keys to move around the file and Backspace to remove old characters. Change only the values shown in the table. To save, hold Ctrl and press O, confirm the filename remains .env, then press Enter. Press Ctrl+X to exit. Reopen nano .env, check your version and password edits were saved, then press Ctrl+X again. These are Control-key shortcuts on both Windows and macOS terminal sessions.
Retain the official docker-compose.yml configuration except for the following applicable HDD setting. If postgres will be stored on hard disks, open that separate file:
nano docker-compose.yml
In the database section, find the commented line # DB_STORAGE_TYPE: 'HDD'. Remove its # and the following single space, leaving the setting aligned with the other database environment settings. It should read DB_STORAGE_TYPE: 'HDD' at that indentation. Save with Ctrl+O, Enter, then exit with Ctrl+X. If your database is on SSD storage, leave this comment unchanged. This edit belongs in docker-compose.yml, not .env.
Checkpoint: you know the full project path, and it contains the matching Compose file and your customized .env. The settings must include IMMICH_VERSION=v3.3.5 and your own database password.
6. Start Immich and create your account
From this same folder run:
sudo docker compose up -d
sudo docker compose ps --all
The first command downloads images and starts the stack in the background. The second lists its containers and status. If something exits or continually restarts, inspect the reported errors before proceeding:
sudo docker compose logs --tail 100
When the server is ready, enter http://YOUR_NAS_IP:2283 in your browser's address bar, replacing YOUR_NAS_IP with the address from step 2. Use a computer on the same LAN. Startup time depends on this installation; use status and logs rather than a fixed waiting period.
Select Getting Started and follow the account prompts. The first account registered becomes the administrator. Save its new login credentials.
7. Upload a sample and restart
- Keep the original on your computer. In Immich use Upload to select one copied, non-sensitive sample photo. Extra photos and a short sample video are optional.
- Open the sample photo in Immich and check its contents. If you added optional samples, open those too.
- Before adding the full collection, return to your NAS terminal in the same project directory and restart the app:
sudo docker compose restart
sudo docker compose ps --all
Reopen the same local browser address. Confirm that the same sample photo remains available, along with any optional samples. You can locate the library directory beneath your recorded project folder in Files, but do not rename, move or rearrange Immich-managed contents.
This check demonstrates persistence across this normal restart. It does not verify a backup or restore. Later .env changes need up -d, rather than a restart alone. Keep this SSH session for the backup steps below. If it disconnects or the SSH timer expires, re-enable SSH in UGOS, reconnect with the step 4 command, then repeat cd and pwd with your saved project path before entering any NAS commands.
8. Back up the media and database together
Use the independent backup task you configured and trialled in step 1. If it is not ready, complete UGREEN's external-drive setup before proceeding with this protection step.
Before creating the dump, establish a quiet interval. Have every user and client stop uploads, edits, moves and deletions, and wait for any jobs that change or relocate files to finish. Keep these changes paused throughout the dump, shutdown and backup copy. If you cannot maintain that interval, stop here and follow the official stopped-server backup procedure instead. The sequence below depends on nothing changing during that interval; it is not a claim of a tested backup result.
While changes remain paused, create a fresh database dump under Administration > Job Queues > Create job > Create Database Dump > Confirm. Wait for that job to finish. It appears in library/backups with the chosen upload-root default. The dump contains metadata, not photos/videos.
Keep the quiet interval in force. After the dump completes, stop and remove the service containers while keeping their data folders:
sudo docker compose down
Confirm down finishes successfully before copying. Do not add -v or delete any project folders. With the services stopped and changes still paused, run your configured backup task for the entire library folder, including its backups subfolder, to the external destination. Do not exclude media, dotfiles or database dumps with filter rules. Also preserve docker-compose.yml, .env and the pinned version in your installation notes. Keep this settings backup private because .env contains the database password.
In Sync & Backup > Back up & Restore, inspect task progress and execution history. Wait for successful completion; if it reports errors, keep the source data and resolve them. Retrieve a backed-up sample and confirm the new database dump is present at the destination, using the same restore/readback workflow you trialled in step 1.
Only after the copy and checks are complete, start the retained installation again from the project directory:
sudo docker compose up -d
Check that Immich is available again in the browser, then let users and clients resume uploads and other changes. Do not resume them before startup.
The dump covers the database metadata; the rest of library supplies the media and associated files. An automatic dump kept only on this NAS is not an independent backup. Do not substitute a copy of the running postgres directory for a database dump. Follow Immich's backup and restore guide when arranging and checking your backup.
For recovery into an existing installation, open Administration > Maintenance > Restore database backup, select an available dump or upload its .sql.gz file, and choose Restore. Restoring replaces the current database. It requires the corresponding media files and a compatible Immich version.
A fresh installation offers Restore from backup on its welcome screen after the saved data folders have been placed in its UPLOAD_LOCATION. Follow the official guide's folder and integrity checks; test recovery with a spare copy before replacing your only installation. No restore was performed for this article.
After the backup and browser check, run exit to close this ordinary administrator SSH session, then disable SSH under Control Panel > Terminal.
9. Update or remove the app
For every later maintenance session, re-enable SSH in UGOS, reconnect using step 4, and repeat cd to your recorded project path followed by pwd. Only run the following commands after confirming you are connected to the NAS and inside that directory. When finished, exit and disable SSH again.
Before an update make a verified backup, save the working files and note the current pinned version. Read the destination release notes and official upgrade instructions, including required Compose changes. Update the version pin and matching release configuration when required; from the project directory run these separately:
sudo docker compose pull
sudo docker compose up -d
Repeat the small upload/restart check. Do not assume changing back to an older image reverses database migrations. Use the backup and compatible official recovery procedure if rollback is necessary.
To stop and remove the service containers while preserving the installation directory, first back up, then run:
sudo docker compose down
Do not add -v and do not delete immich-app, library or postgres if you intend to keep your installation. With these bind mounts, removing containers is separate from erasing stored files. Keep configuration and data; up -d from the same folder starts the retained installation again.
Troubleshooting
- Cannot SSH: check SSH remains enabled, correct NAS IP/SSH port and same LAN; automatic timeout may have disabled it.
- Compose missing: stop at the readiness gate and resolve supported Docker/Compose with UGREEN.
- Images cannot download: check the NAS internet connection and registry access, then the exact release/image names.
- Port already used: in
2283:2283, the left number is the NAS port and the right number is the container port. Change only the left 2283 in the Compose mapping to an unused NAS port, such as 2284; apply up -d and use :2284 in the browser. The number is illustrative and must be free. - Permission denied: confirm correct project/data path and required folder access. Avoid broad chmod 777 or guessed user IDs.
- Upload disappears after restart: stop adding files and inspect folder mappings and database state; preserve the files and logs before trying recovery.
For help, keep your NAS model, UGOS version, Compose version, pinned Immich version and relevant logs. Remove passwords and other secrets before sharing them. Use the official Immich installation guide and UGREEN SSH instructions alongside your saved settings.