

How to install Jellystat on your UGREEN NAS
Install Jellystat with Docker and Portainer on a UGREEN NAS, connect Jellyfin, check persistent storage, and download a backup for safekeeping.
Eugene Gavrilov
10 min read- NAS & storage
Your Jellyfin server already plays your media. Jellystat gives you a separate place to inspect sessions, viewing history, and library statistics. In this guide, you will add Jellystat and its database to your UGREEN NAS, connect your existing server, and check that the installation keeps its settings when you restart it.
The recipe is for a fresh installation, using Jellystat 1.1.12 and the PostgreSQL 18.1 image in the upstream example checked on November 4, 2026. These versions are supported by retrieved project sources; this article does not report a physical NAS installation or a successful restore test. Keep existing PostgreSQL data out of this recipe. It is not a database migration procedure.
Interface labels can vary by version. The Jellyfin API-key menu and Jellystat’s initial Create User label come from the supplied installation article; they have not been independently checked in a running instance. The later Jellystat setup and backup controls are supported by its 1.1.12 source code.
Start with the right prerequisites
You need a working Jellyfin server, administrator access to it, your NAS's local IP address, and a computer on the same trusted network. On the NAS, Docker must be available and installed. UGREEN documents installation through App Center → Docker → Install; its Docker guide applies to firmware 1.19.1.0126 and later. Check the app's availability on your model, since the interface and supported environment can vary.
Portainer must already be installed and connected to the NAS's local Docker Standalone environment. You should be able to sign in and select that environment before continuing. If necessary, follow Portainer's installation instructions and initial setup first. A new Portainer instance may require a setup token from its logs. Portainer setup is a prerequisite here, rather than a step this article walks you through.
Use a trusted local network throughout. Do not create router port-forwarding rules for these services. This recipe opens Jellystat over unencrypted HTTP; it needs neither a domain nor an HTTPS certificate for local numeric-IP access.
Before switching to Portainer, open Jellyfin in your browser and save its working address. It might look like http://192.168.1.50:8096, but use your own server address, port, and any required base path. The number after the colon is a port: it selects a service at that address.
Give Jellystat access to Jellyfin
In Jellyfin, sign in as an administrator. The supplied installation source describes Dashboard → API Keys → +: name the application Jellystat, confirm, and save the generated key privately.
An API key is the credential Jellystat will use for the server connection. Keep it in your password manager alongside the server address. You will create a separate Jellystat login later.
Jellyfin is the main path below. For Emby, prepare your Emby address and API key and change IS_EMBY_API to "true" in the configuration. Leave it "false" for Jellyfin. The project documents this setting; no Emby setup test is claimed here.
Prepare one stack for the application and database
Docker downloads packaged software called images, then runs them as containers. A Portainer stack groups related services and their configuration. This stack contains Jellystat and PostgreSQL, which holds Jellystat's working data. Volumes keep saved data outside those replaceable containers.
There are also two addresses to keep distinct. Your browser will open Jellystat at the NAS address and port 3791. Inside Jellystat's setup form, you will enter the address of your existing Jellyfin server. Those addresses have different jobs even when both applications run on the same NAS.
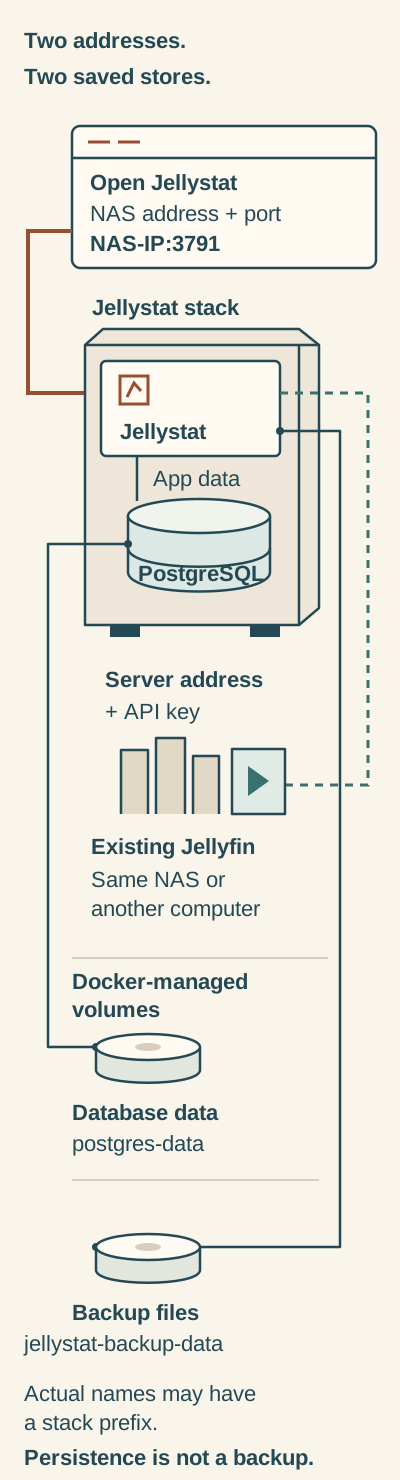
Open Jellystat at its own NAS address and port. It connects to your existing server and stores data in Docker-managed volumes.
Your browser uses the NAS address and published Jellystat port. Jellystat uses your existing media server’s address and API key. Docker manages the postgres-data and jellystat-backup-data volumes; actual names may include a stack prefix. Saved volume data provides persistence, not a complete backup.
Select your NAS's Docker environment in Portainer. Open Stacks → Add stack, name the stack jellystat, and select Web editor.
An environment variable is a named setting passed to a container. Here, two variables supply private values to the stack.
In the stack's Environment variables area, use the individual variable fields to add:
| Variable name | Value to generate and save privately |
|---|---|
JELLYSTAT_DB_PASSWORD | A unique random password of at least 32 letters and digits. |
JELLYSTAT_JWT_SECRET | A different random secret of at least 64 letters and digits. |
The lengths and alphanumeric restriction are this guide's practical recommendations, not vendor minimum requirements. Generate the values with a password manager. Portainer's variable fields are configuration storage, so protect access to Portainer and exported settings.
Paste this entire block into the web editor. Leave both ${...} expressions intact: they refer to the values you just added. Dollar signs have a special meaning in Compose substitution; the generated letters-and-digits values avoid punctuation escaping for this recipe.
services:
  jellystat-db:
    image: postgres:18.1
    restart: unless-stopped
    shm_size: "1gb"
    environment:
      POSTGRES_USER: postgres
      POSTGRES_DB: jfstat
      POSTGRES_PASSWORD: ${JELLYSTAT_DB_PASSWORD}
    volumes:
      - postgres-data:/var/lib/postgresql
    healthcheck:
      test: ["CMD-SHELL", "pg_isready --dbname=jfstat --username=postgres"]
      interval: 10s
      timeout: 5s
      retries: 5
    logging:
      driver: json-file
      options:
        max-file: "5"
        max-size: "10m"

  jellystat:
    image: cyfershepard/jellystat:1.1.12
    restart: unless-stopped
    environment:
      POSTGRES_USER: postgres
      POSTGRES_DB: jfstat
      POSTGRES_PASSWORD: ${JELLYSTAT_DB_PASSWORD}
      POSTGRES_IP: jellystat-db
      POSTGRES_PORT: "5432"
      JWT_SECRET: ${JELLYSTAT_JWT_SECRET}
      TZ: Etc/UTC
      IS_EMBY_API: "false"
    volumes:
      - jellystat-backup-data:/app/backend/backup-data
    ports:
      - "3791:3000"
    depends_on:
      jellystat-db:
        condition: service_healthy
    healthcheck:
      test: wget --no-verbose --tries=1 --spider http://localhost:3000/auth/isConfigured || exit 1
      interval: 60s
      timeout: 30s
      retries: 5
      start_period: 30s
    logging:
      driver: json-file
      options:
        max-file: "5"
        max-size: "10m"

volumes:
  postgres-data:
  jellystat-backup-data:
The configuration adapts the project's Compose example, pins the application version, supplies the database name explicitly, and uses Portainer variables for private values. PostgreSQL 18.1 follows that example; it is not a claim that this is the newest PostgreSQL patch. Jellystat 1.1.12 was the latest release observed during the source check.
Review these settings before deployment:
- Browser port:
3791:3000sends NAS port3791to Jellystat's internal port3000. If3791is occupied, change only the left number and record your replacement. PostgreSQL's5432is internal to this stack and has no published NAS port. - Time zone:
Etc/UTCselects UTC and is an acceptable choice for this walkthrough. You can leave it unchanged. - Database storage: keep
/var/lib/postgresqlexactly as shown. PostgreSQL 18 changed its storage layout; older instructions using/var/lib/postgresql/datado not apply to this recipe.
Docker creates the named volumes postgres-data and jellystat-backup-data. The first holds the database; the second receives files from Jellystat's backup feature. You do not need to create shared folders or set a NAS user ID for this configuration. These are Docker-managed volumes, rather than ordinary folders in UGOS Files. A volume provides persistence; it does not by itself provide a backup.
Deploy, then open the application
Choose Deploy the stack and let Portainer download the images. Inspect both containers in the stack. The configuration waits for the database readiness check before starting Jellystat, and Jellystat has its own HTTP health check. Open the container logs if either service stops or stays unhealthy. A deployment success message is only the first checkpoint.
In your browser, open http://YOUR-NAS-IP:3791, replacing YOUR-NAS-IP with your NAS address. For example, a NAS at 192.168.1.50 would use http://192.168.1.50:3791. Use your chosen port if you changed it. This configuration uses http.
At first run, create a Jellystat username and password and save them. Choose Create User when prompted.
On the server connection screen, enter your Jellyfin address in URL, paste the API key into API Key, and choose Save Jellyfin Details. The release-pinned setup code begins a library sync after the details save successfully.
Use an address reachable from the Jellystat container. For Jellyfin on the same NAS, use the NAS IP and Jellyfin's published port. Avoid localhost: inside Jellystat's container, it refers to that container itself. If Jellyfin lives on another computer, use that computer's address.
Check that you can rely on it
Treat the following as checks for your installation. No fixed collection time, complete historical reconstruction, or completed NAS test is implied.
- Confirm that Jellystat shows recognizable information from the intended server.
- Play an item through Jellyfin and inspect Jellystat for its session or activity. If nothing appears, check the connection and logs before assuming a particular delay.
- Record one visible library or activity entry. In Portainer, open the stack, stop it, then start it again. Sign back in and compare the account, server connection, and recorded entry.
- If the first-run setup returns, inspect the attached volumes. Preserve all candidate volumes while you identify the original database; do not delete them to start over.
In Portainer's Volumes list, identify the two volumes attached to this stack and save their actual names with your configuration. Stack deployments commonly add a prefix, so do not guess the names or a host folder path. Volume browsing is available only in some Portainer environments.
Make a backup you can take off the NAS
A restart check establishes persistence, not recovery. In Jellystat Settings, find the backup task in the tasks area and use its Start control. Check that the task finishes successfully, then open the Backup tab. For the new file, select Actions → Download and save a copy outside the NAS. Look for the task responsible for backups; its exact label may vary.
Jellystat exports selected application tables, subject to exclusions in its settings. That export does not include your media, a complete PostgreSQL installation, the Compose file, or the environment values. Keep your stack text, private settings, credentials, deployed versions, and actual volume names separately. A Portainer configuration backup does not include managed container data either.
Plan recovery before you need it. This is a preparation checklist, not a complete restore procedure:
- Keep the downloaded backup, saved image versions, private settings, and original volume names together in your recovery notes.
- Any recovery check needs an isolated installation with fresh volumes, the saved Jellystat version, and saved server credentials. Before proceeding, establish a distinct stack identity, an unused browser port, and volume attachments that cannot overwrite the original data. This article does not supply those separate-installation steps.
- Jellystat's Backup tab has upload and Actions → Restore controls. Restore writes application data. A complete recovery walkthrough must explain how to use them on the isolated copy and compare recognizable library and activity entries afterward. Preserve the original volumes throughout.
Do not treat a downloaded file or this checklist as evidence of successful recovery. Restore completeness and compatibility between versions have not been verified for this guide.
Diagnose a failed step without losing data
| Symptom | Next check |
|---|---|
| Portainer rejects the stack | Check YAML indentation and that both named variables have values. |
| Image download fails | Check internet access, registry reachability, and the exact image name and tag. |
| Port is already allocated | Choose an unused left-hand port in 3791:3000; leave 3000 unchanged. |
| Database stops or fails readiness | Read its logs and check the volume attachment and password settings. Do not add an arbitrary user: override. |
| Password error appears after editing settings | Restore the original saved database setting first. PostgreSQL initialization variables do not change credentials in an already populated database. |
| Jellystat opens but the server connection fails | Check the server address, API key, container reachability, and Jellyfin/Emby setting. |
| The browser cannot open Jellystat | Check the container status, NAS IP, published port, and local network or firewall restrictions. |
For an application issue you cannot resolve, use the Jellystat issue tracker. Include the image tags, NAS model, UGOS version, and relevant logs after removing API keys, passwords, tokens, and private addresses.
Update or undo the installation carefully
Before updating, download a new backup and save the current configuration and private values. Read the release notes, then use Stacks → jellystat → Editor to change the Jellystat image tag to your selected supported release and choose Update the stack. Keep the volume names and mounts intact, and repeat the dashboard and recorded-entry checks afterward. A routine Jellystat update should not change the PostgreSQL major version.
To pause the installation, stop its stack. To remove the running services, record the volume names and save the configuration first, then use Stacks, select jellystat, and choose Remove. Review your version's confirmation and decline any option to delete the volumes. Keep both volumes and the saved settings while deciding whether to return to the installation. Deleting volumes is a separate destructive action; do not prune them as a troubleshooting shortcut.
An older image tag may not undo database changes made by an update. Preserve the original data and previous configuration; use a separately checked recovery copy if an update requires recovery. The installation steps are complete when Jellystat opens locally, connects to the intended server, passes your restart check, and you have downloaded a backup and saved the configuration. Restoration remains a separate, unverified step.