

Install Manyfold on a UGREEN NAS and Add Your First Model
Set up Manyfold Solo in UGOS Docker, map persistent folders, add a sample STL, check login and restart persistence, and back up before updates.
Eugene Gavrilov
9 min read- NAS & storage
Turn a folder of downloaded 3D models into a library you can browse from a computer on your home network. This guide installs Manyfold, adds one model, and shows you how to check that the account and files survive a container restart. Start with a copy of one STL file you own, in a new folder. Manyfold can organise and rename library files, so keep your existing archive separate while learning.
This is a new installation using the official Manyfold Solo image, which includes its database and supporting services. It is a documentation-based procedure researched on November 4, 2026, without a physical NAS installation or restore test. It does not migrate an existing Manyfold database.
1. Prepare Docker and a NAS account
Your NAS needs the Docker app. UGREEN documents support for DH4300 Plus and listed DXP models, and excludes DH2300. Check the vendor's Docker guide for your model. Manyfold publishes AMD64 and ARM64 images; that alone does not prove compatibility with every NAS. The UGOS labels below follow UGREEN's documentation and may vary with your interface.
- In App Center, install Docker.
- Open Control Panel > Network > Network Connection and record the NAS's local IP address. An address such as
192.168.1.50identifies a device on your network; this is an illustration, not a value to copy. - Under Control Panel > User Management > User > Add > Create, create a standard user named
manyfold. Give it access only to the application folders prepared below, keeping unrelated shared folders inaccessible.
Docker runs an application from an image, its packaged software. A container is the running instance. A Docker Project saves its configuration in Compose format. We will use UGOS's Project editor for installation; the short terminal step below only reads the account's numeric IDs.
Find the account's two numbers
Manyfold needs the numeric ID of the NAS user and its group. You will enter these as PUID and PGID. Names and numbers differ between NAS installations, so do not copy somebody else's numbers.
In Control Panel > Terminal, temporarily enable SSH, the connection used to run a command on the NAS. Note the configured SSH port. Open Command Prompt on Windows or Terminal on macOS, then enter this command with your own administrator name, NAS IP address and SSH port:
ssh ADMIN_NAME@NAS_IP -p SSH_PORT
On a first connection, SSH normally displays a host-key fingerprint and asks whether to continue. First check that the IP in your command matches the NAS address recorded in UGOS. Then compare the fingerprint with an independently trusted fingerprint for your NAS before accepting it. The IP check alone does not verify the key. If you have no trusted fingerprint, pause and ask your NAS administrator or UGREEN support how to verify it; do not guess. A changed-key warning also needs investigation.
At the password prompt, type the NAS administrator password and press Enter. Normally, no characters or dots appear while you type; that does not mean the keyboard has stopped working. After signing in, enter:
id manyfold
Record the numbers immediately after uid= and gid=. For example, uid=1026(manyfold) gid=100(users) would mean PUID 1026 and PGID 100; those are illustrative numbers. Enter exit to disconnect, then disable SSH again if you do not normally use it.
2. Give Manyfold persistent storage
In Docker > Project > Create, name the Project manyfold. Record the full storage path shown in the wizard. In the NAS Files app, create two empty folders inside that location: config and models. Give the manyfold user read/write permission to both, with access through their parent folders.
The two folders serve different purposes:
| Folder inside the recorded Project directory | Path seen by Manyfold | Contents |
|---|---|---|
config | /config | Solo database and plugins |
models | /models | Your model library files |
The configuration uses ./models:/models: the left side means the NAS's models folder inside the Project directory; the right side is the name Manyfold uses for that same folder. This mapping is a bind mount. It gives the container access to files on the NAS. When Manyfold asks for a library location, you will enter /models.
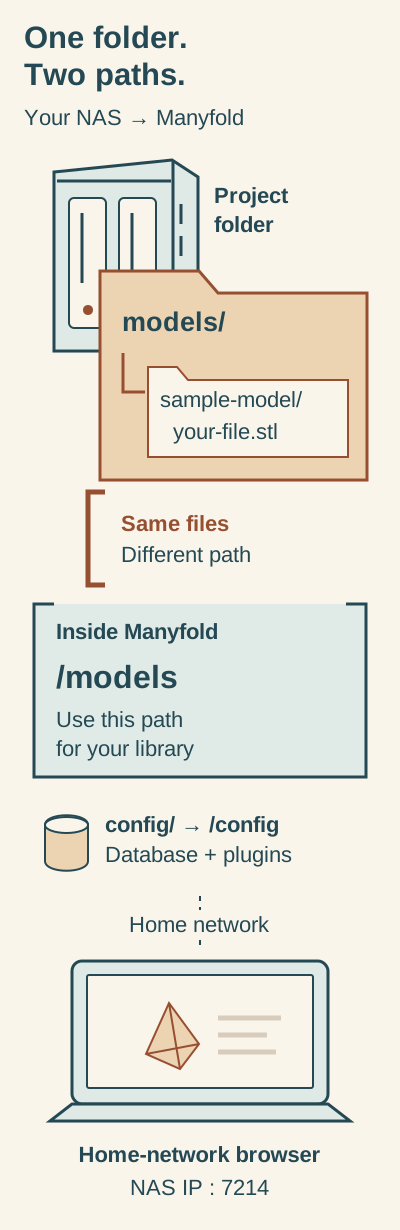
The Project’s models folder and /models inside Manyfold are the same files. Keep config separate.
In text: ./models:/models maps the Project’s models folder to /models in Manyfold; put your sample file inside models/sample-model. Separately, ./config:/config stores the Solo database and plugins. Open the library from your home-network browser at http://NAS_IP:7214, using the actual NAS IP and your chosen NAS-side port.
3. Paste the Project configuration
Open your password manager's generator and generate a new random string, for example 128 characters using letters and numbers. Copy the generated value; do not make it up by typing a memorable phrase. Manyfold accepts a long random string. Its conventional 128-character hexadecimal format is not required for this method.
Save the value privately with your Compose configuration. This SECRET_KEY_BASE is separate from the password you will later choose for the Manyfold administrator. Changing the secret invalidates login sessions.
Return to the Project's Compose editor and paste the following configuration. Replace all three capitalised placeholders before deploying. The environment entries are application settings: use your recorded numbers for PUID and PGID, and your new secret for SECRET_KEY_BASE. Keep the indentation.
services:
  app:
    image: ghcr.io/manyfold3d/manyfold-solo:latest
    ports:
      - "7214:3214"
    volumes:
      - "./config:/config"
      - "./models:/models"
    environment:
      PUID: "YOUR_UID"
      PGID: "YOUR_GID"
      SECRET_KEY_BASE: "YOUR_LONG_RANDOM_SECRET"
    restart: unless-stopped
    security_opt:
      - no-new-privileges:true
    cap_drop:
      - ALL
    cap_add:
      - CHOWN
      - DAC_OVERRIDE
      - SETUID
      - SETGID
This adapts the official Solo example with its documented security settings. Keep PUID and PGID; Manyfold does not support replacing them with a Compose user: entry. Solo needs no separate database or Redis connection settings.
A port directs a connection to an application. Here 7214:3214 connects NAS port 7214, chosen for this guide, to Manyfold's internal port 3214. If 7214 is already occupied, choose a free NAS port and change only the left number. Use that new number in every browser address below.
For initial setup, leave MULTIUSER out. Manyfold starts in single-user mode, which automatically logs visitors in. Keep access limited to your trusted home network while you create the administrator account; enable login immediately afterward as described below. Save a private copy of the configuration, then select Deploy. Under Docker > Container, check that the container is running and open its Log.
4. Open Manyfold and add one model
On a computer on the same home network, open:
http://NAS_IP:7214
Replace NAS_IP with your recorded address. For example, the address might be http://192.168.1.50:7214. You do not need to register a domain. Do not enter localhost on your laptop: that points to the laptop itself.
Keep this installation on a trusted home network, without router port forwarding or public access. Its HTTP connection is unencrypted. HTTPS requires a separately configured proxy; leave HTTPS_ONLY unset for this HTTP procedure.
-
Complete the initial administrator form with an email address, username and strong password. Save these Manyfold credentials. An email address alone does not enable password-reset delivery; that requires SMTP mail configuration.
-
After saving the administrator account, return to the Project's Compose configuration. Under
environment, add the following at the same indentation asPUID,PGIDandSECRET_KEY_BASE:MULTIUSER: "enabled"Redeploy the revised Project configuration, preserving the same storage path, folders and secret. Reopen Manyfold and check that you can sign in with the credentials you just saved. Save this revised Compose configuration with your secret.
-
Add a local filesystem library with
/modelsas its location. This is the container path from the storage table. -
In the NAS Files app, create
sample-modelinside the Project'smodelsfolder. Copy your sample STL into it. The layout ismodels/sample-model/your-file.stl, not a file directly insidemodels. Files in the library root are not scanned. -
Adding the library starts a scan. If you copied the file afterward, use Manyfold's scan action in its navigation to scan again. Wait for the scan, then look for the model in the model list. The preview may not appear immediately.
Once the model appears, restart the app container through Docker. Reopen the same browser address, sign in, and check that the model remains. Also locate its file in the NAS's models folder. These checks confirm your installation's persistence; they do not replace a backup.
5. Back up before updating or removing it
The image is replaceable software; your mapped folders and saved configuration contain the data you need to preserve. To back up the stored data while the app is stopped:
- Stop the Manyfold container and confirm that it has stopped.
- Copy the entire
configandmodelsfolders, plus your private Compose configuration and secret, to separate backup storage. Include hidden files and any database sidecar files; do not select only the SQLite database file. Copying an actively changing SQLite database can make the backup inconsistent. - Restart the container and repeat the account/model check. No restoration test is claimed by this guide.
The latest image tag can point to newer builds over time. Before requesting a Project image update, read the Manyfold release notes, save an immutable digest or verified fixed tag identifying the currently working image, and back up the data with the container stopped, as described above. Saving only the text latest is insufficient because that tag can change. Use a publisher-provided tag or digest verified in the image registry; do not guess the tag from a release title. If you cannot identify the working build, postpone the update until you can preserve a usable rollback reference.
If an update fails, stop the app and preserve the failed state separately. Restore the pre-update folders to the same Project locations, with the saved secret and matching previous image reference. Redeploy and repeat the account/model checks. Reverting only the image while retaining a newer database is not a reliable rollback plan.
To uninstall, first copy the backup outside the Project directory. Then remove only the manyfold Project under Docker > Project. UGREEN warns that removal can affect relative Project folders, so do not rely on those folders being preserved. Delete model data only when you deliberately no longer need it; remove the image only if no other container uses it.
If something does not work
Work from the first failing stage. Use the next check to narrow down the problem.
| Symptom | Next check |
|---|---|
| Image will not download | Check the exact image name, registry access and supported architecture. |
| Container stops | Read its Log. Check the secret, actual PUID/PGID values, folder mappings and write permissions. |
| Port is occupied | Change the left number in 7214:3214 and use it in the browser address. |
| Browser will not connect | Check running state, the actual NAS IP, the same local network and the NAS-side port. |
| Login is skipped after setup | Check that MULTIUSER: "enabled" is in the applied configuration. Password-reset email also needs SMTP configuration. |
| Library is empty | Check /models, a model file inside a subfolder, permissions and scan completion. |
| Account or models disappear after rebuilding | Stop and check the original Project directory and mounts before creating a replacement account. Restore saved data instead of guessing new paths. |
For help with container deployment, use UGREEN's Docker documentation. For application setup, consult Manyfold's administrator guide, library guide and first-scan guide.