

Try the Monkeytype Frontend on a Synology NAS
Try a historical Monkeytype frontend using Synology Container Manager. Understand the two ports, check a typing test, and stop or remove the trial safely.
Eugene Gavrilov
8 min read- NAS & storage
Want a typing test you can open through your NAS? Monkeytype offers customizable browser typing tests. This guide walks through a historical third-party frontend container, then gives you checks to try from a computer on your home network.
The intended result is a page where you can complete a typing test. This is a limited frontend trial: it does not set up the current official Monkeytype service, account hosting, or a NAS database for typing history. The image's availability and compatibility with your NAS remain unverified; no physical NAS installation was performed for this guide.
Before you begin
You will use Container Manager, Synology's container interface, and its Project workflow. An image is packaged software; a container is a running instance of that software. A Compose file describes the services and settings that a Project should run.
Prepare these three things:
- DSM access and an installed, accessible Container Manager with the Project workflow are prerequisites. Find your model and DSM version under Control Panel > Info Center > General. If you cannot access Project, stop here. See Synology’s Project documentation.
- A computer and NAS on the same trusted home network. Use local access for this trial and do not add router port forwarding.
- An existing writable shared folder where you can keep a small Project working folder. That folder will hold the deployment configuration; it is not a typing-results database.
If the image cannot run on your NAS’s CPU architecture, stop rather than force a different architecture.
Understand the address before creating the Project
Find the NAS address in DSM under Control Panel > Network > Network Interface. Read the IPv4 address of the connected interface serving your computer’s home network; do not change the settings. If several interfaces are connected and you cannot identify the right one, ask your network administrator before continuing. The route is documented in Synology’s DSM 7.3 guide.
A port is a numbered connection point. This recipe uses 5450:5000: the first number is the NAS-side port you will put in your browser address, and the second is the port inside the frontend container. Choose an unused NAS-side port; keep the container-side value at 5000.
Your browser address will look like this:
http://<NAS-local-IP>:5450
Replace <NAS-local-IP> with the NAS's actual local address. For example, http://192.168.1.20:5450 is an illustrative address, not an address to copy unless it belongs to your NAS. Use the NAS address rather than your computer's localhost.
You do not need to buy a domain or configure DNS merely to attempt this HTTP address. A domain is a readable address, DNS resolves names to addresses, and HTTPS encrypts the connection and uses a certificate to establish server identity. This trial does not configure those services. Current official Monkeytype self-hosting requires HTTPS for non-localhost access, including a home network, so the historical HTTP route may fail. See the official self-hosting instructions for that separate deployment.
Opening a local address is not an access restriction. The port mapping below publishes on all NAS host addresses by default. Keep this trial on a trusted network, do not add router forwarding, and stop if you cannot establish appropriate access for that network.
Create the Monkeytype Project
Open File Station and enter an existing writable shared folder. Create a folder named monkeytype there. Synology’s folder-creation help calls the action Create folder, followed by entering the name and OK; those labels are from DSM 6 help and may differ on your DSM version. Select the resulting folder as the Project’s Path below. It holds configuration, with no application-data mount added by this recipe.
- Open Container Manager > Project > Create.
- Set the Project name to
monkeytypeand select your working folder as its Path. - In the Compose Source options, use the editor to create
docker-compose.yml, or upload a file with that name. Enter the complete configuration below, preserving the indentation.
services:
  monkeytype:
    image: themythologist/monkeytype:frontend-latest
    ports:
      - "5450:5000"
    restart: on-failure:5
The image line selects the historical frontend from the third-party publisher themythologist. The tag frontend-latest does not establish that it contains the current Monkeytype release. Its exact build version has not been verified.
The ports line connects NAS-side port 5450 to container-side port 5000. If 5450 is already in use, change only the left number to another unused NAS port and use that same number in your browser address. The restart: on-failure:5 setting retries a container that exits with an error up to five times. It does not update the software or promise startup after a NAS reboot; see Docker’s restart-policy documentation.
There are no credentials, startup environment variables, backend services, or application-data mounts to fill in for this recipe. A mount connects persistent storage to a location inside a container; no supported Monkeytype data location has been established for this image, so do not add a guessed NAS folder.
- Skip the optional Web Station portal for this direct-port trial. Review the summary, select Done, and choose to start the Project.
- Check the Project state and details before opening the browser address. If startup does not complete, work through the checks below.
How your browser reaches Monkeytype
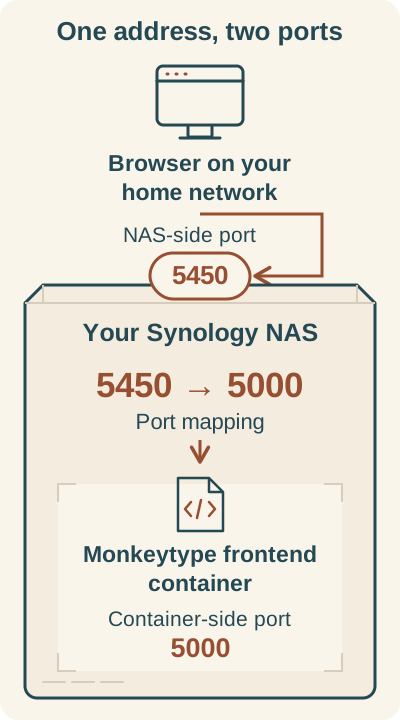
Connection schematic for the supplied historical mapping: NAS-side port 5450 forwards to container-side port 5000. If you choose another NAS-side port, use it in the browser address too. This is not evidence of a running installation.
In 5450:5000, the first number is the NAS-side port you put in the browser address. The mapping forwards the connection to port 5000 in the Monkeytype frontend container running inside your NAS.
Browser address: http://<NAS-local-IP>:5450. Substitute your NAS's actual local address and, if you changed it, your chosen NAS-side port.
Open the page and try a test
Complete these checks on your installation.
- From the computer on your trusted network, open the NAS address at port
5450, or the replacement port you selected. - If the frontend opens, complete a short typing test and look for the resulting speed and accuracy. A loading page alone is not the functional check.
- Change one visible preference, then reload the same address in the same browser. Record whether that preference remains.
- In Container Manager, select this Project and use Action > Restart. Refresh the same browser address and try another short test. Record the actual behavior of the preference and the typing test separately.
If the page is blank or reports a secure-context problem, use the recovery section below. Do not disable browser protections to make the trial continue.
What is saved?
The Project working folder holds the Compose configuration. The supplied recipe has no application-data mount or backend/account service, and it establishes no NAS-hosted typing-history database or backup procedure. A successful typing test does not establish those features.
Browser preferences are a separate question. Browser localStorage, where used, belongs to that browser and address, not a NAS folder. This old build's preference implementation is unverified; the reload and restart checks above let you observe its behavior. Clearing site data or changing the address may change which settings appear. Do not treat a preference surviving a restart as proof that typing history is stored on the NAS.
If something does not work
The Project does not start
Open the Project’s Details > Containers to identify its container. In Container Manager > Container, select that container, open Details, and use Log to inspect its events and status. If no container was created, keep the Project’s download/build error instead. These routes follow Synology’s container troubleshooting guidance.
If the image cannot be downloaded, check the exact image/tag text and network connectivity. If the publisher no longer provides the image, stop this procedure. If the error concerns CPU architecture, no compatible alternative architecture is established here; do not force one.
For a port conflict, choose an unused NAS-side port. Change the left side of 5450:5000, edit the Project through YAML Configurations, and redeploy with the new settings. Use the matching port in the browser URL.
The local address does not open
Check that the Project is running, that the address belongs to your NAS, and that the URL uses the NAS-side port from your configuration. If those checks do not resolve it, stop repeated attempts. Collect the exact error text, NAS address and chosen port, Project/container status, image tag, model and DSM version, and available logs before asking for help. For image download or startup issues, use the publisher’s support. Do not disable the firewall or broaden network access to continue.
If the frontend is blank or reports an error such as crypto.randomUUID, consider the secure-context requirement: current official self-hosting requires HTTPS outside localhost. A different NAS port does not resolve that requirement. Stop this historical trial, or treat the official documented HTTPS deployment as a separate project; do not assume one setting will repair the old frontend.
You expected an account or saved history
Account hosting and a NAS history database are outside this recipe's scope. Do not try to solve that gap by changing permissions on the Project folder or adding a guessed storage mount. A current official deployment would be a separate migration, not a replacement image line in this file.
Before changing the image
Keep a copy of docker-compose.yml and record the current image tag or available image identification before making changes. Reusing frontend-latest gives no promise of a newer Monkeytype build. Use a specific publisher tag or digest only after you have actually found and inspected it.
If you have a suitable reviewed replacement from that publisher, edit the image through the Project's YAML Configurations and redeploy with the new settings. Restart alone does not replace the image. Keep the current image until you have repeated the typing-test checks successfully. The current official Monkeytype stack is a separate deployment with its own requirements.
Stop or remove the trial
For a reversible undo, select the monkeytype Project and choose Action > Stop.
For removal, first copy the Compose configuration somewhere outside the Project folder. Review Synology's warning that Delete removes project data, and delete only this monkeytype Project when you are ready. Do not treat deletion as a backup step. Browser storage is separate from Project data.