

How to Install Neko on a Synology NAS and Open It Locally
Install Neko with Portainer on a Synology NAS, open its Firefox session on your home network, and check transferred files after a restart.
Eugene Gavrilov
9 min read- NAS & storage
Run Firefox on your NAS and open its session from a device on your home network. You will create one shared Neko room, connect to it, then transfer a small file and download it again after a restart to check its storage.
This walkthrough starts with working Portainer access to your NAS. It uses a trusted home network (LAN) and does not configure access from the internet. The procedure follows documented software behavior; it has not been tested on a physical Synology NAS.
Check the NAS and understand what runs where
Before continuing, have these ready:
- A Synology NAS with its supported Container Manager or Docker package installed. Check the supported-model information on Synology’s Container Manager package page for your actual NAS; the Synology name alone does not establish compatibility. Neko publishes Firefox images for 64-bit Intel/AMD and ARM.
- Administrator access to Portainer, already connected to the NAS's Docker Standalone environment. Portainer is the graphical tool used here to manage containers and their storage. Installing and connecting it is a prerequisite to this guide; use the official Portainer installation documentation if it is not ready.
- The NAS's local IPv4 address and a computer on the same trusted home network.
An image packages the application. A container is a running instance of that image. Your computer opens Neko's interface; Firefox itself runs in the container on the NAS. Neko sends its screen and controls between them using WebRTC. Everyone joining this installation uses the same shared room.
A volume is storage Docker manages separately from the replaceable container. Here, a volume named neko-downloads connects to /home/neko/Downloads, the folder Neko sees inside the container. You will find the volume's entry in Portainer, and copy its files through Neko's file-transfer feature. This recipe does not create a File Station shared folder.
Only that Downloads storage is retained by this configuration. Firefox profiles, bookmarks, cookies and signed-in sessions are not preserved across container replacement.
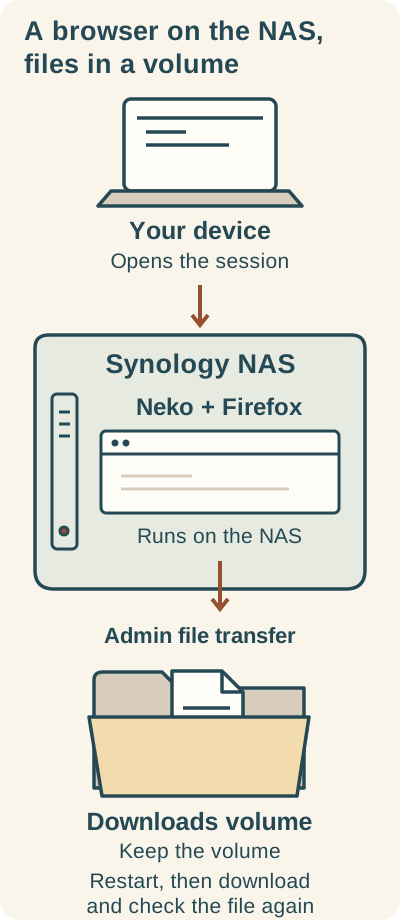
Neko runs Firefox on the NAS. Keep its Downloads volume, then check your transferred file after a restart.
Your device opens the shared browser session; Firefox runs on the NAS. The administrator file-transfer feature uses the Downloads volume. Keep that volume when replacing the container. Firefox profiles and signed-in sessions are outside this storage setup. Upload a test file, restart the container, download it again and compare its contents yourself.
Prepare the address, passwords and storage
A local IP address identifies the NAS inside your home network. A port identifies a service at that address: it is the number after the colon in a URL. A hostname is a readable name that resolves to an address; you do not need a hostname or public domain for this guide.
In DSM, open Control Panel → Info Center → Network and read the IP address for the home-network connection. Use its IPv4 address for NAS_IP. If several addresses appear, choose the reachable address on the same home network as your computer. Do not change the network settings. See Synology’s Info Center help.
For example, a NAS whose local address is 192.168.1.18 would use http://192.168.1.18:7343. Substitute your NAS's actual address. Use neither 127.0.0.1 nor a container's private address for a connection from another device.
This connection uses unencrypted HTTP. Keep it on your trusted LAN. Do not add router port-forwarding rules. If a NAS or network firewall applies, the client needs access to TCP port 7343 and the complete UDP range 52000–52100; restrict that access to your trusted LAN. Guest Wi-Fi isolation can prevent the connection.
Create the storage before deploying:
- Select the NAS environment in Portainer, then open Volumes → Add volume.
- Enter
neko-downloadsas the name and use thelocaldriver. - Leave NFS and CIFS disabled, then choose Create the volume. Dedicate this volume to Neko.
Choose two different strong passwords: one for regular users and one for the administrator. The administrator password gives access to file transfer in this setup, so keep it private. These settings are stored as plain text; protect saved configuration files and exports.
Create the Neko stack
A stack groups the application's container configuration. The YAML below describes that configuration; indentation is part of its structure. An environment variable is a named setting, such as a password or the NAS address.
- In the NAS's Docker Standalone environment, open Stacks → Add stack.
- Name the stack
nekoand select Web editor. - Paste this configuration.
services:
  neko:
    image: ghcr.io/m1k1o/neko/firefox:3
    restart: unless-stopped
    shm_size: 2gb
    ports:
      - "7343:8080"
      - "52000-52100:52000-52100/udp"
    volumes:
      - downloads:/home/neko/Downloads
    environment:
      NEKO_DESKTOP_SCREEN: "1920x1080@30"
      NEKO_MEMBER_MULTIUSER_USER_PASSWORD: "${NEKO_USER_PASSWORD}"
      NEKO_MEMBER_MULTIUSER_ADMIN_PASSWORD: "${NEKO_ADMIN_PASSWORD}"
      NEKO_WEBRTC_EPR: "52000-52100"
      NEKO_WEBRTC_NAT1TO1: "${NAS_IP}"
      NEKO_FILETRANSFER_ENABLED: "true"
      NEKO_FILETRANSFER_DIR: /home/neko/Downloads
volumes:
  downloads:
    external: true
    name: neko-downloads
The image and settings follow the documented v3 recipe and the download-volume configuration described here.
- In Portainer's environment-variable fields, add these names and supply your own values. Do not leave them blank.
| Name | Value to enter |
|---|---|
NAS_IP | Your NAS's actual local IPv4 address |
NEKO_USER_PASSWORD | Your chosen regular-user password |
NEKO_ADMIN_PASSWORD | Your different administrator password |
Portainer substitutes these values into the ${…} references in the YAML.
Before deploying, understand the remaining groups:
- Image and restart:
:3follows the v3 major release and can change within that major; it is not an exact version pin.unless-stoppedcontrols restarting while respecting a manual stop. - Screen and memory:
1920x1080@30is the example desktop setting.shm_size: 2gballocates shared-memory space; it does not mean a NAS with 2 GB of total RAM meets a tested requirement. - Connections: host TCP port
7343reaches Neko's internal port8080for its page and connection setup messages. The UDP range carries the browser's media connection and must matchNEKO_WEBRTC_EPRexactly, including port numbers.NEKO_WEBRTC_NAT1TO1advertises your NAS's reachable LAN address. - Storage and transfer:
external: truerefers to the volume you already created. The mount and file-transfer directory point to the same Downloads location. These transfer settings do not enable website downloads inside Firefox; its default browser policies restrict file access and downloads.
Choose Deploy the stack. Open its container details and check its running state and logs. A running container is the first checkpoint; you still need to check the actual browser and files.
Open the browser session
- On your computer, open
http://YOUR-NAS-IP:7343, replacingYOUR-NAS-IPwith the address entered asNAS_IP. - Enter a display name of your choice and your administrator password.
- Inside the NAS-hosted Firefox screen, enter
https://neko.m1k1o.net/in Firefox’s address bar and confirm the page changes. Use the address bar inside the shared screen, rather than the address bar of the computer browser displaying Neko. A loaded login page alone does not establish that the WebRTC connection works.
Transfer a file, restart and download it again
This check uses Neko's administrator file-transfer area, separate from downloading a website's file inside Firefox. It lets you check the retained Downloads volume without changing Firefox's browser policies.
- On your computer, create a small plain-text file named
neko-check.txt. Put an identifying sentence in it, such as “This is my Neko storage check.” - While signed in to Neko as administrator, find its file-transfer controls. Use the upload function to select
neko-check.txtfrom your computer. The goal is to see that filename in Neko’s transfer file list. See the official file-transfer documentation for the feature; this guide does not assume a particular icon label. - Use the transfer download function for that listed file to download it back to your computer, then open the downloaded copy. Check the sentence.
- In Portainer, open Containers, select the Neko container and use its restart control.
- Reconnect to Neko, sign in as administrator and download
neko-check.txtagain. Open the new copy and compare its contents.
The desired result is the same readable file after the restart. Perform this check yourself before relying on storage; no successful transfer or restart on your NAS is implied by this guide.
If the upload is denied
A new volume may need its Downloads directory assigned to Neko's documented user. Use this remedy only for the dedicated volume created above.
- In Portainer, open Containers → your Neko container → Console.
- Select shell
/bin/shand userroot, then choose Connect. This opens a command box inside the container. - Run this one command:
chown 1000:1000 /home/neko/Downloads
- Choose Disconnect, then retry the upload.
The command assigns the mounted Downloads directory to Neko's numeric user and group. If uploads still fail, inspect the container logs before changing permissions further.
Keep copies, update or undo the installation
Before changing or removing the installation, download the transfer files you need to your computer and open them to check the copies. Save the Compose configuration and environment values privately. A backup of Portainer's own settings does not include this workload volume.
To put copied files back, upload them through Neko's administrator file-transfer area into the retained volume or a new dedicated deployment, then check their contents. This copies transfer files; it does not restore a Firefox profile.
For a deliberate update, record the old image reference and configuration, use the official image and tag guidance to choose a published exact patch tag for the Firefox image. In Stacks → neko → Editor, change the image reference and select Update the stack. Keep neko-downloads, then repeat the browser and file checks. If you need to roll back, reapply the previous image reference and configuration with the volume retained, and check again. An exact recorded tag makes the version reproducible; the mutable :3 tag alone does not.
To remove Neko:
- Stop the stack from its details page.
- In Stacks, select its checkbox, choose Remove and confirm.
- Keep the external
neko-downloadsvolume until you have checked your file copies. Removing that volume separately deletes its stored data.
If a checkpoint fails
- Deployment fails: check the stack configuration and container logs, including image compatibility with the NAS's architecture.
- The page cannot be reached: check the NAS address, TCP port
7343and applicable firewall rules. If you changed the host TCP port, use the changed port in the URL. - The page opens but no working Firefox screen appears: check
NAS_IP, the complete matching UDP range, firewall access and browser WebRTC restrictions. The official Neko troubleshooting guide covers deeper diagnosis. Keep troubleshooting within the LAN; router forwarding is not required for this procedure. - The file cannot be uploaded: follow the narrowly scoped permission check above. If the file is missing after restart, check that the configuration still mounts
neko-downloadsat the file-transfer directory before relying on it.
Keep a private record of your local URL, image reference, stack configuration and volume name. Finish with a responsive browser session and the repeated file download check.