

Install NetAlertX on a UGREEN NAS and check your home network
Install NetAlertX through Portainer on a UGREEN NAS, protect local login, configure scanning, and verify saved data after a restart.
Eugene Gavrilov
10 min read- NAS & storage
Use NetAlertX to build an inventory of devices on your home network. This guide installs it through Portainer, keeps its configuration and database in a NAS folder, and finishes with a restart check.
This is a documentation-based procedure, not a report of a physical UGREEN test. The UGREEN Files workflow comes from the supplied September 2026 guide; the container configuration follows the maintained project's documentation checked on November 4, 2026. Menu names may differ on your installed software.
Before you finish, perform these checks yourself:
- Open the dashboard on your local network.
- Sign out and confirm your password is required.
- Restart the app and confirm a saved comment remains.
An unfamiliar device needs identification; its presence alone does not prove an intrusion.
Have these details ready
You need a UGREEN NAS with working Docker support, a storage volume, administrator access, and Portainer already connected to the NAS Docker environment. Check Docker availability through the NAS App Center and your model's documentation; UGREEN's Docker setup guide explains supported-model setup. If Docker or Portainer is unavailable, complete that setup first; do not assume every UGREEN model supports this procedure.
Write down the NAS's local IP address—the numeric address used to reach it from home, for example 192.168.1.50. This example is illustrative. You will also need the network's subnet and the NAS interface connected to it when configuring scanning. Scan only a network you administer.
An image supplies the application; a container runs it. The stack below describes its settings. A bind mount connects a real NAS folder to a folder inside the container. The configuration uses host networking, so the app shares the NAS network rather than receiving a separate container address.
Keep access on your private network. Do not add router forwarding or publish this service through a public domain for initial setup. HTTP does not encrypt traffic; a password does not turn HTTP into HTTPS.
The app and its saved data have different lifetimes: the container runs the app, while the mounted NAS folder retains your configuration and database. Restart the container and compare a saved change to check that connection.
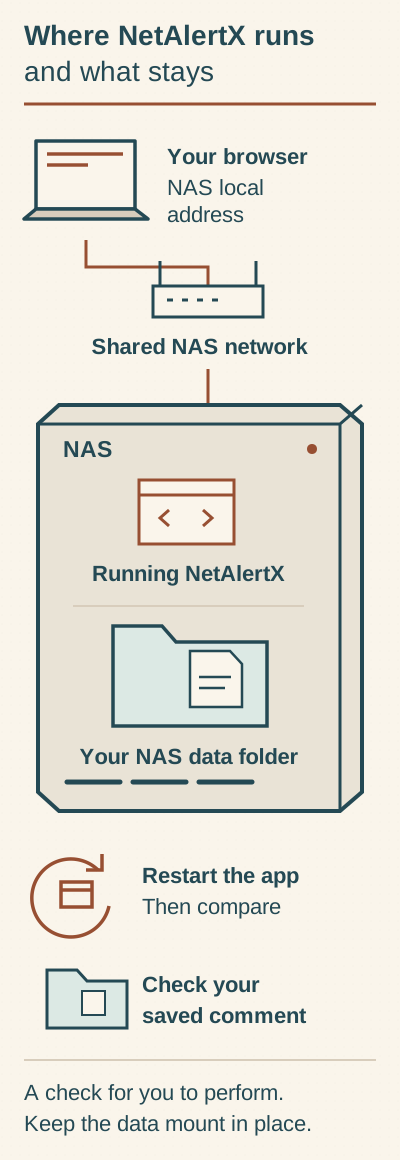
The container runs NetAlertX; the NAS folder stores its data. Restart the app, then check that your saved comment remains.
Text alternative: Open NetAlertX using the NAS local address and configured app port. The container runs the app. A persistent mount connects its data to your NAS folder. Save a device comment, restart the app, and compare the comment with the value you recorded.
Create the persistent folder
In UGREEN Files, open the existing docker shared folder. Create netalertx, then data inside it. Within data, create config and db as sibling folders. Use these exact lowercase names to match the configuration. The supplied guide uses /volume1/docker/netalertx/data; confirm the actual full path on your NAS rather than assuming its volume number. If the file interface does not expose the absolute path, have the NAS administrator identify it before deployment; do not guess.
| Location | Purpose |
|---|---|
NAS example: /volume1/docker/netalertx/data | Folder you keep and back up |
Container: /data | App view of that same folder |
Give your NAS administrator account read/write access to this dedicated app folder through the NAS folder permissions controls. That lets you manage files, but it does not prove the container can write them: Linux ownership is a separate check. NetAlertX normally uses numeric user and group IDs 20211:20211.
Start with the normal startup provisioning in the stack below. If its logs report permission denied, stop the container. An administrator who uses SSH can apply the following ownership correction on the NAS, after confirming this is the dedicated NetAlertX folder. Replace the example path if yours differs:
sudo chown -R 20211:20211 /volume1/docker/netalertx/data
The recursive option changes ownership of this folder and everything inside it. Never substitute the entire shared docker folder or a storage-volume root. Restart and inspect the logs again. If you do not use SSH, have the NAS administrator perform this exact folder-specific correction; do not grant everyone write access to the whole share. If a NAS ACL still denies the app, resolve that ACL on the same dedicated folder with the administrator.
Add the Portainer stack
Select the Docker environment that runs on the NAS in Portainer. Open Stacks → Add stack, name it netalertx, and use the web editor. Read the settings below before pasting the configuration.
A port selects one service at the NAS address: the web port opens the dashboard, and the backend port serves the app API. An environment variable is a named setting supplied to the app. latest is a moving image tag; unless-stopped is the automatic restart policy.
This uses the maintained image namespace. latest is a moving tag, not a fixed release. The recipe deliberately omits host sysctl changes; the official Portainer example also omits them. Do not copy a build-only image reference from the repository's developer Compose file.
/data:rw keeps app data writable while read_only protects the rest of the container. ro makes the timezone mount read-only. tmpfs supplies temporary working space; it is not your backup. The six capabilities allow scanning and startup ownership/user setup without enabling blanket privileged mode.
PORT selects the web port; GRAPHQL_PORT selects the backend port. LISTEN_ADDR: 0.0.0.0 listens on NAS interfaces, so limit access through your network/firewall. There is no ports: mapping because host networking uses host ports directly. If a port is occupied, select a free value for the affected environment variable and redeploy. Use the chosen web port in your URL.
| Setting | What it does / what to change |
|---|---|
image | Application download reference; keep the maintained namespace. latest changes over time. |
container_name | Gives the running app the name netalertx; keep it unless that name already exists. |
network_mode | Keep host for this local scanner recipe. |
read_only, cap_drop, cap_add | Keep these together: protect the app filesystem and grant specified runtime/startup abilities. |
First volumes entry | Replace only the NAS-side path before :/data:rw if your actual path differs. |
Second volumes entry | Shares NAS timezone read-only; keep it. |
tmpfs | Temporary writable runtime space with the documented identity; keep it. |
environment | Named values read by the app; keep defaults unless resolving a documented port conflict. |
restart | unless-stopped restarts the app automatically except when you deliberately stop it. |
Paste the following YAML into the web editor. Replace only the NAS-side path before :/data:rw if your confirmed folder path differs. Keep the remaining settings together.
services:
  netalertx:
    image: ghcr.io/netalertx/netalertx:latest
    container_name: netalertx
    network_mode: host
    read_only: true
    cap_drop:
      - ALL
    cap_add:
      - NET_RAW
      - NET_ADMIN
      - NET_BIND_SERVICE
      - CHOWN
      - SETUID
      - SETGID
    volumes:
      - /volume1/docker/netalertx/data:/data:rw
      - /etc/localtime:/etc/localtime:ro
    tmpfs:
      - /tmp:uid=20211,gid=20211,mode=1700,rw,noexec,nosuid,nodev,async,noatime,nodiratime
    environment:
      PORT: "20211"
      LISTEN_ADDR: "0.0.0.0"
      GRAPHQL_PORT: "20212"
    restart: unless-stopped
Select Deploy the stack. Deployment success is a first check, not proof that scanning works. In Containers → netalertx → Logs, look for startup errors before moving on.
Open the app and protect login
http:// starts a web connection without encryption. From the same private network, open http://192.168.1.50:20211, replacing the example address with your NAS address. The colon introduces the web port. No domain name or certificate is needed for this local HTTP check. Do not use localhost in your laptop browser: that would address the laptop itself.
Open Settings → Set Password, as named in the current plugin documentation. Enable password login, set your own strong password, and save. Store it in your password manager. The documented default is 123456; replace it if presented. Sign out and reopen the URL to verify that your password is required. The supplied guide's older Settings → System → Set password route may differ.
Tell NetAlertX which network to scan
A subnet is the range of network addresses to scan. In Settings, find SCAN_SUBNETS. Configure the subnet and the interface attached to it; the official documentation recommends the UI rather than editing the config file. For illustration only, a network 192.168.1.0/24 attached to interface eth0 uses the entry 192.168.1.0/24 --interface=eth0. Do not copy those values until you confirm they match your NAS network.
Find the interface in NetAlertX's System Info → Network Hardware. Obtain the subnet from your router's LAN settings or your network administrator. An IP address alone does not establish the subnet mask. Save, then allow the discovery process to run; the installation documentation suggests allowing 5–10 minutes initially.
If expected devices are missing, check the interface and subnet first, then firewall rules or isolated guest/VLAN networks. Host networking does not make every remote network directly scannable.
Check saved data before relying on it
Perform this check yourself; no physical NAS test result is implied.
- Choose a discovered device you recognize and open it.
- Add a harmless comment, such as “Persistence check”—an illustrative label. Save it and record its exact value.
- In Portainer, open Containers → netalertx and choose Restart. Restart only this app.
- Reopen NetAlertX and the same device, then compare the saved comment.
- Locate
configanddbunder the NASdatafolder you chose earlier.
If the comment disappears, inspect the mount path before entering more data. The app's container paths /data/config and /data/db must point to your persistent NAS folder. Do not enable ALWAYS_FRESH_INSTALL; it can reset configuration and database on startup.
Back up, update, or remove it
Back up. Before updating, record the running image digest/version from Portainer and save the stack configuration. Stop NetAlertX and copy the entire data folder to a separate backup location, then start it again. Include both config and db. A device CSV alone does not include historical data.
Update. Read the project's release notes and migration instructions before pulling a newer image and redeploying your stack with the same data path. A fixed release tag or digest makes later recreation more predictable than latest; record the exact reference you actually use. Recheck login, discovery and saved comments after updating.
Restore the matching backup. For rollback, stop the new container, preserve its data separately, and restore the pre-update folder together with its matching recorded image version. The project recommends restoring on the same app version used for the backup because database definitions can change. A downgrade against a newly migrated database is not a substitute for restoring the matching backup.
Remove the app. To uninstall, stop and remove this stack in Portainer. Keep the NAS data folder and backup until you decide you no longer need them.
Optionally delete data. Delete the retained folder and backup separately only when you intend to erase your inventory and history.
If setup fails
- Docker or Portainer is missing: complete setup for your supported model before using this recipe.
- The stack is rejected: recheck YAML indentation and the actual mount path; inspect the error before altering permissions or privileges.
- Image cannot download: confirm NAS internet/DNS access and the exact maintained image name above.
- Permission denied: use the dedicated-folder ownership procedure, then check the NAS ACL. Administrator file access and container ownership are different.
- Page will not open: check container logs, NAS address, chosen web port, and local firewall. A port conflict needs an environment-variable change, not a host-port mapping.
- Page opens but devices are missing: verify
SCAN_SUBNETS, interface, host mode and network reachability. - Password forgotten: preserve the data folder and consult the official password plugin recovery note; ask the NAS administrator to help with configuration recovery.
- Login menu differs: follow the current Set Password documentation, not an older screenshot.
For unresolved errors, collect the image version, relevant startup log lines, and your subnet/interface configuration, removing passwords and other private details. Consult the official troubleshooting material and project issues. Optional notifications and integrations can wait until discovery and persistence pass your checks.