

Install Plex on a UGREEN NAS and Check Hardware Transcoding
Install Plex with Portainer on a supported Intel UGREEN NAS, map persistent folders, verify hardware transcoding and plan backups and updates.
Eugene Gavrilov
12 min read- NAS & storage
Set up Plex to read movies already stored on your UGREEN NAS, open the server on your home network, then check whether a video that Plex converts during playback uses hardware acceleration. Finish by restarting Plex and checking that the library and settings remain.
This guide follows current LinuxServer Plex documentation, Plex requirements and UGREEN guidance checked on November 4, 2026. The procedure has not been tested on a physical NAS.
Check your NAS before starting
This route starts after Docker and Portainer are available. It includes a short SSH session to read account IDs and check the graphics device, plus permission checks in UGOS. If you are not ready to use a terminal or cannot identify the required host folders, complete those prerequisites with UGREEN support before starting the stack. Preparation and the first library scan take different amounts of time; generate the four-minute claim token only when everything else is ready.
Plex serves an existing personal movie library. Transcoding converts video when playback requires a different format or quality. A Docker image supplies the software; a container runs it. A bind mount connects a NAS folder to a path the container sees. Hardware assistance requires compatible hardware and a supported conversion, rather than simply enabling a checkbox.
Before continuing, confirm that you have:
- A Docker-capable UGREEN NAS running current UGOS Pro. Install Docker from UGOS App Center on a supported model.
- A supported Intel Quick Sync processor and an existing graphics device under
/dev/dri. The checks below establish device availability. - An active Plex Pass on the server owner's account.
- Working Portainer managing Docker Standalone on this NAS. If it is absent, complete its official Linux installation before starting this guide.
- A movie folder you can read and a dedicated configuration folder you can write to.
DH2300 is not officially Docker-supported. DH4300 Plus and AMD GT models do not use this Intel path. Verify your exact CPU and model before continuing.
Use a computer on the NAS's home network and the NAS's actual local IP address. A port is the numbered service endpoint on that address. This guide uses Plex port 32400 with host networking, so Plex shares the NAS address. Use the local address below; leave public remote access for a separate setup. Its http:// prefix means the browser connection does not use HTTPS encryption. Keep this first check on your trusted home network. Host networking itself does not limit access to the LAN; retain local network firewall/access controls and leave Plex Remote Access disabled. Stop a previous Plex installation occupying that port before continuing.
Give Plex access to two NAS folders
In UGOS File Manager, create a separate folder for Plex configuration. Identify the existing movie folder, and note both full absolute NAS paths. A display/share name alone is not sufficient. Use the actual absolute location from your own NAS, rather than a copied /volume1 example. If you can only find a display/share name, obtain the corresponding host path from UGREEN support before deploying; do not guess. Grant the selected NAS account read/write access to the configuration folder and read access, including directory traversal, to the movies folder. Check these permissions in UGOS; don't grant everyone write access or change the entire media tree merely to make a container start.
Find your NAS account IDs and graphics device
PUID and PGID are the numeric identity of a NAS account, not a Plex username or password. Never copy someone else's numbers. To obtain IDs, temporarily enable SSH in UGOS Control Panel > Terminal. Restrict it to the local network and note the configured SSH port. Open Windows Terminal/PowerShell or macOS Terminal on your computer. Enter ssh -p PORT USERNAME@NAS_IP, replacing those three names with the configured port, your NAS administrator username and NAS local IP. Check that the first host-key prompt belongs to this NAS, then enter the NAS password; the password stays invisible. These are instructions to fill real connection values, not a command to paste literally.
At the NAS shell, before using sudo/root, run:
id
ls -l /dev/dri
Take the number after uid= for PUID and after gid= for PGID. These refer to the logged-in NAS account; if using another account for folder access, run id followed by that account's actual name instead. Use IDs from the NAS, not from your laptop. The device listing must show existing graphics devices; their names and numbering vary. If /dev/dri is missing or no graphics devices appear, stop and resolve model/firmware/driver availability with UGREEN support. Do not invent device nodes or assume card0/renderD128 exists. These commands read information; they do not enable missing hardware.
Prepare the stack, then generate the claim token
Before deploying, confirm how the folder names connect:
| Stored on your NAS | Plex sees | Access |
|---|---|---|
| Your existing movies folder | /movies | Read-only |
| Your dedicated Plex configuration folder | /config | Read/write |
The configuration folder stores the server database and settings; it does not replace the original movie folder. A folder mapping gives a stored folder another name inside Plex. Keep these two NAS folders when replacing the running container.
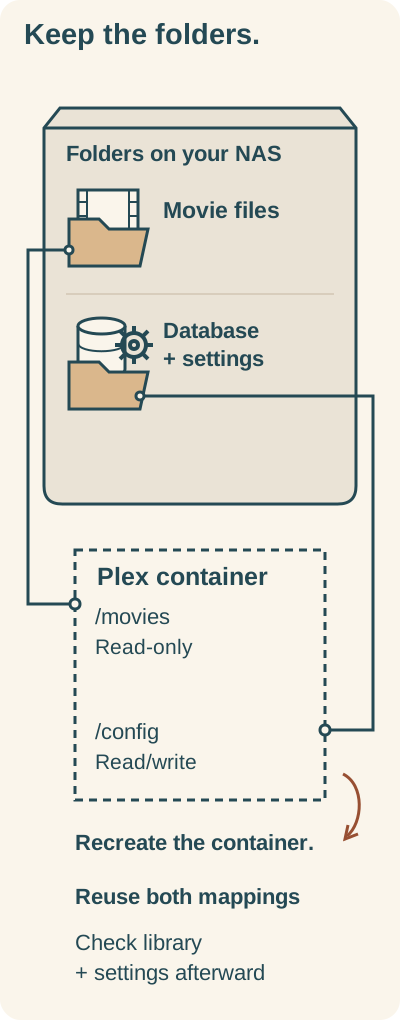
Keep the NAS folders and reuse both mappings when recreating the Plex container; check the library and settings afterward.
Text alternative: Your NAS stores the original movies and Plex configuration in separate folders. Plex reads them through /movies and /config. Recreating the container can keep this data when the same folders and mappings are retained; check the library and settings afterward.
A stack is the saved description Portainer uses to create this Plex container. Its Compose file is the YAML configuration shown below. Environment variables are named settings: Portainer uses the values you enter to fill the matching ${...} entries in that file.
Use Portainer's Docker Standalone environment for this NAS. Choose Stacks > Add stack > Web editor and give the stack a unique descriptive name, such as plexhw. In the environment-variable section add these values from your NAS. No example IDs are safe substitutes.
| Variable | Actual value to enter |
|---|---|
| NAS_PUID | NAS uid number discovered above |
| NAS_PGID | NAS gid number discovered above |
| PLEX_CONFIG | Full absolute path of the existing configuration folder |
| PLEX_MOVIES | Full absolute path of the existing movie folder |
Paste this Compose configuration. The ${...} expressions are Portainer/Compose variables, not unfinished article placeholders. They deliberately refuse empty required values. Do not deploy until all four variables have real values, the two folders exist, permissions are checked and /dev/dri exists. If Portainer rejects required interpolation or long bind syntax, stop and check the Docker Standalone environment/version; do not remove these checks to bypass the error.
services:
  plex:
    image: lscr.io/linuxserver/plex:latest
    container_name: plex
    network_mode: host
    environment:
      PUID: "${NAS_PUID:?Enter the NAS user ID}"
      PGID: "${NAS_PGID:?Enter the NAS group ID}"
      TZ: Etc/UTC
      VERSION: docker
      PLEX_CLAIM: "${PLEX_CLAIM:?Generate a fresh Plex claim token}"
    volumes:
      - type: bind
        source: "${PLEX_CONFIG:?Enter the existing config folder path}"
        target: /config
        bind:
          create_host_path: false
      - type: bind
        source: "${PLEX_MOVIES:?Enter the existing movies folder path}"
        target: /movies
        read_only: true
        bind:
          create_host_path: false
    devices:
      - /dev/dri:/dev/dri
    restart: unless-stopped
| Setting | Purpose |
|---|---|
image and VERSION | The documented LinuxServer image supplies Plex. latest is a moving tag; VERSION: docker uses the software shipped in that image. |
container_name: plex | A local name used by the restart and inspection commands. It must be unused. |
PUID / PGID | The selected NAS account's IDs and permissions. |
TZ: Etc/UTC | A valid neutral timezone; you may leave UTC. |
/config and /movies | Persistent configuration with write access, and your movies read-only. create_host_path: false catches missing source folders. |
/dev/dri | Access to existing graphics devices. LinuxServer handles device-user permissions inside the container. |
network_mode: host | Plex shares the NAS address. No ports section is required. |
restart: unless-stopped | Return after Docker restarts, except when deliberately stopped. |
Prepare everything above first. Sign in at https://www.plex.tv/claim/ and obtain a new token. Add PLEX_CLAIM in Portainer's variable section and deploy within four minutes. The token is a credential; keep it out of screenshots and shared Compose files. Select Deploy the stack. Wait for the container to run, then inspect its logs if it stops. A deployment request being accepted is not the same as a running, usable Plex server. If the token expires before first start, generate a fresh one, replace the variable and update/redeploy the stack.
Open Plex locally and add a movie library
Open http://NAS-IP:32400/web using the NAS's actual LAN address, not the literal NAS-IP text. Sign in as server owner, name/claim the server, and add a Movies library. Browse to /movies inside Plex; the original UGOS path is outside the container's view. Finish setup and wait for a movie you own or are permitted to use to appear.
After the server is claimed, remove the PLEX_CLAIM line from the Compose environment section and its token variable in Portainer. Update the stack without re-pulling the image, retaining all folder mappings. This clears the one-time token from your saved setup; it does not require a fresh claim for an already claimed server.
Check whether Plex uses hardware
In the server's Settings > Transcoder, show advanced settings, enable Use hardware acceleration when available and Use hardware-accelerated video encoding, and save. The server owner needs Plex Pass. There is no need to prescribe Super fast background processing or HDR tone mapping for this first ordinary video check.
Direct Play sends a movie without video conversion, so successful playback alone does not test hardware transcoding. Play your chosen test movie, then lower player quality below its source resolution to force a video transcode. Open Activity > Dashboard and expand the Now Playing details. Check for (hw) beside the video conversion. If transcoding occurs without (hw), check Pass, the processor/graphics device and format support. Passing one file does not guarantee every codec, subtitle or HDR workload.
Restart Plex and check that the library remains
Restart the chosen container in Portainer's container controls, or from your NAS SSH session run sudo docker restart plex; sudo requires your authorized NAS administrator password. Reopen Plex and confirm the library, sample and settings remain. Confirm the configuration files are in the recorded host folder. The restart policy concerns return after Docker restart; it does not replace this persistence check or repair permissions.
Fix the first thing that fails
- Page won't open: check NAS LAN address/32400/web, running container, logs, local network/firewall and whether another Plex already occupies the host port. Do not add a port mapping to fix host networking.
- Empty library: check that real movies exist in the host source and
/movieswas chosen inside Plex; check NAS-account IDs and folder read/traversal permission. - Startup permission/device error: check configuration write permission and existing /dev/dri; don't grant privileged mode or fabricate card numbers.
- Unclaimed server: use owner account and a fresh four-minute claim token; check logs without sharing credentials.
- Library or settings disappear after restart: compare the recorded configuration host path with the stack source mounted at
/config, and check configuration write access. Keep existing folders while investigating; do not replace the configuration with an empty folder. - No
(hw): force an actual transcode; check owner Pass, Intel support/device visibility, advanced options and the video's format.
Back up before updating
Before pulling an update, save the image reference for the Plex container you are actually running. Reconnect to the NAS through SSH if needed. Run these two lines in that NAS shell:
plex_image_id=$(sudo docker inspect --format '{{.Image}}' plex)
sudo docker image inspect "$plex_image_id" --format '{{range .RepoDigests}}{{println .}}{{end}}'
The first line stores the running container's image ID in a temporary shell variable. The second prints registry references for that exact image, rather than looking up today's latest tag. Copy the complete line for the LinuxServer Plex repository, including its name, @sha256: and all digest characters, into a private maintenance note. Do not copy the image ID from the first line or only the short hash. If the command fails, prints nothing, or you cannot identify the Plex reference, stop before updating and obtain help; do not invent a digest. These inspection commands do not pull an update.
Save the Compose file and nonsecret Portainer values with that reference. Stop Plex in the container controls and copy the entire recorded host configuration folder to a separate backup location. Preserve the original movies separately. Restart Plex if you postpone the update.
To update now, use Portainer's stack Editor and Update the stack with image re-pull. Repeat the library, hardware and restart checks. latest may now identify a different image; your saved repository-and-digest line identifies the previous one.
To reverse a failed update:
- Stop the new Plex container and preserve its configuration separately for diagnosis.
- Restore the matching pre-update configuration copy to the recorded configuration host folder, retaining the selected account's access. Keep the same
/configand/moviesmappings. - In Portainer's stack Editor, replace the entire value after
image:with the complete previous repository-and-digest line saved above. Keep it as one line; do not append it to:latest. Select Update the stack to recreate Plex from that reference. Docker usesrepository@sha256:digestinstead of a tag to select an exact image. - Recheck library visibility, playback and persistence. If the recorded image is unavailable or Plex still fails, retain both configuration copies and seek help rather than resetting the library.
A new Plex release can alter its database, so switching only the image back is not guaranteed to work. This recovery plan needs both the saved image reference and its matching configuration backup; it is not a promise that arbitrary downgrades succeed.
Remove Plex while keeping your files
To uninstall, use Portainer Stacks, tick this stack, Remove and confirm. Keep both mapped NAS folders and backups unless intentionally deleting their data. A removed container can be recreated against retained configuration and media; never confuse removal with a data cleanup.
Exit the SSH session with exit and disable SSH in Control Panel > Terminal once the checks are complete. Plex does not need the SSH service to remain open. Keep the first deployment local; remote access is a separate task.
You have completed the local setup when Plex opens at the NAS address, your sample appears and plays, the library remains after restart, and you can find the configuration folder. A separate (hw) indicator during a forced video transcode establishes hardware use for that stream.
If prerequisites remain uncertain, consult UGREEN's knowledge center for model and folder access and Plex's hardware guide for video-format requirements.