

Try RustFS on Synology: A Local S3 Storage Setup
Create a local RustFS trial in Synology Container Manager, map persistent folders, upload a sample object, and check it after restarting.
Eugene Gavrilov
11 min read- NAS & storage
If you want to explore S3-compatible storage on your NAS, start with a disposable file. RustFS gives compatible applications an S3 endpoint: a network address for storing and retrieving objects. An object is a file plus information about that file, grouped in a bucket. Use this walkthrough to create a small local trial through Synology Container Manager, upload a disposable file, and check it after a restart.
This is a source-grounded procedure, not a report of a physical NAS test. RustFS's own storage guidance strongly recommends XFS and individually exposed disks, and advises avoiding Btrfs and ext4. A normal Synology shared-folder deployment does not establish that those requirements are met. Keep this installation for evaluation with files you can replace; use the official deployment planning guidance before entrusting important data to it. Do not reformat NAS disks to follow a Linux tutorial.
Check the NAS before creating anything
Sign in to DSM, the NAS operating system, with an administrator account. In Control Panel, open Info Center and record the model and installed DSM version. In Package Center, search for Container Manager. Install the compatible version offered for this NAS. If the package is unavailable, stop and consult Synology's model compatibility list; an image supporting ARM does not make every ARM Synology model compatible. Container Manager's Project interface is available from DSM 7.2, with newer package releases requiring newer DSM versions.
RustFS documents at least 2 GB RAM for a test environment. Leave additional memory for DSM and existing services; a NAS with only 2 GB installed may not have that much available. Production figures are substantially larger and differ between official pages: the common Linux prerequisites say 128 GB minimum, while the hardware guide includes a 64 GB entry configuration. Neither is a promise that a small NAS is suitable for production.
One local data path is enough for the single-node single-disk trial used here. RustFS adds no erasure-code redundancy in this mode. Four disks are not a universal prerequisite for trying RustFS, and creating several directories on one NAS volume does not create independent disks or servers. Keep another copy of every file you upload.
You also need free local storage, internet access to download the images, a computer on the same trusted network, and two unused NAS ports: 9540 for the browser console and 9541 for the S3 API. An IP address is the NAS's numeric address on the local network. A port is the number after the colon in an address. These are our chosen outside ports; RustFS listens on 9001 and 9000 inside its container.
Create the persistent folders
A Docker image is the packaged application. A container is a running instance of it. We will keep its files in NAS folders mounted into the container so replacing the application does not deliberately replace its data.
Use the console address to open the management interface in your browser. A compatible application sends S3 requests to the API address. The console also connects to that API to manage storage; if it needs a server address, use the API address as described below. The mapped NAS data folder connects to /data inside the RustFS container. These connections describe the local evaluation; check your sample after a restart and back up before removing the project.
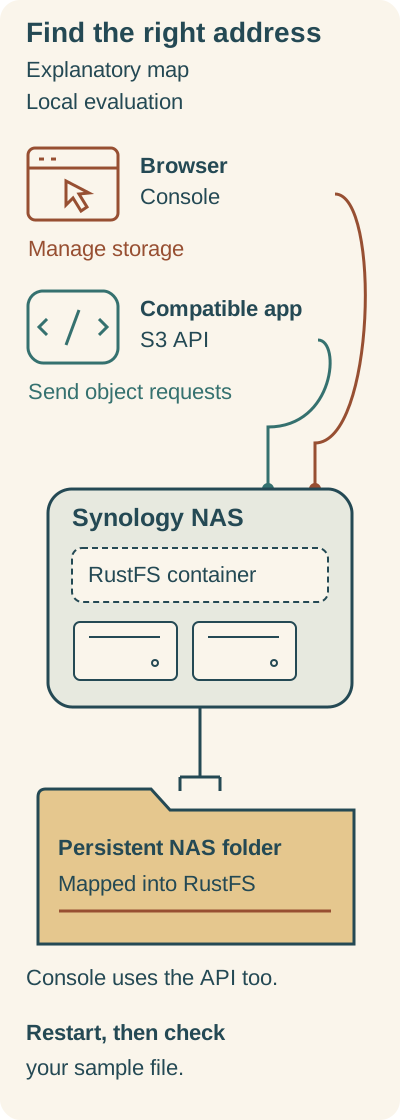
The browser console, S3 API and persistent NAS folder have different jobs.
Text alternative: Use the console address in your browser to manage storage. A compatible app uses the S3 API address instead; the console also connects to that API. RustFS uses the mapped NAS data folder. After restarting the container, check the bucket and sample file.
In File Station, open the docker shared folder. If it is absent, create a shared folder named docker through Control Panel → Shared Folder, on the local volume you intend to use. Create a folder named rustfs, then two empty folders inside it named data and logs. Do not use an existing folder containing unrelated files.
Before continuing, verify and record the full absolute NAS path to the new rustfs folder, including its volume. File Station's friendly docker/rustfs name alone does not establish this path. The example below assumes /volume1/docker/rustfs; use it only after confirming that the shared folder is on volume 1. If you confirm volume 2 instead, record /volume2/docker/rustfs and replace the /volume1/docker/rustfs prefix in all four bind-mount entries: the helper's data and logs mounts and the storage service's data and logs mounts. Keep the paths after the colons unchanged.
If you cannot establish the shared folder's actual volume and full path from your DSM interface, stop before creating the project and resolve it with Synology's documentation or your NAS administrator. This walkthrough does not establish a version-specific DSM path-discovery sequence. Do not guess a volume number or mount an NFS share for RustFS data.
Create the project
Open Container Manager → Project → Create. Enter rustfs as the project name and select the docker/rustfs folder as its working path. Choose the option to create a Compose file in the editor. Compose is a text description of the container settings. Leave the optional Web Station web portal disabled.
The configuration defines two services. rustfs-permissions is a short-lived helper that prepares the two empty folders. rustfs is the storage application and stays running after the helper finishes.
Each environment variable is a named application setting. The table explains the settings before you paste them; the edits immediately below the configuration identify the values to replace.
| Setting | What it does |
|---|---|
RUSTFS_ACCESS_KEY, RUSTFS_SECRET_KEY | Set the RustFS login credentials. |
RUSTFS_ADDRESS, RUSTFS_CONSOLE_ADDRESS | Set the internal API and console ports. |
RUSTFS_CONSOLE_ENABLE, RUSTFS_CONSOLE_CORS_ALLOWED_ORIGINS | Enable the browser console and identify its permitted browser origin. |
| Logger settings | Choose the log detail level and folder inside the container. |
volumes | Map a real NAS path on the left of the colon to a path inside the container on the right. |
ports | Specify the NAS address, outside port and inside port, in that order. |
restart | unless-stopped restarts the storage application unless deliberately stopped; "no" lets the helper finish once. |
Paste this configuration, preserving its indentation:
services:
  rustfs-permissions:
    image: alpine:3.24.1
    user: "0:0"
    volumes:
      - /volume1/docker/rustfs/data:/fix/data
      - /volume1/docker/rustfs/logs:/fix/logs
    command: ["sh", "-c", "chown 10001:10001 /fix/data /fix/logs && chmod 750 /fix/data /fix/logs"]
    restart: "no"

  rustfs:
    image: rustfs/rustfs:1.0.4
    depends_on:
      rustfs-permissions:
        condition: service_completed_successfully
    user: "10001:10001"
    environment:
      RUSTFS_ACCESS_KEY: "REPLACE_WITH_YOUR_ACCESS_KEY"
      RUSTFS_SECRET_KEY: "REPLACE_WITH_YOUR_RANDOM_SECRET"
      RUSTFS_ADDRESS: ":9000"
      RUSTFS_CONSOLE_ADDRESS: ":9001"
      RUSTFS_CONSOLE_ENABLE: "true"
      RUSTFS_CONSOLE_CORS_ALLOWED_ORIGINS: "http://192.168.1.50:9540"
      RUSTFS_OBS_LOGGER_LEVEL: "warn"
      RUSTFS_OBS_LOG_DIRECTORY: "/logs"
    command: ["/data"]
    volumes:
      - /volume1/docker/rustfs/data:/data
      - /volume1/docker/rustfs/logs:/logs
    ports:
      - "192.168.1.50:9541:9000"
      - "192.168.1.50:9540:9001"
    restart: unless-stopped
Before deploying, make these edits:
- Replace all three
192.168.1.50values with the NAS's actual local IPv4 address, found in Control Panel → Network → Network Interface. Keep this address stable using your router's DHCP reservation setting. Binding to that address selects the published NAS address; it does not authenticate visitors or block routed networks. - Replace both credential placeholders. Use a unique access key and a password-manager-generated random secret, for example 32 letters and digits. For this first setup, letters and digits avoid Compose interpolation and quoting surprises. These are RustFS credentials, separate from your DSM login. Store them in your password manager. The Compose file contains the secret, so keep its folder and DSM administrator access private.
- Confirm the folder paths match your NAS. The first short-lived service changes ownership of only the two new directories to RustFS's numeric user, 10001. It does not grant everyone write access, and the application itself runs without root privileges. This follows the official permissions-initialization pattern.
The explicit image tag keeps this project from silently following latest. RustFS 1.0.4 is the latest release identified in the official release list on November 4, 2026. Its versioned build files support AMD64 and ARM64. Registry availability for that exact tag was not independently confirmed during preparation; if the pull fails, inspect the official image tags and release notes rather than substituting an arbitrary image.
Finish the wizard and start the project. Wait for the image downloads and startup to complete. The permissions container should finish with exit code 0; that is expected. The RustFS service should remain running. If either fails, open its logs before continuing.
Open RustFS and save a sample object
On your computer, open http://NAS-IP:9540, replacing NAS-IP with the same address used above. This walkthrough uses HTTP only inside a trusted local network. Do not create router port-forwarding rules or expose the console through a public hostname. HTTPS encrypts browser traffic and requires a certificate; external access needs a separate secured design.
Choose Key Login and use the access key and secret from the Compose file. If the console requests a server address or cannot reach RustFS, open its Server Configuration or /config page, set the service address to http://NAS-IP:9541, and save after its health check succeeds. Port 9540 opens the interface; port 9541 serves S3 requests.
On the Buckets page, select Create Bucket, name it rustfs-test, and create it. Open the bucket, choose Upload File/Folder, select a small disposable file from your computer, then Start Upload. Confirm the object appears and download it back through the console. Open the downloaded copy and compare its contents with the original. UI wording may vary with the bundled console version.
For an additional API reachability check, open http://NAS-IP:9541/health. A successful HTTP response checks that endpoint; it does not prove that uploads work, so complete the file test too.
Check persistence before adding more files
In Container Manager, select the rustfs project and use Action → Restart. When the service is running again, reopen the console, sign in if needed, and download the sample object again. Its contents should match. This is a check for you to perform, not a result observed on our hardware. If the bucket or sample is missing, stop adding data and follow the missing-data checks below before changing or removing the project.
In File Station, locate docker/rustfs/data and docker/rustfs/logs. RustFS manages the contents of data; do not rename, edit, or delete internal files there. An S3 bucket is not an ordinary shared folder to maintain manually. If File Station refuses to show the contents after the ownership change, do not grant broad permissions just to browse them; use the console for objects.
Troubleshoot in this order
- Image will not download: check NAS internet access, the exact repository and tag, and the model's processor architecture. An unsupported image manifest is not fixed by changing folder permissions.
- Permissions service fails or RustFS reports permission denied: compare every mount path with the new folders. Check the permissions container's log and DSM shared-folder ACLs. Do not switch the RustFS service to root or apply
chmod 777to the shared folder as a shortcut. - Address already in use or cannot assign requested address: check that the configured IP belongs to this NAS and that the host ports are free. If you change 9540 or 9541, also update the browser address, CORS origin, and console server configuration accordingly.
- Login fails: verify Key Login, the S3 server address, and the two RustFS credentials. Changes to environment values require redeploying/recreating the service; an ordinary restart keeps its existing container configuration.
- Container stops or NAS becomes slow: read its logs and Container Manager's resource statistics. Check free memory and disk space. Stop the trial if the NAS cannot spare the documented resources.
- Upload fails or the object never appears: check that the RustFS service remains running and read its logs. Check the API health endpoint described above, then confirm that the console is using
http://NAS-IP:9541for the same NAS and that you have opened the intended bucket. A healthy endpoint alone does not establish a successful upload. Resolve reported path or permission errors using the folder checks above, then retry only with the disposable sample. - Bucket or sample is missing after restart: stop adding data. Confirm the console is connected to the same S3 endpoint and check the service logs and API health. Compare the saved Compose configuration with the current project: the storage service must still map the original NAS
datafolder to/data, and both services must still reference the same originaldataandlogsfolders. Preserve those folders, the configuration and the relevant logs while investigating; do not delete or reinitialize them. These checks may identify a configuration mismatch; they do not promise recovery.
For help, retain the image version, DSM/package versions, and relevant logs. Remove passwords, tokens, and private object names before sharing them with RustFS's GitHub community or Synology support.
Update, stop, or remove it safely
Before updating, export any objects you want to keep and verify those copies. Save a private copy of the Compose configuration and credentials. For a consistent folder-level backup, stop the project before backing up its data; keep the backup outside this project's folder. A restart check is not a restore test.
Read the target RustFS release notes, download the corresponding image, then change the image: value through the project's YAML Configurations editor and deploy the changed project. Keep both bind mounts pointing to the same folders. Repeat the login, upload/download, and restart checks. Do not assume changing back to an older image can reverse a data-format change; consult the release's compatibility guidance and preserve the pre-update backup.
To pause, use Project → Action → Stop. To uninstall, first export anything needed, stop the project, and preserve an external copy of its folders and configuration. Synology describes Delete as deleting containers and project data, so do not assume it preserves a directory selected as the project path. Read the confirmation dialog before removing the project. Delete leftover data and logs folders only when you intentionally want to discard the stored objects. Keep Container Manager installed if other applications use it.
Documentation used
This local procedure combines Synology Project management with RustFS container instructions. Check the RustFS filesystem and memory prerequisites, production hardware guide, Console guide, and release notes for the limits described above. The environment and log-path choices are also grounded in the 1.0.4 container definition. Fact IDs in this review draft resolve to the accompanying fact registry; they are editorial annotations.