

Install SearXNG on Synology with Container Manager
Install SearXNG on Synology with Container Manager, open it on your home network, preserve configuration, and plan updates and removal.
Eugene Gavrilov
9 min read- NAS & storage
Put a SearXNG search page on your Synology NAS and open it from a device on your home network. This guide uses a Container Manager Project, keeps configuration in a folder you can find, and includes checks before and after a restart.
SearXNG sends your searches to other search engines and combines their results; it needs an internet connection. Running it at home does not guarantee anonymity: outgoing searches use your instance's internet address. This installation uses unencrypted HTTP between your browser and NAS. Keep it on a trusted home network without router port forwarding or public access.
The browser address opens the running application. A separate NAS folder holds its configuration and cache. Preserve that folder when replacing the application.
Your browser opens the app; its configuration stays in a NAS folder
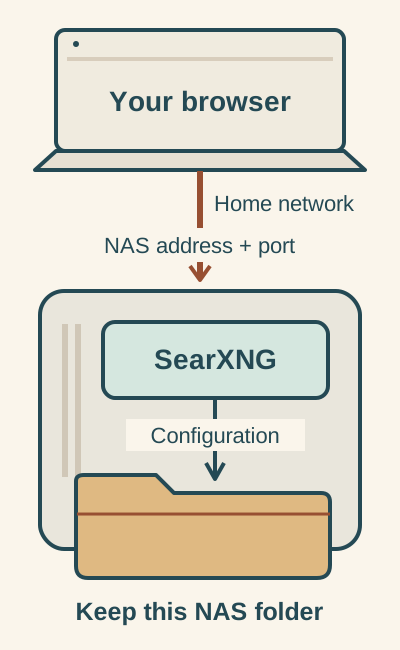
The browser address opens the running app. The mapped NAS folder holds its configuration.
Text alternative: Your browser connects to the NAS address and the chosen host port. SearXNG runs in the Project. Its configuration directory maps to the NAS folder you choose.
1. Check your NAS and prepare the folders
This procedure covers DSM 7.2 or later with Container Manager available for your NAS model. Open Package Center, find Container Manager, and install it if necessary. You need an administrator account able to create folders and Projects. If the package or Project interface is unavailable, stop and check support for your exact model and DSM version.
In File Station, open the existing docker shared folder. Choose Create → Create folder and make a folder named searxng. Inside it, create two folders: config and data. If there is no docker share, have an administrator create a dedicated shared folder first.
Right-click the searxng folder in File Station and choose Properties → General. Copy the Location folder path. For example, it might be /volume1/docker/searxng; your volume or share name may differ. Keep this full path in your notes; use your own volume and folder names in the Project's Path field.
An image packages the application; a container runs it. We will connect ordinary NAS folders to directories inside the container. That connection is a bind mount: the files stay in the NAS folders when the container is replaced.
2. Create the settings file
On your computer, open a plain-text editor and paste the following. Use your password manager to generate a new secret with at least 32 random letters and digits, then replace REPLACE_WITH_YOUR_NEW_RANDOM_SECRET before saving. Keep the quotation marks.
use_default_settings: true
general:
  instance_name: "Home NAS Search"
server:
  secret_key: "REPLACE_WITH_YOUR_NEW_RANDOM_SECRET"
  limiter: false
  public_instance: false
Save the file as exactly settings.yml, not settings.yml.txt. In File Station, upload it into searxng/config. Check its name and location before continuing.
use_default_settings retains SearXNG's defaults while applying these overrides. instance_name gives us a recognizable server setting to check later. SearXNG uses this secret internally; it does not create a login. Protect it and any backup containing it.
Use these settings for this home-network setup. public_instance: false is a configuration choice, not an access restriction. A public service needs a separate deployment design.
3. Create the Project
Open Container Manager → Project → Create. Enter:
- Project Name:
searxng. - Path: the actual
searxngfolder prepared above. - Source: the option to create
docker-compose.ymlwith the editor.
Paste this complete Compose file. Compose is the text recipe defining the image, ports, storage and restart behavior.
services:
  searxng:
    image: docker.io/searxng/searxng:latest
    restart: unless-stopped
    ports:
      - "5147:8080"
    volumes:
      - ./config:/etc/searxng
      - ./data:/var/cache/searxng
The values mean:
imageselects SearXNG's documented image.latestcan change over time; record the working image before an update.5147:8080sends NAS port 5147 to SearXNG's internal port 8080. The left number is the one you will type in your browser../configand./datarefer to folders beneath the Project Path. They store server configuration and application cache respectively. Both must be writable by the container.unless-stoppedallows automatic restarts after interruptions while respecting a deliberate stop.
The port mapping listens across the NAS's host addresses; it does not enforce home-network-only access. Use it on a trusted network without public forwarding. If you need to bind one NAS LAN interface, use "192.168.1.100:5147:8080" instead, replacing the example IP with your NAS's actual LAN IP. If that IP changes, you must update the binding.
Skip the optional Web Station portal, review the summary, choose Done, and start the Project when prompted.
4. Open your search page
In DSM, open Control Panel → Info Center → Network. Read the IP address for the NAS connection to your home network. Use that IP in the address below. On a computer connected to the same trusted network, open:
http://NAS-LAN-IP:5147
Replace NAS-LAN-IP with your NAS's actual local IP address. For illustration, a NAS at 192.168.1.100 would use http://192.168.1.100:5147. The IP identifies the NAS; the number after the colon identifies this service. Do not use DSM's management port or add /webman.
A domain is a name pointing to an address. You do not need a domain or certificate for this initial local HTTP setup. Typing https:// instead will not enable encryption on this HTTP port.
Check: look for the SearXNG page and the name Home NAS Search. Try an ordinary query, such as Synology documentation. A successful search checks the page and outbound search connection at that moment; it does not verify every engine.
5. Check what survives a restart
In Container Manager, select the Project and choose Action → Restart. Reopen or refresh the page, check that Home NAS Search remains, and try another search. In File Station, confirm that config/settings.yml and the data folder remain in your Project folder.
This is your server-configuration persistence check. Cache files may appear as features use them; an empty cache folder immediately after setup is not by itself a failure. Browser preferences are different: SearXNG saves them in cookies, so a remembered browser preference does not verify your NAS backup.
These are checks for you to perform. This documentation-based procedure has not been tested on physical Synology hardware.
6. Update or remove deliberately
Before updating
Use Project → Action → Stop. Copy the entire Project directory—including config, data and docker-compose.yml—to a backup outside the Project, preferably on another device. Protect it because it contains your secret.
Also preserve the working image: open Image, select the SearXNG image, and choose Action → Export. Record its image/version information and keep the export with the backup.
Read upstream migration notes before choosing a newer image. For repeatable deployments, replace latest with an actual version tag or digest verified in the upstream registry. Do not copy a dated tag from a documentation example and assume it is current.
Recreating replaces the running container using your saved configuration. Restart alone does not update the application. Keep both folder mappings unchanged.
For a pinned image reference:
- Record the old exact reference and choose a verified newer version after reading migration notes.
- Open Project, select
searxng, and go to Action → Details → YAML Configurations to locate the image setting.
For the latest reference used in this guide:
- Preserve the old image export before downloading a replacement: the same
latestname can identify a different image later. - Choose a verified version tag for the replacement and locate the image setting through the same YAML Configurations route. Image → Action → Update only downloads an image; it does not prove that the running container changed.
Before changing the image: consult Synology's Project procedure for deployment through YAML Configurations. The documentation confirms this route but does not specify the final save/recreation dialog for every package version. These steps prepare the update; they are not a complete click-by-click replacement procedure. If your interface does not clearly offer deployment of the changed configuration, stop and obtain package-specific guidance before proceeding. Once the container has been recreated with the selected image, repeat the page, search and instance-name checks.
If an update fails, stop the Project and preserve a separate copy of the failed state. Recovery requires the old image plus its matching pre-update folders and YAML. Restore those together before redeploying the old image; do not point an older version at changed data blindly. Import an exported image through the Image page if needed. Seek help if a removal/import dialog is unclear. This is a recovery plan, not a tested restore.
Stop or remove
For a temporary pause, use Action → Stop; use Start to resume.
To remove this installation:
- Stop
searxngand copy its entire Project directory to a backup outside that directory. Check that the backup includes the YAML,config/settings.ymlanddata. - In Project, select
searxngand choose Action → Delete. - Before confirming, read the removal dialog: Delete removes the Project's containers and project data. Treat the mapped
configanddatafolders as potentially removable, and rely on the external backup—not folder survival. If the dialog does not make the affected paths clear, cancel and consult Synology's Project help or Synology support before confirming.
Do not delete other applications' folders or uninstall Container Manager while other applications use it.
If something fails
Container Manager is missing
Check support for the exact NAS model and DSM version. This guide does not apply as written when the package is unavailable.
The image will not download
Check NAS connectivity, available storage and clock settings. Read the download error for registry access, DNS or rate-limit problems before changing the recipe.
The Project rejects the file or reports a port conflict
Preserve YAML indentation with spaces and keep the port mapping quoted. Check the Project Path points to the folder containing config and data. If NAS port 5147 is already allocated, choose an unused host port—for example, 5148—while keeping the internal port 8080. Use the new host port in your browser too.
The container stops or keeps restarting
Open Container → Details → Log. Check for settings, missing-folder or permission errors. Verify the exact settings.yml filename, indentation, secret replacement and folder mappings. For permission errors, inspect the app's mapped folders and upstream ownership guidance; do not make the whole docker share writable by everyone.
The browser cannot open the page
Check that the Project/container is running, then verify the actual LAN IP, published host port and network reachability. Use http:// for this setup.
The page opens but searches fail
Check engine errors and the NAS's outbound internet access. One unavailable search provider does not mean the entire installation failed. When asking Synology or the SearXNG project for help, include versions and relevant logs with secrets removed.
Record your local URL, Project name, actual folder path and working image reference together. Those details will help you find this installation again when you need to maintain it.