

Install SparkyFitness on a Synology NAS with Portainer
Install SparkyFitness with Portainer, configure private settings and NAS folders, open it on your home network, and check a saved entry after a restart.
Eugene Gavrilov
12 min read- NAS & storage
Run SparkyFitness on your NAS and open it from a browser on your home network. It records nutrition, exercise, water and health information. Save a first diary entry, then check that it survives stopping and starting the app. This guide uses the project's current Compose file and your own generated secrets. It is a source-grounded installation procedure, not a report of a tested Synology installation.
Before you start
You need a Synology NAS with Docker or Container Manager available for your model, administrator access to DSM, and Portainer already installed and connected to that NAS's Docker Standalone environment. If Portainer is missing, complete the official Portainer installation instructions before continuing. A Swarm environment is outside this guide. Do not assume every Synology model can run these images; an image architecture error is a reason to stop and check support.
Your DSM administrator manages the NAS; the SparkyFitness account you create later is a separate account. Note your NAS model and DSM version before starting, so you can supply them if an image or container feature is unsupported.
Work from a computer on your trusted home network. Find the NAS's local IP address in DSM's network settings or your router's device list. This is its address inside your home. A port is the numbered entrance for an app at that address. For example, if your NAS has address 192.168.1.50, the browser address used below is http://192.168.1.50:3004. Use your actual address. localhost means the computer running your browser, so it is usually wrong here. Keep the NAS's address stable with a router address reservation if available.
No public domain, DDNS, router forwarding or certificate is needed for this initial browser check. A domain is a readable name for an address; an HTTPS certificate lets your browser verify the named server and establish an encrypted connection. This HTTP setup is for a trusted LAN only. Mobile releases and features such as passkeys require HTTPS; set up HTTPS before accessing your records remotely.
A Docker image is the packaged software; a container is a running instance. Compose describes the related containers in one file, and Portainer calls their deployment a stack. An environment variable is a named setting passed into that deployment. The official file connects the browser-facing frontend, application server and PostgreSQL database.
1. Give the data a permanent home
This procedure assumes your container setup already has a docker shared folder. If it is missing, pause and have your NAS administrator create a suitable dedicated shared folder before continuing. In DSM File Station, open that folder and create sparkyfitness. Inside it, create postgresql, backup and uploads. Right-click the new parent folder, open Properties → General, and copy its Location path; on a volume named volume1 it may be /volume1/docker/sparkyfitness. If yours differs, use your real path throughout. Do not reuse an existing application's database folder.
The three folders have separate jobs: postgresql holds the live database, uploads holds uploaded images, and backup receives exported backups. The existence of the backup folder alone does not mean a backup exists. A bind mount connects each NAS folder to a container directory so recreating a container does not require discarding its data.
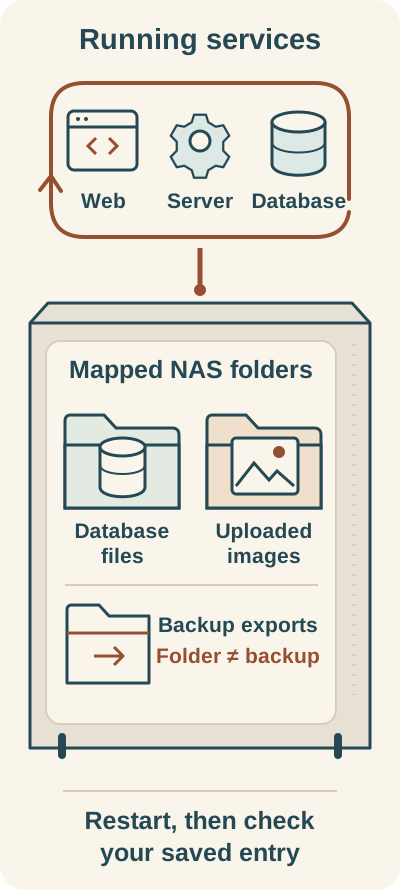
Conceptual view of the services and their mapped NAS storage. Check your saved entry after a restart; a mapped folder is not itself a backup.
SparkyFitness runs web, server and database services. Its mapped NAS folders retain the database and uploaded images; the separate backup folder receives exports. Restart the stack, reopen your saved entry and check that it remains. The presence of a backup folder alone does not prove a backup exists.
2. Download the official Compose file
Open the project's current production Compose file and save it as docker-compose.yml on your computer. Make sure it is the YAML text, not a saved GitHub HTML page. Keep this exact downloaded file with your installation records.
The Compose file reviewed on 4 November 2026 uses PostgreSQL 18.3-alpine, a server and a frontend, with browser port 3004. Its source is the changing main branch and its app images use latest; this is not a pinned release. Do not combine it with an old PostgreSQL 15 folder or an older guide's mount location. Existing installations need the project's PostgreSQL upgrade procedure, not this fresh-install workflow.
3. Generate your private settings
Open the official environment-file generator. Start with Minimal. Set Application Access URL to the complete HTTP address you will open, using your NAS IP and port 3004. The generator's LAN IP shortcut is a starting point; replace its sample address with yours.
Let the generator create a fresh database password, API encryption key and Better Auth secret. Do not paste credentials from a blog. The API key must be 64 hexadecimal characters; the auth secret uses base64. Save these generated values securely and keep them unchanged during routine updates. Changing the auth secret can lock out accounts using two-factor authentication.
Enable Persistent Host Storage Paths and enter your actual absolute paths for DB_PATH, SERVER_BACKUP_PATH and SERVER_UPLOADS_PATH. With the illustrative volume1 parent above, these are /volume1/docker/sparkyfitness/postgresql, /volume1/docker/sparkyfitness/backup and /volume1/docker/sparkyfitness/uploads. Set TZ to your own time zone under server runtime, because it affects diary calendar days. Leave internal database host, port and application-role settings at their defaults.
Before deployment, use this field checklist. These are settings in the generator or Portainer, not terminal commands.
| Setting | What to do | What must stay consistent |
|---|---|---|
| Three service images | Start with the downloaded official file | After deployment, retain image identity records; latest can change |
SPARKY_FITNESS_DB_USER | Keep the supplied sparky default for a fresh install | The same value serves database and server |
| Database name and host | Leave official defaults | Internal hostname is sparkyfitness-db; this is not your NAS IP |
SPARKY_FITNESS_DB_PASSWORD | Keep the unique generated password | Preserve it after the first database initialization |
| Application database role | Leave optional role variables unset | The current server maintains this role automatically |
DB_PATH | Enter your absolute postgresql folder path | Host path maps to /var/lib/postgresql in this compose version |
SERVER_BACKUP_PATH / SERVER_UPLOADS_PATH | Enter the two absolute NAS folder paths | Retain both alongside database data |
SPARKY_FITNESS_FRONTEND_URL | Enter your actual browser URL | Protocol, NAS IP and port must match what you open |
| Frontend host port | Keep 3004 unless occupied | If changed, change frontend URL too |
| Internal server port | Keep 3010 | Frontend talks to the server inside Docker; do not publish another host port |
| Extra trusted origins | Leave unset for this single-address installation | Use the configured frontend URL consistently |
TZ | Select your local time zone | Diary days follow this setting |
| API encryption key / auth secret | Keep the fresh generated values | Back them up; never regenerate during routine updates |
SPARKY_FITNESS_DISABLE_SIGNUP | Keep false until intended accounts exist | Change to true and redeploy afterward |
Download the generated .env file. Review it before use: correct URL, three paths, time zone and newly generated secrets. Store it privately; it contains passwords in readable text. Do not put it in a public repository or a support screenshot.
4. Deploy through Portainer
Sign in to Portainer and select the Docker environment attached to your NAS. Open Stacks → Add stack, name it sparkyfitness, choose Upload, and select your downloaded docker-compose.yml. Under environment variables, choose Load variables from .env file and select the generated .env. Loading the YAML alone does not supply those private values.
Check the loaded values against the saved file. Keep the three internal services and their network as supplied; there is no need to publish the database or server separately. Leave optional Garmin services disabled for this first installation. Click Deploy the stack and allow the images to download.
Open the stack's container list. If a container keeps restarting, inspect its logs before changing settings. Wait for the database to become healthy and the application containers to run. A successful deployment message is only the start of your verification.
5. Open it and prove your data survives
On the same trusted LAN, open the exact URL saved in SPARKY_FITNESS_FRONTEND_URL. Register your own account promptly: current documentation says the first registered user becomes administrator. Complete any initial profile questions the app requires before opening its diary. The official feature index groups water tracking under Daily Diary: look for the hydration card and its quick-add drinks or container controls. Use one of those controls to record an amount for today; 250 mL is an illustrative test amount if your configured units offer it. Note the amount shown and today’s date. Refresh, return to the same day, and confirm that its water record or total still includes the amount. Current water documentation does not specify exact button labels; if you cannot find these controls in your version, stop at this checkpoint and consult the linked feature documentation or project support rather than assume the persistence check passed. These are checks for you to perform, not results we have observed.
In Portainer, open Stacks → sparkyfitness. The Stack details area provides the stack stop action; use it, then inspect the container list on that page and confirm all three services are stopped. To start them through documented individual controls, open Containers, select the database container and use its start action. Wait for database health before starting the server container, then start the frontend container the same way. The container-details guide shows where status and these controls appear. Do not remove containers during this check. Reopen the same address, sign in and confirm the entry remains. From Containers, open the database or server container and choose Inspect, then expand its mounts in the inspection tree: their source paths must match the NAS folders you chose. Find those folders in File Station, without editing database files. If data disappears, stop and resolve the mount mismatch before entering more records.
Once your intended users have registered, open Stacks → sparkyfitness → Editor → Environment variables, set SPARKY_FITNESS_DISABLE_SIGNUP to true, and choose Update the stack, retaining the same secrets and paths. If your Portainer version does not offer Editor for the uploaded stack, follow its version-specific editing instructions before changing anything; do not delete and recreate the stack as a workaround. Confirm existing users can still sign in. Keep the saved .env consistent with that change.
Prepare recovery before attempting an update
Treat this section as a maintenance preparation checklist, not a complete Synology restore tutorial. Finish a supported backup and restore plan before pulling replacement images. Until then, leave your working installation and its data in place. A restart check proves survival of that restart; it does not prove that a backup can restore your app.
Keep your exact downloaded Compose file and private .env. Record each container's configured image reference and image ID from its Portainer details/inspection. Retain any repository digest available from the corresponding image details as well; a container image ID and a registry repository digest are different identifiers. Keep the old local images and do not run image cleanup while preparing recovery. Saved latest text alone cannot select the original build later.
For a filesystem backup, PostgreSQL's official requirements require a stopped server and the complete database cluster. Stop the stack using the controls above and verify all three containers are stopped. Preserve the original postgresql, uploads and backup folders in place, together with configuration and secrets. Arrange a backup to separate storage that preserves ownership, permissions and every database file. A File Station ZIP download is not established here as such a backup. If your chosen tool cannot confirm those requirements, keep the stopped originals untouched and get qualified NAS/PostgreSQL support before proceeding.
Have that support help you verify a restore into a separate location with compatible images before relying on it. A registry repository digest, when available, can pin an image: entry using the actual repository name followed by @ and its saved sha256: digest. Use the real saved reference for each service; never substitute an image ID for a repository digest. Reusing only mutable tags is insufficient. Do not edit a working deployment just to experiment with recovery.
Before a future update, read the project's release notes and database migration guide. Update frontend and server together as required by the release, preserve secrets and paths, and repeat account and persistence checks. Changing a PostgreSQL major image alone does not upgrade its database files. This guide does not establish a tested Synology restore route, so do not begin that update until you have the recovery plan above.
If an update has already failed, stop all three services and leave the failed state intact. Do not overwrite its folders, initialize a fresh database there, change original credentials, or try older app code against a newly migrated database. Give support the saved pre-update configuration, image identities, backup inventory and redacted logs. Restoration must put a complete compatible pre-update data set, permissions, secrets and images together while stopped; keep both originals and the failed state until recovery has been checked. No restore was tested for this guide.
Stop, remove, or erase deliberately
Stopping through Stacks → sparkyfitness → Stack details leaves the installation available to start again. To remove its containers, first stop and verify all services as above. Then open Stacks, select only sparkyfitness, choose Remove, and confirm Remove, following the official removal guide. The absolute NAS paths in this guide are bind-mounted folders, separate from the containers; retain those folders and your configuration. Do not delete the folders in File Station as part of stack removal.
Deleting retained NAS folders is a separate, permanent erasure decision. Do that only after you intentionally choose to erase the records and have checked any backup you want to keep.
If something fails
| What you see | What to check first |
|---|---|
| Image cannot be pulled or has no matching manifest | Confirm internet access and the image's support for your NAS architecture. Do not substitute an unrelated image. |
| Port is already allocated | Another app uses 3004. Choose an unused frontend host port via SPARKY_FITNESS_FRONTEND_PORT, and update the access URL to match. Keep internal backend settings unchanged. |
| Page opens but login fails or reports an origin error | Compare the browser's complete address with the configured frontend URL, including HTTP/HTTPS and port. |
| Database authentication fails after editing settings | Restore the original DB credentials: editing environment values does not change an initialized PostgreSQL password. |
| Container reports permission denied | Check the reported NAS path and folder permissions. Do not give every user write access to your entire docker share. |
| Frontend runs but app requests fail | Inspect server logs and database health; keep the supplied internal server hostname rather than replacing it with localhost. |
These are diagnostic branches drawn from the configuration, not failures observed on a test NAS. For help, use the project's issue tracker with image references and redacted logs. Never attach your .env.