

Install Technitium DNS Server on a Synology NAS: A Beginner’s Guide
Install Technitium DNS Server with Synology Container Manager, open its local console, test one Windows DNS lookup and check settings after a restart.
Eugene Gavrilov
10 min read- NAS & storage
Run a DNS server on your NAS so you can see and manage the server answering name lookups. Open its control panel, then send it a test lookup from one Windows computer. DNS translates names such as example.com into addresses. You do not need a purchased domain for this trial. We will leave your router and everyday DNS settings alone.
This walkthrough uses Synology Container Manager’s Project interface. It is based on official documentation, with no physical NAS test claimed. It covers local DNS, not DHCP, clustering, public DNS or encrypted DNS setup.
You will check four things:
- The local dashboard opens.
- Your administrator password works.
- Saved account settings survive a restart.
- One computer receives a DNS answer from the NAS.
Opening the dashboard and sending DNS requests use separate connections. TCP and UDP are two ways of carrying network requests; DNS needs a port entry for each:
| From your computer | Destination on the NAS | Purpose |
|---|---|---|
| Browser | HTTP, TCP port 5380 | Manage Technitium |
| Explicit DNS test | TCP/UDP port 53 | Ask for a website’s address |
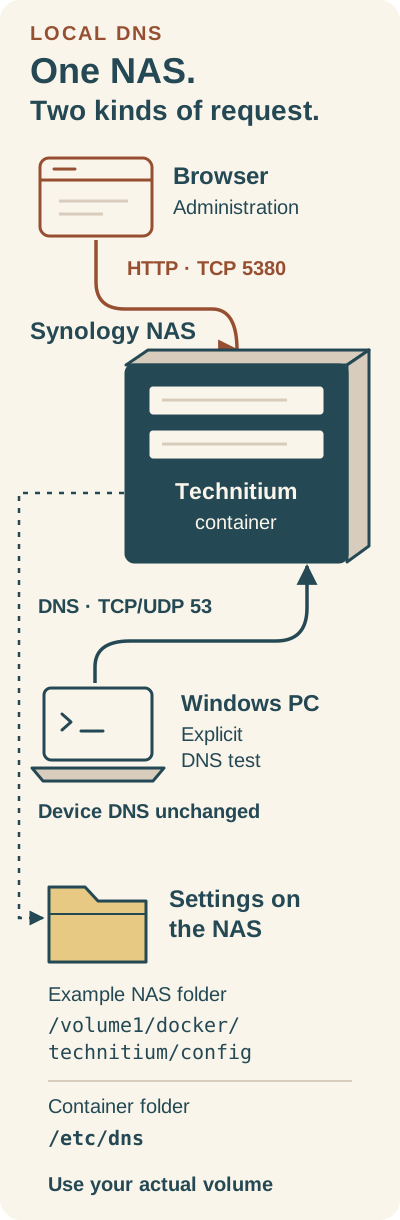
Illustration: administration uses HTTP on TCP 5380; the explicit DNS test uses port 53 with TCP/UDP mappings. Settings live in the mapped NAS folder.
The browser connects to the NAS admin console over HTTP on TCP port 5380. The explicit DNS test queries the NAS on port 53, which needs TCP and UDP mappings. Technitium stores settings in /etc/dns inside its container, mapped to /volume1/docker/technitium/config on the NAS in this example. Use the actual volume path for your NAS. The explicit test does not change the computer’s configured DNS.
Illustration: two connections to the same NAS. The running application stores its settings in the NAS config folder described below.
Check the NAS before starting
DSM (DiskStation Manager) is Synology’s management interface. Sign in with an administrator account. In Control Panel → Info Center → General, note your NAS model and DSM version. Check that Container Manager is offered in Package Center for that model. If it is, select its Install action, finish the package installation, then open Container Manager from DSM’s Main Menu and check that it has Project. If the package or Project is missing, stop and check Synology’s package page; do not install another model’s package to follow this guide.
You also need an existing writable shared folder named docker. If you do not have one, complete Synology’s shared-folder setup first, then return here. In Control Panel → Shared Folder, confirm which volume contains it. The example below uses volume1; a different volume needs a different path.
In Control Panel → Info Center → Network, find the IP address of the connection to your home network. Copy only the numeric address—for example, 192.168.1.20, without http://, a colon or a port number. A QuickConnect link or hostname is not the numeric address needed here. If multiple connections are listed and you cannot identify the one your computer uses, resolve that before continuing. Replace the example digits everywhere: in the YAML, browser URL and test command.
Use a stable address before relying on the server long-term. Keep the NAS and test PC on your trusted home network. Do not create router port forwarding or a public reverse proxy. Binding the ports to the local network address reduces exposure but is not an access-control rule: other networks routed to that address may still reach it.
Ports are numbered doors into a service. Technitium needs 53 UDP and 53 TCP for DNS and 5380 TCP for its browser console. Check whether another DNS service already uses 53, including an existing Pi-hole, AdGuard Home or Synology DNS Server installation. Do not blindly stop a DNS service your household depends on: preserve its configuration and plan the interruption first. Changing DNS to a random host port will not make it a normal client DNS service.
Create a home for its settings
- In File Station, open the writable docker shared folder established above.
- Create technitium inside it.
- Open technitium and create config inside it.
Check: find the new config folder again and compare its NAS path with the left side of the volume mapping below. This example assumes the resulting data path is /volume1/docker/technitium/config. If your shared folder lives on another volume, change the left side of the volume mapping below to match. The config folder must be new, dedicated and empty before the first start. If files already exist, stop and preserve them; use a different empty folder rather than deleting an earlier setup. Initialization values below do not override an existing configuration.
The image is the downloaded application package; a container is a running copy. Its configuration must live in the NAS folder so replacing the container does not mean starting with empty settings.
Create the project
Compose is a small settings file describing what to run.
- Open Container Manager → Project → Create.
- Name the project technitium.
- Choose the technitium folder as its working Path.
- Choose the Source option that creates Compose YAML in the editor.
Before pasting the configuration, prepare these three values:
- NAS local network address: replace every
192.168.1.20with the numeric address you found above. - NAS folder path: verify
/volume1/docker/technitium/configmatches the new empty folder, or replace it with its actual path. - Administrator password: replace
ChooseYourOwnLongPasswordwith a unique long password. Keep it inside single quotes and choose one containing neither a single quote (') nor a dollar sign ($). Compose can interpret dollar signs as variable substitutions; YAML quoting alone is not general protection against that. Store your password in a password manager. Anyone with access to the project configuration can also read it.
Paste the following into the editor and make those substitutions:
services:
  technitium:
    image: technitium/dns-server:latest
    hostname: dns-server
    ports:
      - "192.168.1.20:5380:5380/tcp"
      - "192.168.1.20:53:53/udp"
      - "192.168.1.20:53:53/tcp"
    environment:
      DNS_SERVER_DOMAIN: dns-server
      DNS_SERVER_ADMIN_PASSWORD: 'ChooseYourOwnLongPassword'
      DNS_SERVER_RECURSION: AllowOnlyForPrivateNetworks
    volumes:
      - /volume1/docker/technitium/config:/etc/dns
    restart: unless-stopped
| Field | Value in this recipe | Why it matters |
|---|---|---|
image | technitium/dns-server:latest | Selects the official application package. latest is a moving release label, not a fixed version. |
hostname / DNS_SERVER_DOMAIN | dns-server | Identify the server as dns-server; they do not register a public domain. |
ports | Your NAS address; 5380 TCP and 53 TCP/UDP | Each entry is NAS-address:NAS-port:container-port, then TCP or UDP. Both DNS entries are needed. |
DNS_SERVER_ADMIN_PASSWORD | Your unique password | Sets the initial admin password for a fresh configuration. |
DNS_SERVER_RECURSION | AllowOnlyForPrivateNetworks | AllowOnlyForPrivateNetworks limits recursive name lookups to private networks; it is not a guarantee that only your own devices can connect. |
volumes | Your config folder → /etc/dns | Connects the real NAS config folder on the left to /etc/dns inside the container. |
restart | unless-stopped | Requests automatic restart unless you stopped the container. |
Environment values initialize a fresh configuration only. Later, change saved settings through the application rather than assuming edits to these values will replace them.
Leave the optional Web Station portal disabled. Confirm the wizard summary with Done and choose to start the project. Allow the image download and startup to finish; no fixed waiting time is guaranteed.
Open the console
On the home computer open http://192.168.1.20:5380, substituting your NAS address. This is the application address, separate from DSM. HTTP is used in this local example; it does not configure HTTPS or encrypted DNS. Sign in as admin using your chosen password. Follow any first-run password-change prompt.
If you reused a populated config folder, the initial password variable will not overwrite the saved account. Do not delete the folder to fix a login problem.
Check: the dashboard opens and your chosen password gives you administrator access. If it does not, use the connection checks below. For a login rejection, check that you entered your chosen password and originally started with an empty config folder. Preserve existing files and ask for help through the Technitium issue tracker if access remains blocked; this guide does not reset an existing account.
Ask it one question
On a Windows 11 or Windows 10 computer, open Command Prompt from Start. Type the following, replacing the example IP:
nslookup example.com 192.168.1.20
This asks the NAS directly; it does not change the PC’s configured DNS. Look for the NAS address in the server section and an answer for example.com. Addresses can change, so do not compare against a fixed expected IP. A timeout is a failed check. An answer is a successful individual DNS lookup, not proof that every browser or device uses Technitium.
Check that settings survive a restart
Your initial account settings are the sample data for this check. Confirm that the config folder in File Station now contains files. In Project, select technitium and use Action → Restart. Reopen the console, confirm that the same password works, and repeat the lookup. These checks establish basic persistence for your installation. Stop if settings disappear and check the mapped path before entering more configuration.
Check: you can still use the same account after restarting, and the NAS still answers the explicit test query. If either fails, keep everyday DNS settings unchanged while investigating.
If it does not work
Package or Project is missing
Return to the model/package check above; do not force another model’s package onto the NAS.
Installation reports a port or folder error
For a port conflict, identify the owner of 53 or 5380 before changing anything. For a folder or permission error, verify the NAS path and access to that specific folder; do not grant broad access to all files.
Dashboard is unavailable
Confirm the project is running, the IP matches both the bindings and browser URL, and the computer can reach the NAS. If a firewall is enabled, check trusted-network access to TCP 5380 and both TCP/UDP 53; do not disable the entire firewall.
Login is rejected
Check your chosen password and whether the config folder was empty before the first start. Existing configuration is not overwritten by the password variable. Preserve files and use the Technitium issue tracker for help if you remain locked out.
DNS lookup fails
Check DNS ports, server logs and network restrictions separately from console access. The NAS/container needs working Internet access; without a configured forwarder, recursive lookups need access to external DNS servers. Opening more inbound ports will not fix blocked outbound DNS.
Settings disappear after restart
Stop entering more configuration and compare the real NAS folder with the left side of the mapping. Preserve any files already created while resolving the path or access problem.
Back up, update or undo
Back up
Before an update, save the project YAML, including its image reference. Stop the project and copy the config folder somewhere safe with File Station; treat it as private account and configuration data. Start the project again if you are only taking a backup. Keep that copy separate from the working folder.
Update
For updates, read the Technitium change log and follow Synology’s image update instructions for your installed Container Manager. Keep your configuration copy and saved YAML. A fixed published image tag identifies a chosen release; latest does not preserve the previous release for you. Do not assume that an older application can read settings changed by a newer one. After updating, repeat the console, lookup and restart checks before relying on it.
Undo
For the simplest undo, use Project → Action → Stop. The explicit test query changed no device or router settings, so there is no DNS configuration to revert. If you later direct devices to this NAS, restore their previous DNS settings before stopping it. Keep the config backup and folder until you are certain you no longer need them. Treat Clean/Delete as destructive: Synology’s documentation includes project data in deletion behavior, so do not use them as a harmless restart shortcut.
For further help use Synology’s Container Manager documentation and the Technitium repository’s issue tracker. Include your NAS model, DSM/package version, saved YAML image reference and exact error, with passwords removed.
Documentation used
The configuration follows the official Technitium Compose example, adapted to keep settings in a visible NAS folder and bind ports to the NAS local network address. The GUI steps follow Synology’s Project help. The explicit query follows Microsoft’s nslookup documentation. Documentation checked November 4, 2026. Backup restoration and version rollback have not been tested for this guide.