

Install Prowlarr on a Synology NAS with Portainer
Set up Prowlarr on Synology with Portainer, map its settings folder, open its local port, create a login, and check saved settings after restart.
Eugene Gavrilov
14 min read- NAS & storage
Run Prowlarr on your home network and keep its settings in a NAS folder. Finish by signing in again after a container restart and checking that your saved configuration remains.
Prowlarr manages indexers—the search services used to find torrent or Usenet results—for applications such as Radarr. A download client is a separate application that handles downloads. Installing Prowlarr does not also configure those services or applications.
Your finish line is three reader checks:
- Open Prowlarr through the NAS’s local address.
- Create your own login and sign in after restarting the container.
- Confirm a saved setting remains and locate the settings files on the NAS.
This is a documentation-based procedure, not a report of testing on a physical NAS. The acceptance checks below are for the reader to perform.
Before deployment
DSM is Synology’s NAS management interface. Check the exact NAS model and DSM version in its system information. Look for Container Manager in Package Center and check Synology's supported models and package requirements. Stop here if the package is unavailable for the NAS. Older documentation may call it Docker. The selected LinuxServer image lists x86-64 and arm64 support. Package availability alone does not prove image compatibility.
Have Container Manager installed and Portainer already connected to this NAS as a Docker Standalone environment—Portainer’s connection to this NAS’s container engine. Open that environment and verify its container list loads. Installing Portainer or repairing its connection is a prerequisite outside this Prowlarr stack. Also have a DSM administrator account for preparation and a computer on the same trusted home network.
The NAS’s local IP address identifies it on your home network. In DSM, open Control Panel → Info Center → Network. Record the IPv4 address for the LAN connection your computer uses to reach the NAS. Copy the NAS address, not its DNS server, subnet mask or gateway. Use this recorded value for SSH, NAS_LAN_IP, and the browser URL later. If several LAN interfaces are configured, use the one reachable from this computer; do not change network settings for this installation.
The pieces you will use have different jobs:
| Term | What it means here |
|---|---|
| Image | The packaged application used to create a container. |
| Container | The running instance of that application. |
| Stack | Portainer’s saved deployment recipe. |
| Environment variable | A named setting supplied to the recipe or application. |
| Bind mount | A connection between a NAS folder and a path inside the container. It keeps application data outside the container so it can survive replacement. |
You will supply the NAS folder and account details before deploying the stack.
Prepare the folder and account numbers
In File Station, create a folder called prowlarr inside the docker shared folder. Do not create a second docker folder inside the existing one. This new folder will hold Prowlarr’s configuration.
In File Station, right-click the newly created prowlarr folder and choose Properties → General. Copy the complete Location value. It identifies the actual volume and folder; use it as PROWLARR_CONFIG. If it already ends in /prowlarr, do not append the name again. /volume1/docker/prowlarr remains only an example: retain the volume number shown by your own NAS.
Choose the DSM user whose identity will own this application’s files. In File Station, right-click the new folder → Properties → General and select that user as owner. Under Permission, create an Allow entry granting that user Read and Write for this folder and descendants, then save. Keep this change within the new app folder; do not loosen access to the whole shared folder.
PUID and PGID are numerical account and group identifiers. Do not copy another person’s values. SSH is a temporary command connection to the NAS: you type a command in a terminal, a window that accepts text instructions. A port is a number selecting the service to connect to on a device. The SSH port below is separate from Prowlarr’s browser port later.
Use the NAS address you recorded above to find the account numbers:
- In DSM, open Control Panel → Terminal & SNMP → Terminal, enable SSH, note its port and apply. Keep this access on the trusted LAN.
- Open Terminal on macOS/Linux or Windows Terminal. Enter
ssh -p 22 [email protected], replacing22with the enabled SSH port,accountwith your DSM administrator login and the IP with your NAS address. The address is an illustrative example. Confirm you are connecting to your NAS before accepting a new host prompt. Enter the DSM password; characters may not appear while typing. - Type
id account, replacingaccountwith the DSM user selected for the folder. Read the number afteruid=as PUID and aftergid=as PGID. Do not use the additionalgroups=list. No root shell orsudois needed to read these numbers. - Type
exit, then disable SSH again in the same DSM panel if it was enabled only for this task.
Before continuing, you should have the folder’s full NAS path, the selected user's PUID and PGID, and the actual NAS LAN IPv4 address. If the folder path or account numbers are unknown, resolve them before deployment.
Deploy the Prowlarr stack
In Portainer, select the NAS environment, open Stacks → Add stack, name it prowlarr and select Web editor. Paste the recipe below. Its ${...} entries are Portainer variables, not text to replace in the editor. Supply them in the stack’s Environment variables section before deployment.
services:
  prowlarr:
    image: lscr.io/linuxserver/prowlarr:latest
    environment:
      PUID: ${PROWLARR_UID}
      PGID: ${PROWLARR_GID}
      TZ: ${PROWLARR_TZ}
    volumes:
      - "${PROWLARR_CONFIG}:/config"
    ports:
      - "${NAS_LAN_IP}:9696:9696"
    restart: unless-stopped
The image line selects LinuxServer’s Prowlarr package. latest tracks its stable releases; it does not pin this installation to one release. restart: unless-stopped uses the restart policy in the upstream recipe. The ${...} variables supply your own account, folder, time zone and NAS address.
Add these five variable names with values from your NAS:
| Variable | Value to enter |
|---|---|
PROWLARR_UID | Number after uid= from your account lookup |
PROWLARR_GID | Number after gid= from the same lookup |
PROWLARR_TZ | Etc/UTC, or your valid named time zone |
PROWLARR_CONFIG | Full folder path you created; /volume1/docker/prowlarr only if that is its real location |
NAS_LAN_IP | Actual LAN IPv4 of this NAS; no http://, port or slash |
The application sees /config; File Station shows the NAS side of the mapping. For example, when your actual folder is /volume1/docker/prowlarr, that folder holds the files the application writes to /config. Keep the same mapping when updating.
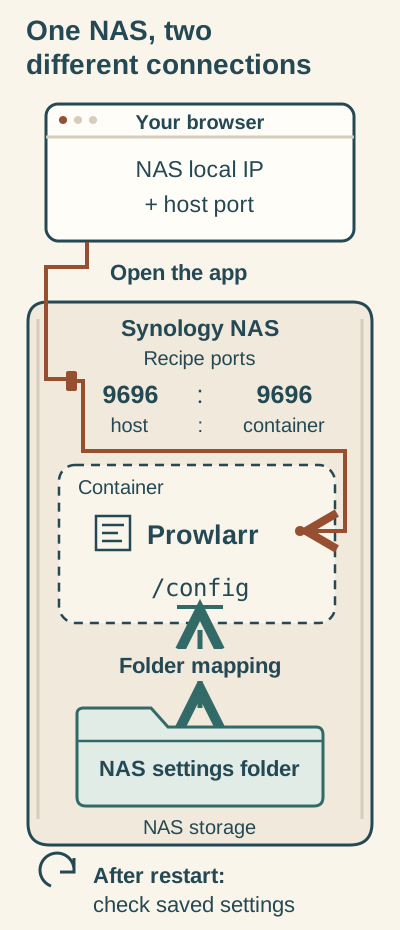
The browser uses the NAS host port. Separately, /config maps to your NAS settings folder. Check saved settings and the mapped files after restart.
Diagram in words: The recipe publishes NAS host port 9696 to container port 9696 at your recorded LAN IPv4. If you change the host port, use that value in your browser. Separately, PROWLARR_CONFIG supplies your actual NAS directory mapped to /config; /volume1/docker/prowlarr is only an example. After restarting, check the saved preference and the mapped NAS files. Restarting the same container alone does not prove survival of container replacement.
The folder mapping and the browser address have separate jobs: /config maps to stored settings, while the published host port takes your browser to the application. Restarting and checking saved settings is a first check. Also check for files in the mapped NAS folder as described below; restarting the same container does not prove that settings will survive container replacement.
The port expression means NAS address, NAS port, container port. With the illustrative NAS address 192.168.1.50, the browser URL is http://192.168.1.50:9696. If NAS port 9696 is already occupied, change only the middle port to an unused one, for example "${NAS_LAN_IP}:9697:9696"; then browse to port 9697.
An IP address identifies a device; the port selects the application on it. A domain is a name resolved to an address by DNS. This local IP setup needs neither a domain nor a certificate. HTTP provides no transport encryption: use the trusted LAN. Binding to a LAN address does not itself establish who may connect. Do not add router forwarding or publish this service through a public reverse proxy for this initial setup.
Click Deploy the stack. Open its container entry to check that it is running and inspect logs if it exits. A deployment acknowledgement alone does not establish that the web application works.
Open locally, create a login and check persistence
Browse to your actual NAS URL and chosen host port. For the first login setup, choose Forms (Login Page) and Authentication Required: Enabled. Set and securely record a unique username and password, then save. Keep authentication enabled on the LAN.
Check that your settings survive a restart before connecting another app.
- In Prowlarr, save a harmless display preference under Settings → UI and note the value.
- In Portainer, open the Prowlarr container entry and use its restart control. Restart the existing container with its folder mapping unchanged.
- Reopen your NAS URL, sign in as required and check the saved preference. In File Station, confirm that files exist in the folder mapped to
/config. If settings have disappeared, follow the checks below before replacing anything.
Optional: add an indexer
Open Indexers → +, choose a provider you are entitled to use and enter its requested account details. Use Test before saving. API keys, cookies and account details depend on the provider; deploying this stack does not create a provider account or subscription. If you save an indexer, you can also check that it remains after a restart.
Optional: connect an existing Radarr
Radarr must already work. An API key is a credential that permits an application connection; keep it private. Here you need the key from Radarr so Prowlarr can connect to it. In Prowlarr, open Settings → Apps → + and choose Radarr. The important directions are:
| Field | Meaning and illustrative value |
|---|---|
| Name | A label such as Radarr |
| Prowlarr Server | URL Radarr can reach for Prowlarr, for example http://192.168.1.50:9696 |
| Application Server | URL Prowlarr can reach for Radarr, for example http://192.168.1.50:7878 only if Radarr actually uses that NAS port |
| API Key | Radarr’s key from Radarr Settings → General, not Prowlarr’s own key |
Choose the sync level before saving: Full Sync lets Prowlarr control the corresponding managed indexer settings, and later manual changes to those settings in Radarr may be overwritten. Test, then save. Check Radarr for the synced indexer. Supported categories and any tags determine what can sync.
A browser being able to open both apps is only the first check: both containers need the appropriate connection in each direction. Inside a container, localhost refers to that container, not its neighbour or the NAS. Separate stack networks do not automatically share service names. A shared user-defined Docker network can provide name-based communication, but requires deliberately connecting both containers; the local NAS URLs above use published ports instead.
Download clients configured in Radarr remain there. Prowlarr’s own download-client setup serves searches initiated within Prowlarr and is not synced to Radarr.
Diagnose the first failed check
| Symptom | Next check |
|---|---|
| Stack cannot deploy | Check YAML indentation and that all five Portainer variables have values; check the error for a port/address conflict. |
| Image cannot start | Compare NAS architecture with image support and inspect container logs. |
| Permission error | Recheck folder path, selected owner, matching UID/GID and Read/Write permission. |
| Page does not open | Confirm the browser device is on the same trusted home network and the NAS IP is correct, then check running status and chosen host port. Examine network/firewall restrictions rather than opening public access. |
| Settings disappear | Inspect whether the same real NAS folder is still bound to /config; do not continue replacing containers until this is corrected. |
| Radarr test fails | Recheck both URLs, published ports and Radarr API key; inspect application logs. Do not change DSM Multiple Gateways as a blanket fix. |
Back up, update and undo
Keep a backup
In Prowlarr, open System → Backup, create a backup and download its ZIP to another device. Save the Portainer recipe and variable values separately. The app archive is not a replacement for the deployment recipe. For a file-level copy of the configuration folder, stop the container first, copy the folder elsewhere, then start it again. Protect backups because they contain configuration and may contain credentials.
Save the exact working image before updating
A registry digest identifies fixed image content, while the latest tag can point to a newer image later. The image ID shown by Docker is a different identifier; do not paste an image ID after the repository name as though it were a registry digest. Save the full repository-and-digest reference before an update.
- In Portainer, open the Prowlarr stack’s running container. Use Inspect, then Text, and copy the top-level Image value (
sha256:followed by the full image ID). This identifies what the running container uses even if its tag has since moved. - Temporarily enable SSH and connect as the DSM administrator using the earlier steps. Enter
sudo docker image inspect --format '{{json .RepoDigests}}' IMAGE_ID, replacingIMAGE_IDwith that complete copied value.sudomay ask for the administrator password. This command reads image metadata; do not run it inside Prowlarr’s container console. - Output is a JSON list. Copy the complete entry for
lscr.io/linuxserver/prowlarrincluding@sha256:and all 64 hexadecimal digest characters, without JSON quotes, brackets or commas. Save it with the recipe and matching pre-update backup ZIP. If no matching reference is returned, stop the update preparation; do not substitute the image ID or look up today'slatestas though it identified yesterday's running image. Typeexitand disable SSH again when finished.
For a stable image selection, replace the whole lscr.io/linuxserver/prowlarr:latest value after image: with the complete saved reference. Its structure is lscr.io/linuxserver/prowlarr@sha256: followed by the actual digest you copied; this is a syntax description, not a supplied digest. An alternative that avoids manually editing the long reference is to change that line to image: ${PROWLARR_IMAGE} and add a Portainer variable named PROWLARR_IMAGE containing the complete copied reference. Do not retain :latest before the @.
Update the container
A restart alone does not update the application: updating requires fetching an image and recreating the container. Keep the same configuration folder and variables for this update. Do not use the in-app updater inside this container.
After creating the pre-update ZIP and saving the old exact image reference:
- Open Portainer Images → Advanced mode. Enter
lscr.io/linuxserver/prowlarr:latestin Image, then click Pull the image and wait for completion. This fetches the current stable-channel image; it does not replace the running container. - Open Stacks → prowlarr → Editor. To adopt that stable-channel update, make the image value
lscr.io/linuxserver/prowlarr:latestagain, or setPROWLARR_IMAGEto that value if using the variable. Keep config path and other inputs unchanged. Click Update the stack and confirm the update. The image pull was performed explicitly in step 1; this procedure does not depend on a particular version’s repull-dialog label. - Check running status, login, saved settings and Radarr connection if configured. Repeat Inspect to see the running image ID; a successful request alone is not evidence of a changed or working app. To pin the new working image, repeat the digest capture and set that exact reference in the stack recipe. If the expected image is not running, stop here and inspect the deployment logs.
If the installed Portainer’s interface cannot complete these documented actions, postpone updating rather than deleting data or guessing a menu. The initial installation remains usable independently of this maintenance step.
Recover using the matching backup
Stop the failed stack and retain its existing configuration directory. Create a separate empty recovery directory in File Station, record its Location and grant the same selected user permissions. Set PROWLARR_CONFIG to that new path. Set the recipe's image value (or PROWLARR_IMAGE) to the complete old registry reference saved before updating. Pull that exact reference through Images → Advanced mode → Pull the image, then update the stack. If the registry cannot supply it and it is not retained locally, stop; the digest is an identifier, not a backup of image bytes.
Open the recovered app, complete login setup if asked and use System → Backup → Restore Backup → Choose File → Restore with the corresponding pre-update ZIP. Recheck settings and connections. This keeps the newer database untouched and gives the old image the older backup it was saved with. Retain the original folder until recovery has been checked.
Stop or remove the installation
To stop using Prowlarr, stop its stack in Portainer. To uninstall the deployment, delete that stack while retaining the NAS configuration folder and downloaded backup. Delete the folder deliberately only when the retained settings are no longer needed. Removing this stack does not uninstall Radarr or Portainer.
Finish at the local checkpoint
Before connecting another application, confirm that you can sign in after the restart, your saved setting remains, and you can find the NAS folder containing the configuration files. Keep the stack recipe and variable values with your backup so you can identify this installation later.