

Install SearXNG on Synology with a Portainer Stack
Set up SearXNG on your Synology NAS with a Portainer stack. Learn the port mapping, persistent folders, startup checks and backup preparation.
Eugene Gavrilov
12 min read- NAS & storage
Give your NAS a search page you can open from a device on your home network. You will create folders for configuration and cache, deploy one SearXNG container through Portainer, and check your first search. SearXNG combines results from other search engines; individual providers may sometimes be unavailable.
You need an existing, working Portainer installation managing your NAS through a Docker Standalone environment. Use this setup only on a trusted home network. The procedure is based on documentation and has not been tested on a physical NAS.
1. Check your starting point
Before creating the stack, confirm these items:
- Container Manager is available for your exact NAS model and DSM version, and is installed and working. Check Package Center. This walkthrough does not cover older Docker-package installations. A Synology name or an ARM processor alone does not establish compatibility.
- Portainer already works and manages the NAS through a Docker Standalone environment. Its installation is a prerequisite. Select the NAS environment when following these steps; it may have a name other than
local. - You have an accessible local
dockershare and can manage folders in it. If the share is missing or inaccessible, stop and resolve the package/shared-folder setup with your NAS administrator or official Synology guidance before continuing. - You will use the NAS's LAN IPv4 address and host port
5147. Find the address in the next section. If deployment reports that the port is already in use, stop and resolve the collision before continuing; this guide keeps5147throughout. The example address192.168.1.50must be replaced.
If Container Manager is unavailable, stop here. If the image later reports that no compatible platform is available, check compatibility before continuing. Upstream's build workflow lists several architectures, but that does not certify your NAS or every image tag.
An image is the packaged application downloaded for installation. A container is a running instance made from that image. A Portainer stack saves the definition of the service you want to run. Here, that definition is written in YAML in Portainer's Web editor.
2. Understand the address and the two ports
The NAS address identifies the NAS on your home network. Find it in DSM under Control Panel → Network → Network Interface: read the IPv4 address of the connected LAN interface used by your home network. Do not change its settings. If several interfaces are connected, identify the one on the intended home network before continuing; the interface name can vary.
A domain is a readable name used instead of a numerical IP address; you do not need to buy or configure one here. The destination in a web address is called its host or hostname and can be a name or an IP address. The port is separate. Use your NAS's numerical address for these steps.
A host port is the numbered entrance on the NAS. The example uses 5147. The container port is the entrance used by SearXNG inside its container: 8080. The stack connects those two ports with this mapping:
Browser
  → NAS 192.168.1.50, host port 5147
  → SearXNG container, app port 8080
After startup, the example browser address will be http://192.168.1.50:5147. Replace 192.168.1.50 with your actual NAS LAN address in both the stack and the browser address. Use the NAS address, not localhost on your laptop.
The http address does not use an HTTPS certificate. Use it only on a trusted home network. Do not add router forwarding or a public reverse proxy as part of this guide. Binding the port to the NAS's LAN address narrows the listening address, but it does not add a login or guarantee that other routed networks cannot reach it.
3. Create the configuration and data folders
In File Station, create a searxng folder inside your docker share, then create config and data inside it. Use dedicated, empty folders for this fresh installation. The example assumes these absolute NAS paths:
/volume1/docker/searxng/config
/volume1/docker/searxng/data
To find the exact paths, right-click each of the config and data folders in File Station and open Properties → General. Copy its Location, checking that you selected the intended folder. Use these two absolute paths in the stack; your volume number may differ from volume1.
In each mount line below, replace only the NAS path before the first colon with that folder's Location. Keep /etc/searxng:rw and /var/cache/searxng:rw unchanged. A browser address or a share-only display path is not the Docker host's absolute folder path.
The stack makes each NAS directory visible at a path inside the container. This relationship is called a bind mount:
| Folder on the NAS: check or replace this side | Folder inside the container: keep this side |
|---|---|
/volume1/docker/searxng/config | /etc/searxng — server configuration |
/volume1/docker/searxng/data | /var/cache/searxng — persistent cache, including favicon cache |
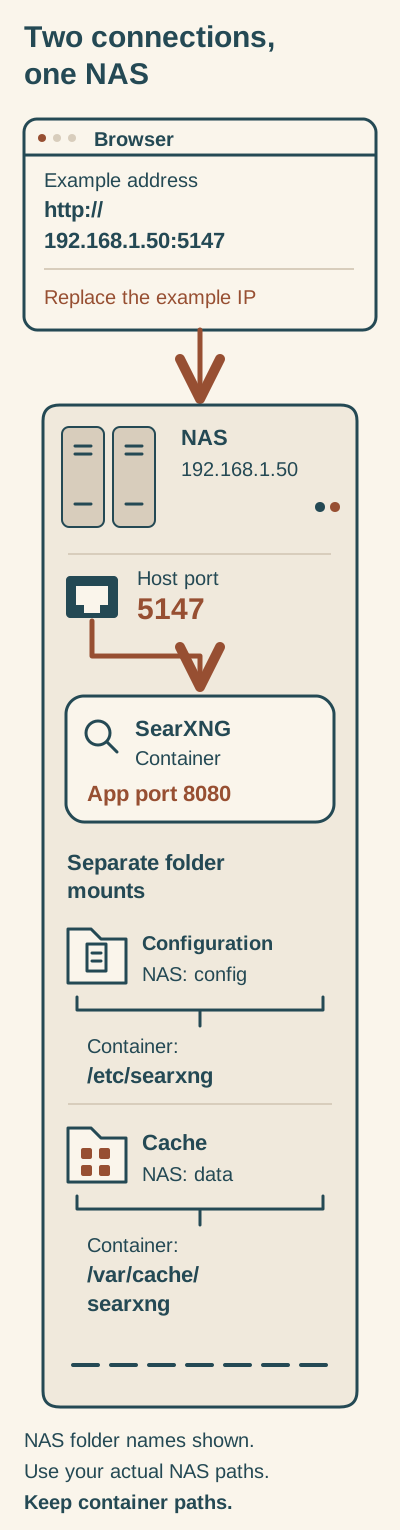
The Portainer stack maps the example NAS address and host port 5147 to SearXNG's app port 8080, and mounts separate configuration and cache folders. Replace the example IP and NAS folder paths.
Text alternative: In the example, the browser opens http://192.168.1.50:5147. The stack binding 192.168.1.50:5147:8080 connects that NAS LAN IPv4 address and host port 5147 to SearXNG's container port 8080. Replace 192.168.1.50 with your NAS's actual LAN IPv4 address. On the NAS, /volume1/docker/searxng/config mounts at /etc/searxng inside the container for configuration; /volume1/docker/searxng/data mounts at /var/cache/searxng for persistent cache, including favicon cache. Replace the NAS paths with the actual folder Locations; keep the container paths unchanged. Mounting makes the NAS folders available inside the container; it is not a backup or file-copy operation. Binding a LAN IP does not add login protection or guarantee network isolation. This is a conceptual illustration, not a tested installation.
Original Huncode illustration by Eugene Gavrilov, 2026. No third-party icons, screenshots, logos or fonts embedded.
The cache folder stores cache data, including favicons; it is not described here as search-history storage. The image's initialization can change ownership inside the mounted folders, which is another reason to use dedicated directories. It needs writable access; do not solve a permission error by giving everyone unrestricted access or copying another application's user ID.
4. Add the stack in Portainer
- Select the NAS's Docker Standalone environment.
- Open Stacks, then Add stack.
- Enter
searxngas the name and choose Web editor. - Paste the following definition. Replace
192.168.1.50with the NAS's real LAN IPv4 address and check both/volume1/...paths. Keep8080and the two container-folder destinations unchanged.
services:
  searxng:
    image: docker.io/searxng/searxng:latest
    restart: always
    ports:
      - "192.168.1.50:5147:8080"
    environment:
      SEARXNG_LIMITER: "false"
      SEARXNG_PUBLIC_INSTANCE: "false"
    volumes:
      - /volume1/docker/searxng/config:/etc/searxng:rw
      - /volume1/docker/searxng/data:/var/cache/searxng:rw
This is an adapted one-service Compose definition, not the full upstream multi-service deployment. Here is what each field does:
| Field | Meaning in this stack |
|---|---|
services | Contains the service definition. |
searxng | Names the service in this definition. |
image | Downloads SearXNG from its official Docker Hub image location. latest moves over time; it is not a pinned, tested release. |
restart: always | Automatically restarts the container after it stops. If you choose Stop yourself, it stays stopped until you choose Start or the Docker engine restarts. This does not repair a configuration error. |
ports | Publishes host port 5147 on the specified NAS LAN address to container port 8080. |
environment | Supplies the two settings immediately below it. |
SEARXNG_LIMITER: "false" | Turns off SearXNG's control for limiting incoming search requests in this home-network setup. |
SEARXNG_PUBLIC_INSTANCE: "false" | Sets public-instance mode to false. It does not itself restrict network access. |
volumes | Mounts the two NAS directories into the container. Each entry is NAS path:container path:rw; rw gives read/write access. |
Leave the image's startup command unchanged. For a fresh configuration folder, startup creates settings.yml and generates the configuration secret. This secret is not a login password. Use fresh folders rather than reusing unknown settings.
- Choose Deploy the stack.
5. Check startup, then make your first search
Portainer accepting the stack does not mean the search page is ready. Open Stacks → searxng and identify its SearXNG service container. Its generated name may be longer than searxng. Open Containers → that container to see its status, then Logs for startup output. Portainer documents both container details and viewing logs.
Check that the container is running, then use the browser check below to confirm that the page responds. There is no fixed startup wait. If the container is stopped or repeatedly restarting, read its logs before trying again; a restart policy does not repair an error.
In File Station, open the config folder and check that settings.yml exists after initialization. If logs report write-permission errors, stop here and resolve folder access with your NAS administrator, using Synology's mapped-folder permission guidance. Do not give everyone unrestricted access or repeatedly redeploy over broken settings.
From a device on the intended home network, open your NAS address with port 5147. For the unmodified example address, that is:
http://192.168.1.50:5147
Search for Synology documentation, for example. You should see a results page; individual providers may be unavailable. A successful search confirms that request.
6. Check that server configuration survives a restart
There are two different kinds of settings:
| Kind | Where it belongs | What it verifies |
|---|---|---|
| Server configuration | settings.yml in the mounted config folder | The server reads configuration from the NAS folder. |
| Browser preferences | Preferences → Save, using browser cookies | Personalization in that browser; it does not prove NAS configuration persistence. |
Use a distinctive instance name to check the saved server configuration:
- In Portainer, open Containers → your SearXNG container. Choose Stop and wait until the status shows it has stopped. Keep this screen available for the later Start action. Keep the NAS and its Docker service running during this edit: restarting the Docker engine can start the container again. If either restarts, check that the container is stopped before replacing the file.
- In File Station, open the exact
configfolder. Selectsettings.yml, then Action → Download → Download. Keep the downloaded file unchanged as your backup and make a separate working copy. - Open the working copy in a plain-text editor. Keep the filename
settings.yml, without adding.txt. Preserveuse_default_settings, the existingserversection and its secret, and the rest of the file. - If there is no
generalsection, add the following block at the top level. Thegeneral:line starts at the left edge; the next line starts with two spaces. Ifgeneralalready exists, change itsinstance_nameentry there instead, adding the entry if needed. Do not add a secondgeneralsection.
general:
  instance_name: "Home search"
- Save the working copy. In File Station, return to the exact
configdirectory and upload the editedsettings.yml, choosing overwrite when asked. See File Station upload guidance if you need help finding that control. You can also drag the file into that open directory and confirm overwrite. Download the installed file again and check that it contains your change. If access is refused, stop and resolve permissions before continuing. - In Portainer's container details, choose Start. Check its status and logs, then reload the search page. Look for Home search in the browser tab title. The central SearXNG logo does not change.
- Use Stop, wait for the stopped status, then Start once more. Reload the page and check both the tab title and the file contents again. This checks server configuration, separately from browser preference cookies.
If the edited configuration prevents startup, stop the container, upload your unchanged original settings.yml into the same config directory and confirm overwrite. Download it again to verify its contents, then choose Start and check status and logs.
If something does not work
Follow the failure from the point where it first appeared:
| Symptom | Check next |
|---|---|
| Container Manager is unavailable, or the expected NAS is missing in Portainer | Recheck model/DSM support and the selected Docker Standalone environment. |
| Image download fails | Check registry connectivity and the reported image/platform error. Do not force an unsupported platform. |
| Startup reports a missing or unwritable folder | Check the real NAS paths and writable access. Keep a backup before changing existing settings. |
| Deployment reports an address or port problem | Confirm that the LAN address belongs to the NAS and host port 5147 is unused. |
| The container fails to stay running | Inspect its state and logs; a restart policy does not resolve the underlying error. |
| The browser cannot open the page | First compare the browser address with the NAS IPv4 from Control Panel → Network → Network Interface and port 5147. Confirm the container is running. If those match, ask your NAS administrator for help with routing/firewall access, referring to Docker's port-publishing guidance. |
| The page opens but a provider fails | Check upstream-engine errors; individual providers may be unavailable. |
Prepare backups before updating
Prepare these copies before attempting an image update. This section covers backup preparation; use the official documentation linked below for the update itself.
- In Containers → your SearXNG container, choose Stop and wait for it to stop.
- Back up both NAS folders,
configanddata, outside their working location. In File Station, select the folders and copy with Ctrl+C on Windows or Command+C on macOS. Open a unique backup destination folder and choose Action → Paste - Skip. Keep these folder copies together with the following records. - In Portainer, open Stacks → searxng → Editor. Copy the current YAML into a local plain-text file named
compose.yaml. Preserve your actual image line and NAS paths. - Open the selected container's Inspect information and note its image information. In Images, match that image and record its listed ID and tags. Keep the ID and tags as displayed; a local image ID is different from a registry digest.
- In Images, select the image, choose Export this image, then Continue. Keep the downloaded tar file with the folder backups and
compose.yaml. The image export does not replace backups of the mapped folders.
If you are postponing the update, return to the same container's details and choose Start.
For the update, follow SearXNG's container installation and management documentation and Portainer's stack-editing documentation. Restarting alone does not download a new image. This guide does not provide a complete update or rollback walkthrough: the exact Web editor re-pull control is unverified, and restoring old files and an image may not produce a compatible downgrade. Keep your matching backups before proceeding.
Remove SearXNG safely
To remove the stack, open Stacks, select the checkbox for searxng, choose Remove, and confirm Remove. Keep the dedicated NAS folders if you want a recovery path.
Deleting those folders is a separate decision: it removes the saved server configuration and persistent cache they contain. Retain any backup you need before deliberately deleting them.