

Set up Synology QuickConnect to get a file away from home
Set up Synology QuickConnect for DS file, download a sample over mobile data, understand direct and relay routes, and keep local recovery access.
Eugene Gavrilov
9 min read- NAS & storage
Set up DS file on your phone, download a small sample from your Synology NAS, then repeat the download on mobile data. Keep local DSM access available so you can change or undo the setup at home.
You will use a NAS user account with permission to read the sample. The exercise only downloads and opens a copy: leave the original file in place.
Know the names and accounts first
The NAS stores and serves your files. DSM is its management interface, where you configure QuickConnect and user permissions. Your home router connects the home network to your internet provider. Local access and internet access take different routes.
A local IP identifies the NAS inside your home network. A domain is a readable name that DNS looks up to find an address. A port identifies a particular service at an address; in a URL, a colon before a number introduces the port.
HTTPS encrypts the connection using SSL/TLS. A certificate must cover the hostname you use. Do not treat an unfamiliar certificate warning as proof that you reached your NAS.
QuickConnect adds a Synology connection service and an ID identifying your NAS connection. The ID is not a username or password. Your Synology Account enables vendor services such as QuickConnect. Your NAS/DSM user account signs into DS file and needs permission for the files. You will use these accounts at different steps below.
These four address examples are illustrative; use your own saved address or ID.
Local IP: http://192.168.1.20:5000
Its job: Identifies a local device and an example DSM HTTP port.
What else it needs: Your actual local address and port; this private address is not an internet domain.
QuickConnect: https://quickconnect.to/ExampleHomeNAS
Its job: Uses an ID to reach supported Synology services through an available route.
What else it needs: An allowed service and a NAS user with permission. DS file uses the ID in its own login field.
Synology DDNS: examplehome.synology.me
Its job: Keeps a readable name associated with an IP address as that address changes.
What else it needs: A reachable service; updating the name does not create the connection.
Custom domain: nas.example.com
Its job: Gives a service a name configured through its domain/DNS provider.
What else it needs: Separate routing, authentication and HTTPS configuration; the certificate must cover the hostname.
You do not need to configure DDNS or manual router port forwarding for this QuickConnect workflow. QuickConnect supports selected Synology applications, not arbitrary container services.
QuickConnect helps the client locate a reachable NAS service. It can establish an available direct route or use the optional Synology relay when needed. Coordination is separate from file transfer: with a direct route, the file can travel between client and NAS; with relay, traffic passes through Synology. These are possible paths, not a trace of your connection. Relay use may add delay, and a successful download alone does not establish which path it used.
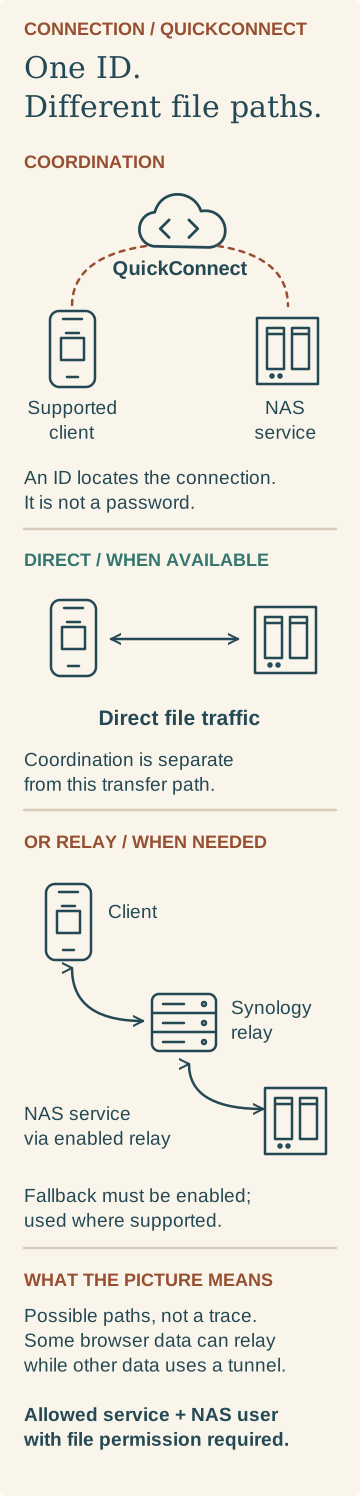
Conceptual QuickConnect paths from Synology’s rolling white paper and DSM help, retrieved November 4, 2026. These are possible routes, not an observed connection. Browser limitations can send some data through relay even when a tunnel carries other data; a successful download does not identify the route.
Diagram text: A supported client uses a QuickConnect ID and the service coordinates access to the NAS. File traffic can use an available direct route or pass through the enabled QuickConnect relay where needed and supported. These are conceptual paths, not a trace: some browser data can still use relay while other data uses a tunnel. An allowed service and a NAS user with file permission remain necessary. A completed download does not reveal which route it used.
Prepare the file and your local recovery access
Use a small, existing, non-sensitive file in a shared folder. Keep the exercise read-only: no moving, deleting or replacing files. Folder read access is sufficient for the download check unless additional restrictions apply.
Install DS file on your phone for this workflow. It accesses File Station on the NAS. The NAS user who will retrieve the sample needs both File Station application permission and read access to the folder/file. A successful login alone does not establish file access. A shared-folder restriction disabling downloads can also prevent opening, previewing or downloading.
From a local DSM administrator session, check Control Panel > Application Privileges > File Station > User for that NAS user's application permission. Confirm the user can read the chosen sample folder; do not broadly reset permissions to fix one file. Keep the local DSM session and its address available while configuring QuickConnect. This local management route is your way to undo the change.
Enable QuickConnect for DS file
These instructions follow Synology’s DSM 7 QuickConnect help and DS file documentation for DS file 4.17 for Android and DS file 5.17 for iOS. Huncode has not tested them on a physical NAS. The app help covers DS file 4.17 for Android and DS file 5.17 for iOS; the precise mobile-service checkbox caption was not independently verified.
- In your local DSM session, open Control Panel > External Access > QuickConnect. Select Enable QuickConnect.
- Sign into your Synology Account, or register when prompted. Choose an available QuickConnect ID: English letters, numbers and dashes are allowed; it must start with a letter and cannot end with a dash. Select Apply. Save the ID and the link DSM displays.
- Open Advanced Settings > Applications/Services. Allow the mobile application service needed by DS file, and leave DSM web access disabled for this workflow. The interface may group mobile clients together; enabling a group does not mean you have enabled DS file alone. The category wording may vary. This service selection is separate from the user's File Station permission.
- Review the QuickConnect relay option. Enable it if you want its fallback when a direct connection is unavailable, then apply the settings.
Download the sample on home Wi-Fi
First check the same app and account you will use away from home. This DS file check uses the QuickConnect ID; your separately retained local DSM connection remains the recovery route.
- Connect the phone to home Wi-Fi and open DS file. In Address or QuickConnect ID, enter your saved QuickConnect ID. Enter your NAS/DSM username and password, enable HTTPS, and sign in.
- Open Synology NAS, then your shared folder and the sample file. Android documentation calls the folder area Shared Folders; on iOS, use the desired shared folder in the Synology NAS tab.
- Use the file's action menu and choose Download. Check Tasks for transfer progress, then locate the downloaded copy in Offline Files. Open the copy if your phone supports its format. Leave the original on the NAS.
If login works but the file is missing or will not download, check this user's application and folder permissions before changing the remote-access setup.
Repeat the download on mobile data
Turn off Wi-Fi and make a fresh DS file sign-in using the QuickConnect ID, NAS/DSM user and HTTPS setting above. Navigate through Synology NAS to the original sample and request Download again. Check the new transfer in Tasks. Opening an existing copy in Offline Files would only check the copy already on your phone.
Once the fresh download completes, open the downloaded copy if its format is supported. You have checked that this account can retrieve this permitted file over that mobile connection. Keep the local DSM address and QuickConnect ID saved for later use.
If home access works but mobile access fails
Check the exact QuickConnect ID, the allowed mobile service in Advanced Settings, the NAS internet connection and Synology's service status. If DS file signs in but cannot retrieve the sample, check File Station and folder/file permissions separately.
If the NAS clock is wrong, use local DSM to open Regional Options > Time > Time Setting, choose an NTP server and select Update Now. This synchronizes the NAS clock. NTP Service, which serves time to other devices, is a different setting.
Write down the exact error and any setting you changed. If these checks do not resolve it, keep your original settings and use that error for further diagnosis.
How DDNS differs from this setup
DDNS maintains a name's address record. An updater sends the current external IP information to the provider; a DNS resolver looks up the name's records, possibly from its cache, and returns an address to the client. The client then makes a separate connection to the destination. DNS lookup and DDNS updates do not carry the file payload.
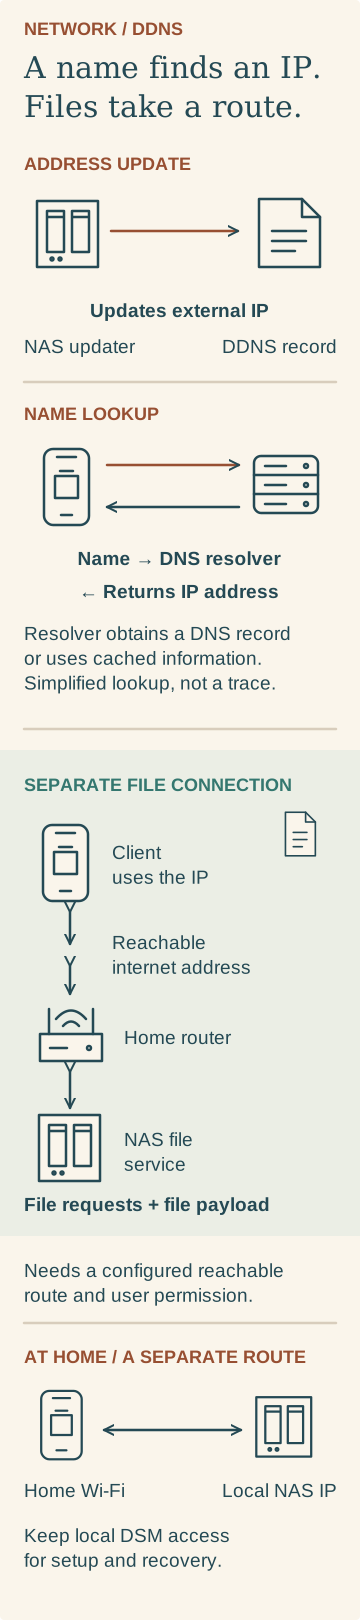
Conceptual DDNS comparison, based on DSM 7 help and DNS documentation retrieved November 4, 2026. Updating or looking up a name does not configure a reachable connection or carry the file.
Diagram text: The NAS DDNS updater sends external IP information to the provider. The client asks a DNS resolver for the name’s address; the resolver obtains a record or uses cached information and returns an IP address. The client then makes a separate connection through a reachable internet address and home router to the NAS service. That connection still needs a configured route and user permission. At home, a local IP provides a separate service connection, and local DSM remains the setup and recovery route.
For a direct connection, that destination must be reachable. Ordinary inbound IPv4 port forwarding needs a public WAN address on the home router. If your ISP uses a private address or carrier-grade NAT (CGNAT), changing the DDNS name does not create the missing forwarding through the ISP's router. IPv6 and separately arranged tunnels have different conditions. This comparison explains the routing boundary; it is not a port-forwarding step for DS file.
Synology's 2023 comparison describes automatic Let's Encrypt use for QuickConnect; it does not promise matching certificates for unrelated custom names or containers.
Undo the QuickConnect change and check local access
In your local DSM session, clear Enable QuickConnect and select Apply. With phone Wi-Fi off, try a fresh DS file sign-in through the saved QuickConnect ID to check that the disabled route is unavailable. This check does not promise that existing sessions instantly terminate.
Separately confirm that your local DSM address still works. Disabling QuickConnect checks one access route; it does not remove separately configured remote routes or recover files. Your read-only sample exercise should have left the NAS original in place.
Sources and version scope
Documentation retrieved November 4, 2026: Synology’s QuickConnect network white paper, supported QuickConnect services, DSM 7 DDNS help, file and folder permissions, QuickConnect troubleshooting and 2023 QuickConnect/DDNS comparison; Cloudflare’s DNS lookup explanation and TP-Link’s public WAN requirement for port forwarding. The diagrams explain documented concepts; they are not traces of a tested NAS connection.