

Set up Audiobookshelf on Synology for your first listen
Install Audiobookshelf with Synology Container Manager, play a sample book on your home network, and check folders, restart persistence and backups.
Eugene Gavrilov
10 min read- NAS & storage
Start with one audiobook on your NAS and a phone connected to home Wi-Fi. This guide takes you through a local Audiobookshelf installation, a first playback check and a restart check before you add the rest of your collection. Audiobookshelf is an open-source server for audiobooks and podcasts, with listening progress kept for each user.
You will use Synology’s graphical Container Manager, so no terminal commands are needed. The procedure targets compatible NAS models running DSM 7.2 or newer with the Project feature available. Check your exact model before continuing.
Documentation-based guide, researched November 4, 2026. No physical NAS installation or restore was performed. Current primary documentation supports the container configuration; first-run account/library labels follow the supplied September 2026 source snapshot and may differ on your screen.
Choose one book and a listening route
Pick one audiobook you are entitled to store. Use a copy for the first setup, leaving your original elsewhere. Keep all files belonging to that book together in one folder. For example, Example Author/Example Book/ is an illustrative folder structure, not a required book title.
Start with a browser on the computer you use for DSM. Later, open the same address in your phone’s browser. The official FAQ documents mobile-browser use but notes that some controls may need landscape orientation or Desktop View. This first check does not promise offline listening or uninterrupted playback while the phone is locked.
An image is the downloaded application package. A container is the running copy. Your books and settings need NAS folders outside that copy so you can replace the software without discarding them.
Give the application three separate folders
First, open Control Panel → Info Center → General and record your NAS model and DSM version. Check Package Center for Container Manager. If the package or its Project page is unavailable for your model/version, stop here and check Synology’s supported package information. This route does not cover the older Docker package.
Install Container Manager if needed. In File Station, use a shared folder called docker on the NAS storage volume. If it does not exist, create it through Control Panel → Shared Folder → Create first. Inside it, create audiobookshelf, then three separate subfolders: config, metadata, and audiobooks. Use your actual storage volume in the paths below; /volume1 is an example.
NAS folders and their container paths
| NAS folder in this example | Seen inside the container as | Purpose |
|---|---|---|
/volume1/docker/audiobookshelf/config | /config | Application database and settings |
/volume1/docker/audiobookshelf/metadata | /metadata | Book information, images, logs and application backups |
/volume1/docker/audiobookshelf/audiobooks | /audiobooks | Your audiobook files |
Each row connects a folder on the NAS to a folder path inside the container. This connection is called a bind mount. The database belongs on this NAS’s local storage, not a folder mounted from another network server. Keep these three mounts separate.
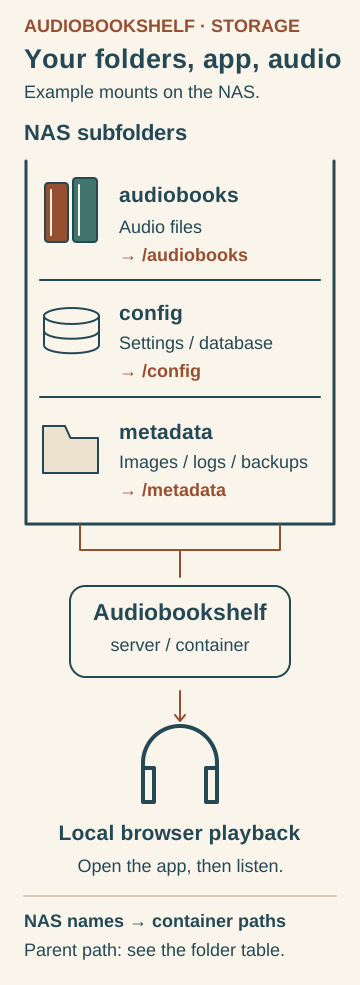
Three separate example NAS folders map into Audiobookshelf; the local browser connects to the app for listening. Original Huncode diagram based on the official Docker instructions and mobile-browser FAQ.
In this example, the NAS parent is /volume1/docker/audiobookshelf/. Its audiobooks subfolder contains audio files and mounts at /audiobooks; config holds settings and the database and mounts at /config; metadata holds images, logs and application backups and mounts at /metadata. A local browser connects to Audiobookshelf for playback. The table above gives the complete copyable paths; these are example folders, not discovered NAS paths.
Copy the sample book folder into the NAS audiobooks directory using File Station’s upload controls. Confirm you can find the audio files there before creating the library. The configuration below lets the application write to its three folders, including media; keep backups of originals and avoid granting Everyone full access as a permissions shortcut.
Create the project and your first library
A local IP address identifies the NAS on your home network. In Control Panel → Info Center → Network, find and record the IP for the connection to your home network; 192.168.1.50 is an illustrative example. If several connections are listed and you cannot identify the home-network one, resolve that before continuing. You do not need to change any network settings.
A port selects an application at that address. Here you will use NAS port 13378. A domain is a readable name resolved to a numeric address through DNS; none is needed for the first local connection. The http connection used below is unencrypted, so keep this initial use within a trusted network.
Before starting, keep the NAS on a trusted home network. Do not create router port-forwarding or automatic port-mapping rules for this setup. Publishing port 13378 makes it reachable through the NAS’s network interfaces; it is not inherently a private connection. Check existing router exposure and restrict access to trusted clients through appropriate network controls.
In Container Manager → Project → Create:
- Set the project name to
audiobookshelf. - Set its working path to the
docker/audiobookshelffolder you created. - For Source, choose the editor option to create a
docker-compose.ymlfile. Paste the configuration below, replacing/volume1if your folders live on another volume. - Leave the optional Web Station web portal disabled for this local-port setup. Review the summary, finish the wizard and start the project.
services:
  audiobookshelf:
    image: ghcr.io/advplyr/audiobookshelf:2.37.2
    ports:
      - "13378:80"
    volumes:
      - "/volume1/docker/audiobookshelf/config:/config"
      - "/volume1/docker/audiobookshelf/metadata:/metadata"
      - "/volume1/docker/audiobookshelf/audiobooks:/audiobooks"
    restart: unless-stopped
The image comes from the official project’s documented registry. 2.37.2 was marked the latest release during research; using that explicit tag makes this recipe reproducible without silently selecting a later version. The folder paths are the examples you created above.
13378:80 means “connect to port 13378 on the NAS, and send the request to port 80 inside the container.” If another application already uses 13378, choose a free NAS port, such as 13379, and change only the left-hand number. Use that number in your browser address too. The restart policy helps the service return after an unexpected stop; it does not install updates, and a deliberate stop remains stopped.
There is no shared secret to paste. Current Audiobookshelf documentation says the server generates a secure random JWT secret when JWT_SECRET_KEY is omitted. Do not reuse a secret from another guide.
Open http://YOUR-NAS-IP:13378, replacing YOUR-NAS-IP with the address you recorded in Info Center. For example, a NAS at 192.168.1.50 would use http://192.168.1.50:13378. The example IP is illustrative. Use the local NAS address rather than a QuickConnect address.
At first launch, create the administrator account with a unique password and save it in your password manager. These are Audiobookshelf credentials. Sign in, open Libraries, add a Books library and give it a name. In the folder chooser select /audiobooks, then create the library and scan it. The folder chooser uses the right-hand container path, not the long NAS path. This account/library sequence is source-supported; individual labels may differ.
Hear the book on your phone
Check that the scanned book appears. Open it in the browser, start playback, seek to another point and pause. Then connect your phone to the same trusted home network, open the same local URL, sign in with the same account and try playing the book. Keep the browser in the foreground for this first check. Record whether playback works and whether progress appears as expected.
Troubleshooting checks for the first local listen
| What you see | What to check next |
|---|---|
| Project will not start | Read the project/container log. Recheck YAML indentation, real folder paths and whether another app already uses the selected host port. |
| Browser cannot open the page | Check that the container is running and the URL uses the NAS’s local IP and chosen host port. Check network access rules rather than disabling all protection. |
| Library is empty | Confirm the files exist in the NAS folder, the mount points at it, the library uses /audiobooks, and a scan has run. |
| Permission error | Identify the specific folder in the log. Check its access permissions and mount path; avoid broad permissions changes across the NAS. |
| Phone controls are missing | Try landscape orientation or Desktop View as the official FAQ suggests. |
For port, mount and library errors, check the relevant setting before changing the installation.
Keep tomorrow’s listening recoverable
Once the sample book plays on your phone, check that you can return to the same library tomorrow.
Restart and find your data
Note your current position in the sample book. In Container Manager select the project and use Restart. Reopen the browser, sign in if needed and check that the library, book and saved progress remain. In File Station, locate the config, metadata and audiobooks folders again. If the library is suddenly blank, inspect the mount paths before creating a new account or scanning your full collection.
Back up before you update
Audiobookshelf’s built-in backups contain its database and images stored in metadata; they do not include your audio files or covers stored with the books. The default backup location is /metadata/backups, which maps to the metadata/backups folder in this example. Copying only that location is not a full media backup.
For a conservative full-copy checkpoint, stop the project and copy config, metadata, your media and docker-compose.yml to a separate backup destination, preferably off the NAS. Record the image tag and folder paths with the backup. Restart the project after the copy. Protect the backup because it contains account and library data.
Update deliberately and retain a way back
Use this pre-update checklist before following the official Docker upgrade procedure:
- Read the release notes for the version you intend to install.
- Take the stopped-project backup above and record your existing image tag.
- Note the replacement tag you want to use. A pinned configuration needs its version number changed; restarting the existing container alone does not update it.
- Follow the official upgrade instructions to fetch that image and replace the running container. Replacing the container with the edited configuration is what redeploying means. The official page also documents a Synology Stop/Reset workaround for cached-image startup failures; this is not a general instruction to delete your project.
- After updating, repeat the sample playback and restart checks before adding more media.
For a fully graphical update route, confirm the steps for your Container Manager version before proceeding. If you cannot match the official instructions to your screen, keep the current version and resolve that step before updating.
If an update fails, keep a copy of the failed state. Stop the project, restore the pre-update folders and Compose configuration from your checkpoint, and deploy the recorded earlier image. Do not assume changing the image tag back will undo database changes. If you cannot identify a matching backup, stop and consult the official backup recovery instructions.
Stop or remove safely
To pause use, Stop the project. Keep your NAS folders and backup. Before removing the installation, copy its data and Compose file outside the project folder. Synology’s deletion operations can remove project data, so read their confirmation carefully; do not treat project deletion as a backup. Keep the media and configuration until you are sure you no longer need them.
For listening away from home, plan remote access separately. A VPN or a maintained HTTPS reverse proxy needs its own configuration. HTTPS uses a certificate to encrypt the connection; a domain name alone does not provide that. Audiobookshelf requires WebSocket support when using the Synology reverse-proxy route. Do not expose the plain HTTP application port as a shortcut.
Your first setup check is complete when you can play the sample book, repeat the check after a restart and point to the NAS folders and separate backup that hold the library. Then add more books.
Sources and version scope
Use the official Audiobookshelf Docker instructions, Synology Project help, application backup documentation and mobile FAQ for current details. The first-run library sequence is also documented in the September 2026 source guide. No screenshots, timing measurements, supported-model tests or successful restore results are claimed.