

How to Install Degoog on a Synology NAS
Install Degoog with Synology Container Manager, set up a first search engine, and check installed engines and saved defaults after a restart.
Eugene Gavrilov
10 min read- NAS & storage
Use Degoog from your home-network devices, make a first search, and check that its installed engines survive a restart. This guide uses Synology Container Manager’s graphical Project interface and a dedicated folder for saved data.
Degoog combines results from the search engines you install. Those providers still receive search requests; hosting the interface on your NAS does not make every part of a search local.
Check your NAS before starting
You need Container Manager on your Synology and access to DSM to create the project. Check your model against Synology’s Container Manager package list. Package availability is the first prerequisite; this guide does not establish Degoog image compatibility with every NAS processor. If startup reports an unsupported image platform, resolve that exact compatibility issue before continuing.
If Container Manager is not installed, open Package Center → All Packages, select Container Manager, and choose Install. Once installed, launch it from DSM’s Main Menu. If your NAS does not offer the package, stop here and check the supported-model list rather than following the Project steps with another package.
The procedure below follows upstream Degoog and Synology documentation reviewed on November 4, 2026. It is a source-grounded installation procedure, not a report of a physical NAS installation or a tested restore.
Understand the address and saved folder
An image is the packaged app that Container Manager downloads. A container runs that app. A Project keeps a docker-compose.yml file. Compose is the configuration format used in that file to describe how the app starts. A folder mapping gives Degoog a place on your NAS to keep data when its container changes.
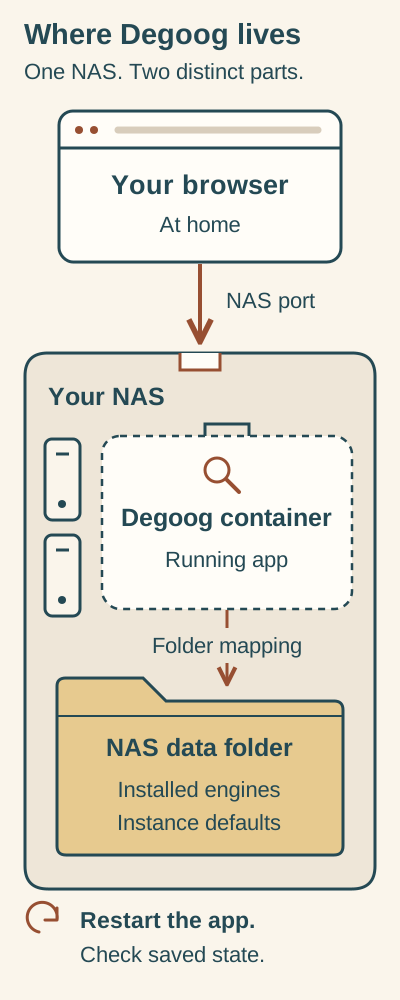
The container runs Degoog; the mapped NAS folder holds its saved application state. After restarting, check installed engines and any saved instance defaults.
Text alternative: Your browser opens the NAS’s local address and chosen host port. The port leads to Degoog’s container. The separate mapped data folder is also on the NAS. Check installed engines and any saved instance defaults after restarting. Search still sends requests to configured providers.
First find the NAS’s address on your home network: in DSM, open Control Panel → Info Center → Network and record its LAN IPv4 address—the dotted number associated with your home-network connection. Do not use a QuickConnect name or public Internet address. If several network interfaces appear and you cannot identify the home-network connection, resolve that choice before continuing rather than guessing an address.
Your browser will open an address such as http://192.168.1.50:4444. This is an illustrative example: replace 192.168.1.50 with your NAS’s actual local IP address. The number after the colon is the NAS port assigned to Degoog. You do not need a domain name for this local setup.
Use this procedure on a private home NAS with trusted local clients and no existing Internet route to the app. Do not add router port forwarding. The mapping below publishes on all NAS interfaces; Docker warns that published ports can bypass host firewall rules, so a DSM firewall setting alone is not a guarantee of local-only access. The settings password protects administration, not every visitor’s access to search.
Create Degoog’s data folder
A shared folder is the top-level storage location you select in DSM; degoog and data will be ordinary folders inside it. If you already have a shared folder called docker for app data, use it. Otherwise, as a DSM administrator, open Control Panel → Shared Folder → Create → Create Shared Folder, name it docker, choose the storage volume under Location, and finish the wizard. Do not broadly change permissions to work around an error.
In File Station, open docker, choose Create → Create folder, enter degoog, and choose OK. Open degoog and repeat those actions to create data. The resulting layout is:
docker/
  degoog/       ← choose this as the Project directory
    data/       ← Degoog’s saved application data
If your app-data share has another name, use that share with the same degoog/data layout. The names are choices for this guide. The important relationship is that data sits inside the directory you select for the Project.
Keep unrelated files out of this folder. Degoog’s startup script recursively changes ownership of its mapped data directory and defaults to user/group 1000:1000. Do not map an entire shared folder or your photo library into the app. Do not copy another NAS owner’s PUID or PGID: those values are account-specific.
Create and start the Project
Open Container Manager → Project → Create. Enter degoog as the Project Name, select your degoog folder as the Path, and choose the Source option that creates docker-compose.yml in the editor.
The indented text below is an installation recipe, not terminal commands. Paste this configuration into the Project editor, adapted from Degoog’s official minimal example:
services:
  degoog:
    image: ghcr.io/degoog-org/degoog:latest
    ports:
      - "4444:4444"
    volumes:
      - ./data:/app/data
    environment:
      DEGOOG_SETTINGS_PASSWORDS: "REPLACE_WITH_YOUR_OWN_PASSWORD"
    restart: unless-stopped
Replace the password marker before deployment. Use your own long, unique password and save it securely. For this first configuration, use a random password made of letters and numbers so punctuation does not interfere with the configuration; keep the surrounding double quotes. This is the password you will enter in Degoog settings, rather than your DSM login password.
Check these entries before continuing:
| Entry | Meaning and what to change |
|---|---|
4444:4444 | Left: the NAS port used in your browser. Right: Degoog’s port inside the container. If NAS port 4444 is occupied, use 4445:4444 and open port 4445 in your browser. |
./data:/app/data | The data subfolder of the selected Project directory maps to Degoog’s internal data directory. Keep it as written for the folder layout above. |
DEGOOG_SETTINGS_PASSWORDS | Replace only the quoted password marker with your saved password. It protects settings and extension administration. |
ghcr.io/degoog-org/degoog:latest | The upstream image. latest changes over time; it does not identify a fixed historical version. |
restart: unless-stopped | The upstream example’s restart policy; an intentional stop remains meaningful. |
Leave the optional Web Station portal off for this local procedure. Review the summary, choose Done, and choose to start the Project. Allow the image download and startup to finish. A running Project is the startup check; you still need to configure search.
Open Degoog and install your first search engine
On a device connected to the same home network, open:
http://YOUR-NAS-LAN-IP:4444
Replace YOUR-NAS-LAN-IP with your NAS’s local IP. If you changed the left-hand port to 4445, use that port here too. For example, a NAS at 192.168.1.50 with the original mapping would use http://192.168.1.50:4444. The example address is not a value to copy unchanged.
A fresh Degoog instance has no installed search engines. Follow the first-run tour, or use the manual route:
- Open the settings gear, enter the password you put in the configuration, and choose Unlock.
- In Settings → Store, find the Engines catalog and install a first search engine.
- Open Settings → Engines and confirm that engine is enabled.
- Return to search and try a query, such as
Synology.
If the page opens but returns nothing, check engine installation and the sidebar’s engine failure messages. An unavailable provider can cause an empty search even when the container is running.
Check that the NAS retains your configuration
Record the engine you installed and its installed status in Store. Optionally, open General → Save current settings as defaults to save your current choices as starting preferences for visitors who have no browser preferences of their own. This does not replace existing browser preferences; Reset to instance defaults explicitly adopts the saved values in your current browser. Locate the degoog/data folder in File Station so you know where the mounted state belongs.
Then perform the restart check:
- In Container Manager, select the
degoogProject and choose Action → Restart. - Once it is running again, reopen your Degoog address and unlock settings.
- Confirm that the same engine is still installed and, if you saved instance defaults, check those too.
- Repeat a search to check that the installed engine still responds.
The installed-engine inventory and instance defaults are the persistence checks. A theme surviving a restart is insufficient: theme, search options and enabled-engine choices can be stored in your browser unless saved as instance defaults. Live search results can also change independently of saved data. These are checks for you to perform, not test results observed for this guide.
Back up before updating
Mapped NAS folders need their own backup. Before an update, select the Project and choose Action → Stop, then copy the entire data folder and the docker-compose.yml file to a backup location outside the Project directory. Keep the settings password securely. Stopping before copying is a precaution for this procedure; this guide does not claim a tested restore.
Container Manager supports Image → select image → Action → Export to retain an offline image copy. An exported image is separate from your saved app data: keep both if you want to retain the installation. Neither an export nor a folder copy establishes that a restore will succeed.
For a first-time owner, this is the supported stopping point before changing the running app: leave the Project stopped with your backup retained, then consult Synology’s Image help for the update controls available in your package. It documents Image → select image → Action → Update, or Update available in the Tag column, followed by confirmation. This guide has not established the next steps that replace the existing Project container or confirm which image it runs afterward. A successful image download alone does not prove that Degoog has been updated.
The configured latest image changes over time and cannot select yesterday’s image for recovery. A recovery attempt needs the retained old image and matching pre-update data. If an update fails, stop the Project, preserve the failed state separately, and keep your pre-update backup untouched while seeking a supported recovery procedure. Do not repeatedly edit image references or combine an older image with newer data in the hope that it restores the app. This guide does not provide a verified rollback procedure.
Fix common first-run problems
| What you see | First check |
|---|---|
| Image or platform error | Preserve the exact message. Container Manager eligibility does not prove the image supports your CPU. Check upstream image information before proceeding. |
| Port already in use | Change only the left side to an unused port, such as 4445:4444, through Project Details → YAML Configurations, deploy the change and use the new port in the URL. |
| Permission error or repeated exits | Stop the Project and retain the exact error, the selected Project directory, and the ./data:/app/data mapping for support. Confirm that you selected the dedicated degoog directory described above. Do not change account IDs or grant everyone broad access to try to bypass the error. |
| Browser cannot open the page | Check that the Project runs, the NAS IP is correct and the URL matches the left-hand port. Confirm the device is on your home network. |
| Settings password rejected | Use the password saved in DEGOOG_SETTINGS_PASSWORDS. To change the configuration, use Project Details → YAML Configurations and deploy the edit. |
| Search opens but has no results | Install and enable an engine, then inspect engine failures in the sidebar. |
| Appearance changes or settings seem lost | Check installed engines and instance defaults. Browser-local preferences alone do not establish whether the NAS data survived. |
Stop or remove Degoog safely
To pause Degoog while keeping the installation available, choose the Project’s Action → Stop.
Before permanent removal, copy the data and docker-compose.yml file outside the Project directory and check that you have retained the copies. Synology describes Project Delete as deleting containers and project data. Read its confirmation carefully and use it only when you are ready to remove those resources; do not assume the mapped folder is guaranteed to survive.
Keep the separate backup if you may reinstall. Delete that retained data only when you deliberately want to discard the saved installation.
For more detail, use Degoog’s settings documentation and Synology’s Project help.