

How to Install Dockhand on a Synology NAS
Install Dockhand on a Synology NAS, enable login, connect its Docker socket, and check saved settings before planning backups and updates.
Eugene Gavrilov
12 min read- NAS & storage
Dockhand gives you a browser dashboard for managing Docker containers on your NAS. This guide takes you through installing it, protecting it with a login, connecting it to this NAS, and checking that its settings survive a restart. Dockhand is an additional interface; the installation below also uses DSM's Container Manager.
The intended result is a dashboard you can open on your home network, with a saved environment named My Synology and a settings folder you can find in File Station. The checks below are for you to perform; this procedure has not been executed on a physical NAS for this guide.
Understand the pieces before installing
A Docker image supplies the application. A container is the running instance created from that image. Your NAS will download the Dockhand image and run a container named dockhand. Its settings will live in a separate NAS folder mounted inside the container at /app/data. Keeping that folder is what lets a replacement container use the saved settings.
You will open Dockhand using your NAS's local area network (LAN) address and a port number. The address identifies the NAS; the port directs your browser to Dockhand rather than DSM. This guide uses browser port 3866, connected to Dockhand's internal application port 3000.
Dockhand also needs a connection to Docker itself. This recipe mounts the NAS's Docker socket, /var/run/docker.sock, into the container. That connection grants powerful control over containers and can allow access to files on the host. Anyone allowed to manage this connection should be trusted as a NAS administrator.
This procedure uses Dockhand's documented root-container option, --user 0:0, to avoid an unverified DSM permission workaround. It gives the application greater privileges. Proceed only if you accept that grant; otherwise consult Dockhand's socket-access guidance before installing.
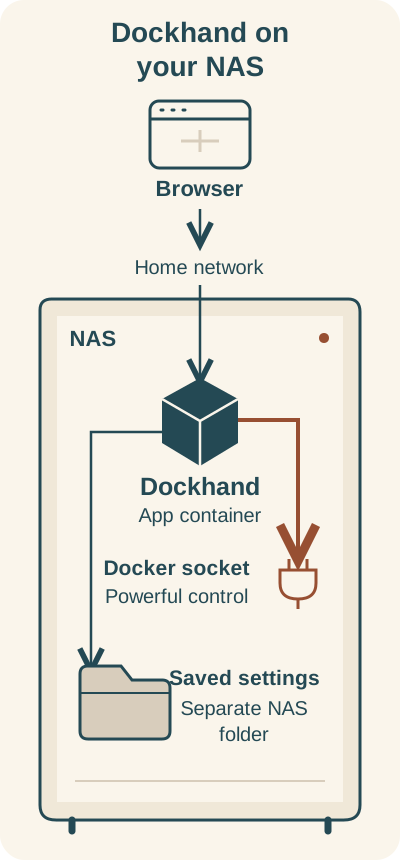
The dashboard, its powerful control connection, and its saved settings are separate parts of the setup.
You open Dockhand in a browser on your local network. Dockhand runs as a container and connects to the NAS Docker socket, which gives it control over containers. Its settings live in a separate NAS folder. Removing the container and deleting that folder are different actions.
Check your NAS and prepare its settings folder
This guide is scoped to DSM 7.2 or later, with Container Manager available for your model in Package Center. Install that package first. If it is absent, stop and consult Synology's Container Manager package and model information instead of sideloading a package. The DSM scope and detailed graphical recipe follow the supplied installation guide; labels may differ in your version.
Dockhand lists Docker Engine 20.10 or later, API 1.41 or later, 512 MB minimum memory, and 1 GB recommended memory as application requirements. These figures do not establish how much memory your entire NAS workload needs. The image must also support your NAS CPU architecture; this guide has not checked its image manifest and does not provide a model or architecture compatibility table.
In DSM, open Control Panel → Info Center → General to find your model, RAM, and DSM version. Before creating the installation task, resolve any uncertainty about Docker Engine/API requirements or image CPU compatibility using the official Dockhand requirements and Synology package/model information, or ask their support with your model and installed package details. The Container Manager package version is not itself the Docker Engine/API version. If compatibility remains uncertain, stop here.
Before creating the container:
- Open Control Panel → Info Center → Network and record the IP address of the LAN interface connected to your home network. This works even if you normally open DSM through QuickConnect or a named address. Use that local numeric address—not a QuickConnect URL, domain name, or public address.
192.168.1.50below is only an example. - In File Station, create a folder named
dockhandbeneath thedockershared folder. - Read the folder's actual location from its properties. Record the full path privately.
/volume1/docker/dockhandis the example used here; a folder on another volume might require/volume2/docker/dockhandinstead. Use your actual path. - Keep the selected image tag and, when created, your Dockhand login credentials in private notes alongside the installation command. Protect these records and any settings backup.
Checkpoint: you can find the empty dockhand folder in File Station and know its full NAS path. It is the destination for saved application data, not the downloaded image.
Prepare one installation command
You will run the command through DSM's Task Scheduler; no SSH login is required for this procedure. Read the values before pasting it.
-
docker run -d— Create and start a container in the background. -
--name dockhand— Give this container the namedockhand. That name must not already belong to another container. Keep it for the checks in this guide. -
--user 0:0— Run Dockhand as the root user and group inside the container. This is an explicit privilege tradeoff for access to its data folder and Docker socket. -
--restart unless-stopped— Allow Docker to restart the container unless you have manually stopped it. -
-p 192.168.1.50:3866:3000— Replace192.168.1.50with your NAS LAN address.3866is the NAS port your browser will use;3000is Dockhand's internal port and stays unchanged. If3866is occupied, choose another unused host port and use it in the browser URL too. -
-v /var/run/docker.sock:/var/run/docker.sock— Make Docker's control socket available at the same path inside Dockhand. Keep both paths as shown. -
-v "/volume1/docker/dockhand:/app/data:rw"— Replace the first path with your actual settings-folder path./app/datastays unchanged: that is where Dockhand expects its saved data.rwgives it read and write access. Keep the quotation marks around the complete argument so a path containing spaces stays together. -
fnsys/dockhand:v1.0.56— Select the application image and version tag. This tag was reached through the official release page on November 4, 2026. It is a deliberate version selection, not a promise to remain the newest release or an immutable image digest.
Check the network before starting. First boot has authentication disabled. Use this HTTP setup only on an isolated, trusted LAN with trusted devices, and stay present to enable authentication immediately. HTTP does not encrypt traffic. A numeric local URL needs no purchased domain or DNS record.
Do not forward router ports or add DDNS or a public reverse proxy for this installation. Binding to the specified NAS address narrows where Docker listens; it is not an access-control rule or a guarantee that the service is isolated. If you do not know whether that address is private and free from external forwarding, stop before starting the container. Ask the person who manages your router/network to confirm the LAN address and that this port has no external forwarding; the appearance of an address alone does not establish isolation.
After replacing the NAS address and folder path where necessary, your command should have this form:
docker run -d \
  --name dockhand \
  --user 0:0 \
  --restart unless-stopped \
  -p 192.168.1.50:3866:3000 \
  -v /var/run/docker.sock:/var/run/docker.sock \
  -v "/volume1/docker/dockhand:/app/data:rw" \
  fnsys/dockhand:v1.0.56
Run the task once in DSM
The DSM steps follow the supplied installation guide; labels may differ in your DSM version.
- Open Control Panel → Task Scheduler → Create → Scheduled Task → User-defined script.
- On General, name the task Install Dockhand, select root as its execution user, and clear Enabled. Here,
rootis the DSM account executing the task;--user 0:0separately selects the user inside the container. - On Schedule, select Do not repeat. This is a one-time creation task, not a recurring update job.
- Under Task Settings, paste your completed command into Run command. Save the task and acknowledge DSM's administrative or password prompts if shown.
- Select Install Dockhand and choose Run once. Allow the image download and container startup to complete, then check Container Manager for the
dockhandcontainer. If the task fails, examine its run details before trying again.
Do not repeatedly run the task to fix an unclear result. If dockhand already exists, another run encounters a name conflict; it does not update that container.
Open Dockhand and enable login immediately
Use a browser on the same trusted network. With the example NAS address, the complete URL is:
http://192.168.1.50:3866
Replace the address with your NAS LAN address, and change 3866 only if you selected a different host port. Do not use localhost from your laptop: that points to the laptop, not the NAS.
Dockhand starts with authentication off. Before adding a management connection:
- Go directly to Settings → Authentication.
- In Users, create a local Dockhand account with a new username and password. These are for Dockhand sign-in; this procedure does not use your DSM credentials to sign in to Dockhand. Save the new credentials privately before enabling authentication. The supplied installation guide labels the buttons Add user and Create user; labels may differ in your version.
- Switch authentication ON and sign in.
- Open the Dockhand URL in a private browser window and confirm it requires login. If the dashboard remains accessible without login, stop
dockhandin Container Manager and resolve authentication before continuing.
Connect the dashboard to this NAS
An environment is the Docker installation Dockhand will manage. For this guide, it is Docker on the same Synology NAS. The socket mounted earlier provides that local connection.
- Open Settings → Environments → Add environment.
- Name it My Synology. This is a reader-chosen label that you will recognize during the persistence check.
- Select Unix Socket as the connection type. If the UI shows a socket-path field, use
/var/run/docker.sock. - For Public IP, enter your NAS's local address. Despite the label, this value supplies the address for generated browser links; it does not instruct you to publish the NAS on the internet.
- Add or save the environment using the available control. Check its connection status and container list without stopping or changing your existing applications.
Checkpoint: you can sign in and identify My Synology as the connected NAS environment. You do not need to add registries or deploy another application to complete this installation.
Check that the saved environment survives a restart
The environment name is a harmless saved configuration to use for this check.
- In DSM Container Manager, stop only the
dockhandcontainer, then start it again. The dashboard will be unavailable while it is stopped. - Reopen the same local URL and sign in. Confirm My Synology remains and connects.
- Return to File Station and locate the settings folder you created. Confirm it now contains application-created data.
If the saved environment disappears or the folder is empty, investigate the data-folder mapping before adding real workloads. A successful check establishes persistence through this restart on your setup; it does not establish that a backup restores correctly or that a downgrade is compatible.
Keep a recovery path before updating
These operations have different consequences:
| Operation | What to preserve and expect |
|---|---|
| Restart Dockhand | Stop and start the same container. Check that the saved environment remains. |
| Update Dockhand | Replace only its container with a deliberately selected image version, keeping its settings folder. Back up first. |
| Remove Dockhand | Stop and remove its container and delete its installation task. Retain its settings folder until you decide you no longer want that configuration. |
| Delete its settings folder | Abandon the saved data in that folder. This is separate from removing the container. |
Back up
Before an update, stop dockhand. Copy or download its complete settings folder off the NAS into a dated backup, and save the exact creation command and old image tag. Treat the backup as administrative configuration containing sensitive settings and credentials. A copy on the same volume is only a short-term recovery copy, not protection against losing the NAS. Do not select just one database file from a running application.
Update
If you postpone the update after taking the backup, start the existing container again. If settings change before you update, stop the container and take a fresh complete backup immediately before updating. When ready to update, review the intended upstream release (the link is for this guide’s selected version), then use Container Manager's Stop and Delete actions on only dockhand. Keep its settings directory and old image. Change the image tag in the saved task, save it, and run the task once to create the replacement. Confirm login, the saved environment, and its connection again.
Recover
If an update fails, stop the replacement and preserve its complete data folder separately. Remove only the failed dockhand container so its name is available again. Restore the complete pre-update folder at its original path, keeping it separate from the failed version’s data, then recreate Dockhand with the matching old tag and saved command. Do not merge old and new database files or assume that an older application can read data changed by a newer release. This recovery approach has not been restore-tested for this guide and cannot guarantee downgrade compatibility.
Uninstall
To uninstall, stop and remove only dockhand, then delete its Task Scheduler installation task. Keep the data folder until you consciously abandon the settings. Do not use Dockhand to delete unrelated applications, stacks, or volumes as part of uninstalling the dashboard.
If a step does not work
Work from the first failed checkpoint:
-
Container Manager is missing — Return to the NAS compatibility check. Confirm official package support for your model.
-
Installation task fails — Read the task's run details and check image-download errors. Verify the selected image and compatibility; do not rerun blindly.
-
A container-name conflict appears — Check whether
dockhandalready exists. The task creates a container; it is not an update operation. -
Host port is occupied — Select an unused host port in place of
3866, preserving internal port3000, and use the selected port in your URL. -
The local address will not open — Confirm
dockhandis running, the NAS address is correct, and the URL uses the selected host port. -
My Synology is offline — Confirm Unix Socket, the path
/var/run/docker.sock, and its mounted path in the installation command; inspect logs for connection or permission errors. Do not make the socket world-writable withchmod 666. -
Login is not required — Stop Dockhand and resolve authentication before adding a management connection.
-
Settings disappear after restart — Check that the real NAS folder is mounted at
/app/dataand contains application data. Pause further setup until persistence works.
Do not disable the DSM firewall or expose Docker over TCP as a generic repair. For unresolved errors, use Dockhand's official manual or the support route it provides and redact credentials and sensitive data from any logs you share.
Evidence note: the live upstream documentation and release information were checked on November 4, 2026. DSM controls and some Dockhand button labels follow the supplied v1.0.49 installation guide and may differ in your version. This article selects image tag v1.0.56 and explicitly uses upstream's root option; it does not claim physical-NAS execution, image-manifest verification, or a tested backup restoration.