

Install Emby on a Synology NAS with Container Manager
Set up Emby on a compatible Synology NAS, connect read-only media and persistent settings, open it locally, and check playback and restart persistence.
Eugene Gavrilov
15 min read- NAS & storage
Give Emby access to a folder of your movies or music, then open that collection from a browser at home. Emby organizes and streams media you supply; installing the server does not supply movies. This guide uses the official Emby image in Synology Container Manager, connects one movie folder, and finishes with a restart check.
This documentation-based procedure has not been tested on a physical NAS; installation, playback, backup and recovery results are not claimed. Its scope is direct access on your trusted home network; hardware transcoding and access from the internet require separate work.
Check that this route fits your NAS
This route combines the graphical Project editor with pasted Compose configuration and two short terminal commands. Before creating folders, check these prerequisites:
- You have DSM administrator access and can use a short SSH session. SSH is a text connection to the NAS, used here only to look up the account’s two numeric identifiers. If you cannot safely complete that step, stop before preparing the installation.
- Container Manager is available for your NAS in Package Center. Its release must support your model and DSM version, and it must provide the Project page used below. An older package named Docker has a different interface. A DSM version alone does not prove compatibility. If Container Manager or Project is unavailable, stop and check your model’s supported package route using the Container Manager release notes, selecting your own model, and Project help.
- You can identify your NAS model and home-network address. In Control Panel > Info Center, record the model and DSM version from General, then the IP address from Network. If several addresses appear and you cannot identify the connection you use for DSM, stop and ask the NAS administrator; do not change network settings. See Synology Info Center help.
- Your processor family is supported by the image. “Architecture” means the processor family. Find your exact model in Synology’s CPU table and read CPU Arch, not Package Arch. The official image lists
amd64,arm64v8andarm32v7;x86_64is another name foramd64. Other entries need an exact documented match—do not guess from a processor brand or package codename. If you cannot match confidently, stop and consult Synology or Emby support with your model details. Supported architecture does not replace the package-compatibility check above. - Your media is already in a NAS folder. You will use its actual path, without relocating the collection.
Do not sideload an unsupported package to reproduce this guide.
Understand what stays on the NAS
An image is the application package. A container is the running instance of that package. Emby needs access to two different kinds of storage: your original media and its own settings. A bind mount connects a real NAS folder to a path inside the container. Keeping settings in a NAS folder allows them to remain when you replace the container.
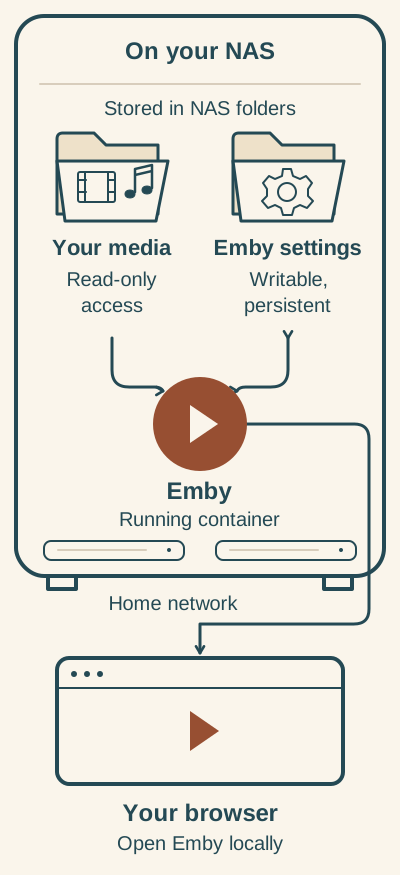
Emby runs on the NAS. This setup gives it read-only access to your media and writable access to a separate settings folder that persists through the NAS mapping. Your browser reaches Emby over your home network. Removing a container and deleting NAS folders are different actions; inspect destructive options before proceeding.
- Your existing media stays in its NAS folder. This setup gives Emby read-only access through its media mount; permissions must also allow reading.
- Emby writes its settings to a separate persistent NAS folder. Correct mapping and write access are required for those settings to survive container replacement.
- Open the running Emby server from a browser using the NAS address and configured port. Home-network use is this guide's scope; a published port does not itself restrict access to your LAN.
A folder consequently has two names in this setup. The NAS-side path is its location in File Station, such as /volume1/media/movies. The container-side path is the name Emby sees, such as /movies. You will use the first when configuring the container and the second when creating the Emby library.
Prepare the folders and their permissions
In File Station, create a project folder and a separate settings folder inside it. Leave your collection in its existing location. The following paths form one worked example; use your actual volume and folders, and create every required folder before deploying.
Project files
- NAS-side folder:
/volume1/docker/emby - Container-side path: none; this folder holds the project definition.
Emby settings — read and write required
- NAS-side folder:
/volume1/docker/emby/config - Container-side path:
/config - Emby must be able to save changes here.
Existing movies — read-only
- NAS-side folder:
/volume1/media/movies - Container-side path:
/movies - The account needs read access; the mount will prevent writes through this connection.
The project folder and names above are illustrative choices. You do not need to move movies into docker, and these names are not universal Emby requirements.
This example runs Emby with a dedicated DSM account to make its folder permissions easier to identify. That is an editorial permissions choice, not a requirement of the image. In Control Panel > User & Group > User > Create, create a user named emby-media, give it a strong password, and keep it outside the administrators group.
Give emby-media read/write access to config and read access to media. A parent folder contains another folder: emby contains config, while docker contains emby. An inherited permission is a rule passed down from a containing folder. The account must also be able to reach the required containing folders.
Inspect the result before deploying:
- In File Station, select your actual config folder. Open Action > Properties > Permission > Advanced options > Permission Inspector. Select
emby-mediaand examine Read and Write; config needs both. - Repeat for your actual movies folder; it needs Read. Check access to the necessary containing folders too.
- If a denial, unclear inherited rule or inaccessible parent remains, stop and use Synology’s permissions guide or ask your NAS administrator. Do not remove unfamiliar denial rules or grant Everyone write access. A group denial can override an apparent grant. These inspections precede the later startup and library checks; they do not guarantee container access.
Find the account's numeric identifiers
The official image uses UID and GID for numeric user and group identifiers. It also supports GIDLIST for additional groups, which this basic example does not set. These are the official image's names; do not substitute PUID and PGID from another image's instructions. A username cannot replace a numeric identifier.
For the lookup, temporarily enable SSH in Control Panel > Terminal & SNMP > Terminal and select Apply. Open Terminal on macOS or PowerShell on Windows. Type ssh, a space, your DSM administrator username, @, and the NAS local IP address. For example, ssh [email protected] is illustrative: replace both the username and IP address.
A first-connection warning may show a fingerprint, an identifier for the server’s key. Compare it with a fingerprint obtained through a trusted separate channel, such as the person administering this NAS. The displayed IP alone is insufficient. This guide has no verified DSM graphical fingerprint lookup. If you have no trusted reference or see a changed-key warning, cancel with Ctrl+C and stop before accepting a key or entering credentials. Never disable host-key checking to continue. See the OpenSSH host-key guidance.
After verifying the identity, enter the DSM administrator password at the password prompt and press Enter. Normal terminal password entry hides the characters, so an apparently empty line is expected. Successful login gives you a command prompt on the NAS; its wording varies. Only then run the lookups below.
Run these two read-only commands, one at a time. They need neither sudo nor a root login:
id -u emby-media
id -g emby-media
Record the first result as UID and the second as GID. Type exit to disconnect. If you enabled SSH solely for this lookup, disable it afterward, first checking that no existing backup or session depends on it.
If login or either lookup fails, do not guess numbers. At an established NAS shell, type exit; at an unanswered prompt, cancel with Ctrl+C. Disable SSH only under the same condition above, preserve the exact error without passwords, and seek help using Synology’s SSH sign-in instructions. Use only its administrator sign-in guidance, not its root-escalation section: this lookup requires no root login.
Create the Emby project
Open Container Manager > Project > Create, following Synology’s Project help if your interface differs. Set the project name to emby and Path to your project folder—for the worked example, /volume1/docker/emby. Under Source, choose the editor for docker-compose.yml. Leave the optional Web Station web portal unconfigured for this direct local connection.
The Compose definition describes the image, folder connections and port in one place. Read the field guide, then paste the example and replace its NAS-specific values before completing the project.
image: which application package to run. emby/embyserver:latest is the official image with its moving stable tag.
UID and GID: who accesses the folders. Replace 1030 and 100 with the two numeric results you recorded.
volumes: which folders Emby can reach. Replace each NAS-side path on the left; retain /config and /movies on the right.
ports: how a browser reaches Emby. 8096:8096 connects NAS port 8096 to the server’s port 8096.
restart: when to bring the container back. unless-stopped permits restart unless you deliberately stop it.
services:
  emby:
    image: emby/embyserver:latest
    environment:
      UID: "1030"
      GID: "100"
    ports:
      - "8096:8096"
    volumes:
      - /volume1/docker/emby/config:/config
      - /volume1/media/movies:/movies:ro
    restart: unless-stopped
For example, 1030 means “the result of id -u emby-media was 1030,” not “all Synology users should use 1030.” Make the corresponding replacement for GID and both NAS-side paths. Keep /config and /movies as shown so the later library instructions match.
The config mount is writable because Emby must save its settings there. The media mapping ends in :ro, making it read-only through this mount. Emby therefore cannot delete those files, save sidecar metadata alongside them, or record into that folder through this connection. Existing NAS read permissions still apply; :ro does not grant missing access or protect against every other route to the files.
The port mapping connects NAS TCP port 8096 to Emby's HTTP port 8096 inside the container. If the NAS port is already occupied, change only the left number—for example, to 18096:8096—and use port 18096 in your browser later. This recipe uses the normal bridge network. This port mapping does not select a particular NAS interface; publishing it is a connection route, not a home-network access restriction: keep router forwarding absent and use only your trusted home network.
Review the summary, select Done, and choose to start the project. Use the displayed project/container status and messages to judge progress; if startup fails, inspect those messages before changing the definition.
Open Emby on your home network
Your browser needs an address and a port. The local IP address identifies the NAS; the port selects Emby on that NAS. With the unchanged mapping, the illustrative URL is:
http://192.168.1.50:8096
Replace 192.168.1.50 with your NAS's local IP address. If you chose 18096:8096, end the URL with :18096 instead. Open it from a device on the same home network. Do not type localhost on your laptop: that points to the laptop itself.
A hostname or domain is a named address rather than the literal IP used here. This local check needs neither a domain setup nor an HTTPS certificate. The http:// connection is unencrypted, so use it only on your trusted home network; publishing a port does not create an encrypted connection.
Follow the startup wizard to choose a display language and create an Emby username with a strong password. This is your Emby sign-in, separate from the DSM account used for folder permissions. Add a library with the content type matching your files. For the movie example, choose /movies, the path inside the container, rather than /volume1/media/movies. Other collections can be added later with their own folder mappings.
Metadata is descriptive information such as a title or poster artwork, separate from the video and sound. If language or country preferences appear, choose the preferences you want; their exact wizard position is not assumed here. Keep automatic port mapping disabled if shown, accept the terms if you agree, and complete sign-in.
Before treating setup as complete, open the Emby server dashboard > Server > Network. Turn off Allow remote connections to this Emby Server, and leave automatic port mapping disabled if present. Save with the available page control, reopen the page and confirm remote access remains off. If you cannot find or confirm the control, stop and consult Emby’s Network Setup instructions. Do not create router forwarding rules while resolving this; the Emby settings do not replace your router or firewall boundary.
Check a file, then check a restart
Use a small home video or other media you have permission to use for the first check. Finding it in the library and playing it are separate outcomes: playback depends on the file, client and hardware.
Work through this checklist yourself:
- Open Emby at the local URL and sign in.
- Confirm the expected item appears in the library, then attempt playback.
- Save an identifiable setting or favorite.
- In Container Manager, use Project > Action > Restart. Return to the same URL and check that your account, library and saved change remain.
- Locate the real config folder in File Station and record its NAS-side path.
If something fails, use the matching symptom below before changing unrelated settings.
Resolve the symptom you can see
Container Manager or Project is missing. Recheck the model, DSM and package compatibility. This procedure depends on the Project interface.
The image will not download. Check available storage, NAS time, registry connectivity and any displayed rate-limit message.
The container repeatedly exits. Open Container Manager > Container, select Emby, then open Details > Log. Read the entries around the failed start and preserve the message and time. These diagnostic messages can identify a missing folder or required setting. Check your UID/GID, config mapping and account access. If the interface differs, use Synology’s container troubleshooting guide.
The browser cannot open Emby. Check that the project is running, then confirm the current NAS IP and published NAS-side port. A guest wireless network may prevent devices from reaching the NAS. LAN means your home network; TCP is the connection protocol used by this browser port. If the container runs and the address and port are correct but access still fails, stop and ask for help with a firewall rule limited to your home network. Do not disable the firewall or guess its network range. Use Emby’s connectivity guide for the help handoff.
The library path is missing or empty. Check that the NAS folder contains the intended files, its mapping reaches /movies, and the chosen identity can traverse and read it. Select the container-side path in Emby. Making the media mount writable does not fix missing read permission.
An item appears but will not play. Keep the exact playback error message, the client you used and details of the file for the support handoff below. Discovery and playback are separate outcomes; file, client and hardware can affect playback. Do not change unrelated container settings to force a result.
Settings disappear after a restart. Recheck that /config maps to the intended persistent NAS folder, then inspect its write access and the container messages.
If the folder, identity and address checks do not explain a failure, collect sanitized logs and stop making unrelated configuration changes. Use the support handoff below.
Prepare a backup before a separate update task
latest is a moving stable tag rather than a fixed release. Record the running Emby version and the image identity shown by Container Manager. An image digest is a precise image identifier; if you later pin an image, use an actually listed tag or full digest, never a guessed tag based on the server version.
Before an update:
- Stop the project. Emby must be stopped for a consistent manual backup of its program data.
- Copy the entire config folder and Compose definition to a separate backup location. Keep source-media backups separately.
- Retain the prior image; Container Manager > Image > Action > Export can export it when sufficient storage is available.
Stop here before attempting the update. Read the official image’s Upgrade instructions, Synology Image help and Project help for your installed versions. A plain Restart does not replace the existing container’s image. If the applicable recreation procedure is unclear, obtain version-specific help before proceeding.
If an update has already failed, stop the project and preserve both the failed configuration and untouched pre-update backup, together with the prior image. Use Emby’s manual-backup guidance and obtain version-specific recovery instructions before restoring anything. Do not start an older server against a database already changed by a newer one; a backup does not guarantee a supported downgrade. Do not improvise a restore.
Stop or remove Emby without discarding your collection
Stopping the project, removing its resources and deleting NAS folders are distinct actions. Stop the project first. Before using Clean or Delete, preserve/export the YAML and back up config and media, then inspect the operation's targets: Synology documents these actions as potentially removing project resources or data. Do not assume a deletion dialog leaves every folder untouched.
Keep the existing media folder. Delete config only if you deliberately want to discard Emby's saved state. Remove temporary accounts or access rules only after checking that nothing else uses them.
If you need help, use the support route linked from the official Emby Docker page. Provide Emby support with the sanitized Compose definition, relevant logs, DSM/package/model details and image identity. Remove passwords and tokens before sharing.
Official resources
- Container Manager release notes — choose your model and check applicable package requirements.
- Synology Container Manager Project help — project creation and operations.
- Official Emby image instructions — supported image configuration and upgrade guidance.
- Emby connectivity help — local connections and network settings.
- Emby manual backups and backup overview — program data and source-media backup roles.
This first installation does not configure hardware transcoding, automatic device discovery, recording, sidecar writes or remote access. The read-only media connection and manual local URL are deliberate scope choices.