

Synology DSM maintenance: Package Center, SSH, tasks and firewall
Install a compatible SPK, open a temporary SSH session, run a DSM task manually, and check access to an app port.
Eugene Gavrilov
4 min read- NAS & storage
A NAS guide may ask you to install an SPK, run a shell command or check whether an app is reachable. Match the action to its DSM control and verify one result before going to the next step.
Install a package from Package Center or an SPK
Open Package Center, search for the package, and install the release offered for your NAS. Open the package from the DSM main menu when installation finishes. Check the model and installed DSM build if the expected package is missing.
When the publisher supplies a compatible .spk, download it from the publisher. Synology packages and utilities are available through the Synology Download Center. In Package Center select Manual Install, choose that file, and read the package identity, compatibility and confirmation shown by DSM before approving. If DSM rejects the file, check the exact package, model and DSM build with the publisher. For Docker apps, separately check Container Manager and image compatibility.

Synology Package Center screenshot. Huncode cropped the toolbar and underlined Manual Install. The package list on your NAS can differ.
Open an SSH session for one maintenance job
- From the trusted local network, open Control Panel → Terminal & SNMP → Terminal. Record whether SSH was already enabled. Enable it if the job requires it, record its configured port and apply the change.
- Open a terminal on your computer. For a NAS at
192.168.1.50with SSH on port2222, usessh -p 2222 [email protected], substituting your port, DSM administrator account and NAS address. Confirm the host identity with your NAS administrator if the key is unfamiliar or has changed. - Run the required command as the signed-in account where possible. When the procedure explicitly needs a root shell, run
sudo -iand enter the password for the same administrator account. Run only the maintenance commands you have reviewed. Theid -ucommand prints0in a root shell. - Run
exitto leave the root shell, thenexitagain to close SSH. If you enabled SSH solely for this job, restore the previous setting once the work is done and you have checked that no other maintenance or backup depends on the connection.
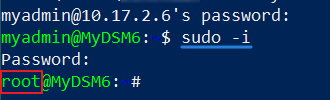
Synology’s terminal example shows an administrator signing in and elevating to root on an older DSM release. Huncode highlighted the elevation command.
Save and run a task manually
Open Control Panel → Task Scheduler → Create → Scheduled Task → User-defined script. Give the task a recognizable name and choose the account the procedure requires. In Task Settings, review the full script before saving. For a one-time job, leave scheduled execution disabled. Select the saved task and use Run to start it manually.
If you need a local output record, open Settings in Task Scheduler and choose where to save output results before running the task. After the run, use Action → View Result and check the app or file the script was intended to affect. Keep the output folder private if the script can print credentials or configuration. For an example with an explicit first check, see running Watchtower manually on Synology.
Check which clients can reach an app port
Open Control Panel → Security → Firewall and record whether the firewall is enabled and which profile applies. Before editing rules, identify the client address, the NAS interface and the actual port the app publishes. Keep access to DSM available through a known local path while you test.
The rules match traffic by properties such as source IP and port. Within an applicable list, the earlier matching rule takes priority. Read the interface rules and the action for traffic that matches no rule. For a local test, use the narrow set of client addresses the application needs. Check a fresh connection from an allowed client, then verify the intended restriction from another client you control if available. A rule in DSM is one part of the path. Also check your router and the app’s published address when deciding who can connect.

Synology’s source-IP rule example. Huncode underlined the controls. Use your own client address or subnet when configuring a rule.
The screenshots come from Synology Knowledge Center’s Package Center, SSH administration and DSM firewall tutorials and are used with permission. The task controls follow the DSM 7 Task Scheduler help.