

Install Emby on a UGREEN NAS and check hardware transcoding
Deploy Emby with Portainer, preserve settings and media mounts, and use playback logs to check Intel hardware transcoding on a compatible UGREEN NAS.
Eugene Gavrilov
13 min read- NAS & storage
Set up a small local media library, keep Emby's settings in a NAS folder, and check whether a playback session actually uses your NAS's graphics hardware. You will check installation and hardware acceleration separately: reaching the welcome screen establishes only that Emby is available.
This guide starts with Docker Engine and a working Portainer Docker Standalone environment on the NAS. It does not cover installing those prerequisites in UGOS. The hardware route below is for an amd64 NAS with Intel graphics and an accessible render device, and requires an Emby Premiere server key. Confirm your model and installed OS support those prerequisites before continuing. No particular UGREEN model or UGOS release was physically tested for this article.
Understand the container before setting it up
Emby organizes and streams your personal media. Here, Docker runs it in a container: a running instance of an application package called an image. Portainer is the management interface used to deploy that container.
The container needs two kinds of storage. A dedicated NAS folder holds Emby's configuration, with permission for Emby to write its settings. Your existing media folder holds the films. A bind mount connects each real NAS folder to a path inside the container. In this guide the settings appear inside Emby at /config, and the movie folder appears at /movies. We give Emby read-only access to the movie mount for this playback setup.
These paths describe the two sides of a connection. If your actual movie folder is mapped to /movies, choose /movies when Emby asks for the library folder. The NAS folder does not need to have that name.
An environment variable is a named setting supplied when the container starts. You will use variables for the real folder paths and numeric user/group identities. Those identities control which files and hardware devices the container can access; the numbers must come from your NAS.
Transcoding converts video for playback. Hardware transcoding uses supported graphics hardware for parts of that conversion. It depends on the hardware, device access and the particular conversion job; a device mapping alone does not establish codec support.
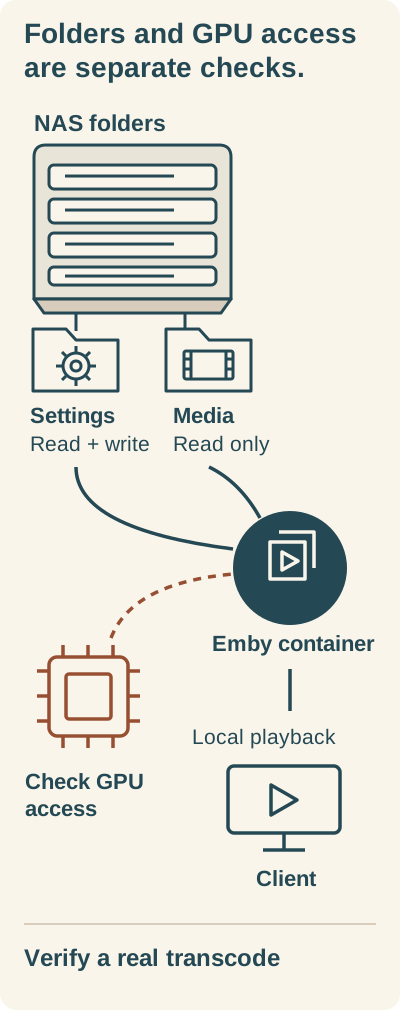
Settings and media use separate folder mounts; GPU access alone does not prove hardware transcoding.
Emby writes its settings to the configuration folder and reads the movie folder through a read-only mount. A client plays media from the container over the local network. The render device is a separate access requirement: inspect an actual video-transcoding session before recording hardware use.
Check the NAS and collect its real values
Record the NAS model, processor, OS release and local IP address. Also identify the existing movie folder and a dedicated location for Emby's settings. A path such as /volume1/docker/embyht/config is only an example: use the actual absolute path on your NAS.
The next checks require a terminal session on the NAS. If that is unfamiliar, ask an administrator to help rather than guessing values. Use the current SSH instructions for your NAS; this guide does not provide a verified UGOS menu path.
Replace YOUR_NAS_ACCOUNT with the account whose identity you intend Emby to use, then inspect:
uname -m
id YOUR_NAS_ACCOUNT
ls -ln /dev/dri/
getent group video
getent group render
Record the following before opening the stack editor:
uname -mshould identifyx86_64for this amd64 route. An ARM image being available does not establish compatibility with these Intel hardware instructions.- From
id, record the account's numericuidand primarygid. - From
ls -ln, record the render node's exact path and numeric owning group. Group names and numbers vary; the actual device listing takes precedence over copied example IDs. - Include the actual render-device group in the supplementary group list. Add any groups the selected account needs to read the media.
The sample below uses /dev/dri/renderD128. If that node is absent, stop before deploying this hardware configuration and establish your model/OS support. Do not create a substitute device or copy someone else's group IDs. A listed node is a prerequisite, not proof of a successful hardware transcode.
Create the settings folder and deploy the stack
Create a dedicated folder for Emby's settings. Give the selected UID/GID write access to it through the NAS's permissions tools, and give the selected identity read and folder-traversal access to the existing movie folder. No Redis folder is needed.
Before deployment, prepare these variables in Portainer's stack environment-variable fields. Each value comes from the checks above; do not leave placeholder text in the deployment.
| Variable | Meaning | Value to supply |
|---|---|---|
CONFIG_PATH | NAS folder that will appear as /config | Existing absolute settings-folder path, writable by the selected identity |
MOVIES_PATH | NAS folder that will appear as /movies | Existing absolute path to your movies |
EMBY_UID | Account identity for Emby | Numeric UID from id |
EMBY_GID | Primary group identity | Numeric primary GID from id |
EMBY_GROUPS | Additional device/media groups | Comma-separated numeric IDs, including the render node's actual owning group |
A port is the numbered entry point for a network service. HTTP is the web protocol used here; unlike HTTPS, it does not encrypt the connection. Keep this setup on your trusted local network.
The Compose configuration below describes one Emby service. It publishes HTTP port 8096, mounts the settings and movie folders, and gives the container access to the inspected render device. It uses bridge networking; do not add network_mode: host, because published port mappings are ignored in host mode. DLNA and Wake-on-LAN are outside this minimal setup.
The image tag latest can change. It is not a fixed release tested for this guide. Record the actual image identity after deployment so you can preserve it before an update.
services:
  emby:
    image: emby/embyserver:latest
    container_name: embyht
    environment:
      UID: "${EMBY_UID}"
      GID: "${EMBY_GID}"
      GIDLIST: "${EMBY_GROUPS}"
    ports:
      - "8096:8096"
    volumes:
      - "${CONFIG_PATH}:/config:rw"
      - "${MOVIES_PATH}:/movies:ro"
    devices:
      - "/dev/dri/renderD128:/dev/dri/renderD128"
    restart: on-failure:5
If the verified usable render node has another name, substitute its actual path on both sides of the device mapping. The sample includes one movie library; add other media mounts only when you have identified their real folders and access permissions.
In Portainer:
- Open the NAS's Docker Standalone environment.
- Choose Stacks → Add stack, enter
embyhtas the stack name, and select Web editor. - Paste the Compose configuration and supply the five variables above.
- Choose Deploy the stack. If deployment fails, inspect the reported error before proceeding.
Download time depends on the connection. A successful deployment is a milestone; it is not a hardware-acceleration result.
Open Emby locally and add one small library
First identify the address you are going to open. The NAS IP means the NAS's address on your local network. A hostname or domain is a name used instead of an address; this procedure uses the local IP so you do not need to set up a name. The port is the numbered entry point for Emby's web service. In this configuration it is 8096.
The complete address has three parts:
http://NAS-IP:8096
Replace NAS-IP with the NAS's real local IP; do not type those letters literally. Open the address from a browser on the same local network. http:// selects HTTP. HTTPS needs a separate configuration: adding port 8920 alone does not provide certificates or an encrypted endpoint. Keep this initial setup on your trusted LAN and do not add router port forwarding.
Follow Emby's setup wizard. The supplied source shows the steps below; wording may differ in your installed version.
- Create your Emby user with a password, and keep the credentials securely.
- Add a Movies library. Select
/movies, the path visible inside the container, as its folder. - Set the metadata language and country you want.
- Disable automatic port mapping, review the terms and finish setup.
Add one small movie you personally own to the NAS folder used for MOVIES_PATH. Scan the library, confirm the title appears and try playing it. If the library is empty, check that you selected /movies inside Emby and that the host folder and permissions match your configuration.
Check persistence, then prove hardware use
Restart and check the same library
Restart the embyht container through Portainer. Reopen the local URL and confirm that your login, settings and sample library remain. In the NAS file manager, locate the real directory you supplied as CONFIG_PATH.
If Emby returns to an empty setup after restart, inspect the settings-folder mapping and its write permissions before continuing. Keep the actual settings folder and stack definition together in your maintenance records.
Inspect a session that converts video
Install the Premiere server key in Emby's server configuration. Open Dashboard → Transcoding and start with Auto where offered; only force an acceleration path that your hardware supports. Do not point a custom transcoding temporary folder at an existing media folder.
Use one playback session so that you can match its evidence. Note the movie filename, client device and start time, then follow these steps:
- Play the sample file. Where the client offers it, select a quality below the source bitrate to request video conversion.
- In a second browser tab, open the Manage Emby Server gear and return to the dashboard main page. Find the playing device under Active Devices and check its playback information. This location is documented in Cloudron’s Emby package guide; labels may differ by release. Confirm video is transcoding, rather than only audio or container remuxing. If the session display does not settle that question, continue to the log; do not treat a generic “transcoding” label as hardware proof.
- Open the Manage Emby Server gear, then Server → Logs in the sidebar, as described in Emby’s log guide. Look for the
ffmpeg-…txtconversion log created at your recorded playback time. Open it and match the input movie filename/path to your sample. Stop other playback and repeat with only the sample if you cannot identify the matching file. A hardware-detection log is a different file and does not prove this session used the GPU. - Read the matching log's processing plan/command and its conversion output together. The terms below come from the FFmpeg CLI and codec documentation. They are examples to interpret, not a captured test result and not text to paste into settings.
| Example term | Meaning and limit |
|---|---|
-hwaccel vaapi | Requests VAAPI decoding. The request can be unsupported; its presence alone does not prove successful decoding. |
h264_vaapi as the selected output encoder | Identifies a VAAPI H.264 encoder; confirm that this is the encoder used for the sample's output, not merely an available option. |
| FFmpeg encoding progress | Shows conversion activity. Combine progressing output and successful playback with the actual selected hardware route; do not infer the decoder from the encoder name. |
If the log does not make the selected hardware route and successful output clear, record hardware transcoding unproven. Use Download on the matching conversion log and the server log from the same time, and ask an administrator or Emby support to interpret them with the filename, playback time and media information. Emby recommends downloading logs through its UI for anonymization; do not publish raw log-folder contents.
| Observed result | What it establishes |
|---|---|
| Direct Play | The file plays without this video-transcoding check; hardware transcoding remains unproven. |
| Video transcoding using software | Video conversion works for the session; hardware use has not been established. |
| Video transcoding with log evidence of hardware use and advancing output | Hardware use is established for the observed part of that particular conversion. |
A visible GPU option, successful movie playback or low CPU usage alone is insufficient evidence. Record the session result instead of assuming every file will follow the same path.
Fix the first failed check
Work from the point where progress stopped. Avoid guessed group IDs, privileged-container shortcuts or broad write permissions.
| What happened | Check first | Next action |
|---|---|---|
| Stack will not deploy | Deployment error, YAML indentation, resolved variables, paths, permissions and device existence | Correct the specific mismatch, then redeploy. Stop the hardware route if its required device is absent. |
Port 8096 is already in use | Another service may own the host port | Choose an unused host port, for example 18096:8096, and use http://NAS-IP:18096. |
| Local page does not open | NAS local IP and the host-side port in the deployed stack | Use that address and port from the same local network; confirm deployment succeeded. |
| Library is empty or inaccessible | Real movie folder, /movies mount and library selection, account read/traverse permissions | Correct the mapping or the selected identity's access, then scan again. |
| Hardware conversion is absent or fails | Premiere key, actual render node and its group, supported hardware/codecs, same-session logs | Resolve the failed prerequisite and repeat the video-transcoding check. |
These checks follow the folder, identity, network and playback requirements of the setup; they do not establish a model-specific diagnosis.
Update with a way back
Arrange administrator assistance before starting an update if you cannot preserve and restore the image and settings yourself. This is the maintenance boundary of the beginner walkthrough. The safe plan below combines Docker's image-preservation tools with Portainer's stack editor; it does not supply a verified UGOS backup-button sequence.
- Save the stack YAML and all five variable values. In Stacks → embyht, the Editor tab contains the Compose definition and the environment-variable section. Keep a copy outside the live settings folder.
- Have the administrator record the exact image used by the running container, preserve it with Docker image save, and record how to select that saved image again. Also record its digest when available. Do this before replacing
latest; that tag can point to a different image later. - Stop
embyht. Copy the entireCONFIG_PATHfolder, retaining its permissions, to a separate pre-update backup location. Verify that the copy is readable and retain the saved image with it. Keep your original media protected separately. Do not proceed until the administrator can restore both parts. - With that recovery set secured, have the administrator select the intended image release or digest in the Compose
image:field and redeploy using the Portainer stack-edit procedure. Preserve the same mappings and variables. Repeat the local-access, library, restart and playback checks after deployment. No fixed release is prescribed here.
If the update fails, use this order with the administrator:
- Stop the failed container before changing its files.
- Preserve the failed configuration in another location for diagnosis; do not overwrite the pre-update backup.
- Restore the complete pre-update configuration to the exact NAS path used by
CONFIG_PATH, with its original ownership and permissions. - If needed, recover the saved image with Docker image load. Select that matching prior image in the saved stack definition, then redeploy with the original variables and mounts.
- Confirm that the local URL opens, the earlier login/settings and sample library are present, and playback works. Repeat the restart check. If restoration fails, stop and preserve the backups and logs for help.
Portainer's stack-file history can restore earlier YAML; it is not a backup of Emby's configuration database or Docker image. An older image must be paired with the saved older configuration rather than a database already changed by the update.
Remove Emby while keeping your folders
Remove the stack/container in Portainer when you no longer want the application. Retain the NAS configuration folder and original media until you have decided they are no longer needed. Removing the application and deleting those host folders are separate actions. The read-only movie mount prevents Emby from writing through that mount.
Record what works on your NAS
Before calling the setup complete, check the results you actually observed:
- The local Emby address opens.
- The sample movie appears and plays.
- Settings and the library remain after restarting the container.
- You can identify the persistent settings folder and original media folder on the NAS.
- You have recorded the hardware-transcoding diagnostic result, including any unresolved failure.
Keep the local URL, image identity, stack, folder mappings and playback result in your maintenance notes. If local playback and persistence pass but hardware proof is missing, you have an Emby installation with acceleration still to investigate.