

How to Install Hastebin on Your Synology NAS
Install Hastebin with Synology Container Manager, open it on your trusted LAN, check a saved paste after restart, and make a stopped backup.
Eugene Gavrilov
10 min read- NAS & storage
Put a block of harmless text on your NAS, save its link, and open it again from another browser tab. This guide follows that task through installation, reopening a paste after a restart, and making a backup with the app stopped. Replacing or updating the container is a separate, assisted exercise. These are checks for you to perform; no physical NAS installation was tested for this guide.
Check the maintenance limit first. The publisher describes this Hastebin image as a pastebin for protected networks, and its Docker Hub page was labelled “Updated over 8 years ago” when checked on November 4, 2026. Treat it as a legacy experiment on a trusted local network. Use harmless sample text, keep it off public routes, and do not put passwords or personal documents into it. This guide makes no authentication, encryption or ongoing maintenance promise.
Know what will run on the NAS
An image is the downloaded application template. A container runs that image. Compose is the configuration file used here to describe the image, network port and storage folder together; Container Manager runs that configuration as a Project.
Install Container Manager through DSM's Package Center if it is available for your NAS. You need access to install the package and manage a Project. This guide requires Container Manager's Project feature. Package availability and image compatibility are prerequisites: it does not establish support for every NAS model or ARM processor. If the package is unavailable or the image cannot run on your architecture, stop at that point.
Understand the address and folder
You will use two different locations. The browser address opens Hastebin; the NAS folder holds the files written by its file-storage configuration.
- Your NAS's private IPv4 address identifies it on your local network. If you already open DSM directly at a known private IPv4 address on your LAN, keep that address and replace DSM's port with Hastebin's port. For example,
http://192.168.1.50:5000becomeshttp://192.168.1.50:7777. A QuickConnect link, hostname, public address or IPv6 address does not supply the private IPv4 value this configuration needs. If you cannot identify it, ask your NAS administrator before continuing. The example below uses192.168.1.50. Use the actual address of your NAS wherever this number appears. - Port 7777 selects this service at that address. The first port in the configuration is the NAS port; the last is the port inside the container. With the example values, the browser address is
http://192.168.1.50:7777. - The NAS data folder is the host side of a bind mount: a connection from a folder on the NAS to a folder inside the container. Here
/volume1/docker/hastebin/dataconnects to/app/datainside Hastebin. Files written through that mount remain on the NAS when the container is replaced.
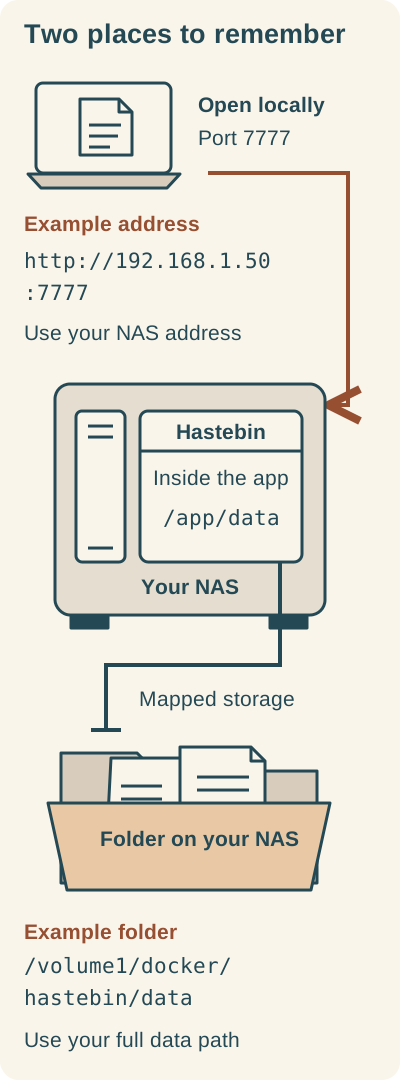
The local address opens Hastebin; the mapped NAS folder holds its data. Both NAS values shown are examples.
Text alternative: Open http://192.168.1.50:7777 from the trusted local network, using your own NAS address. Inside the app, /app/data maps to /volume1/docker/hastebin/data in this example; use the full path of your own dedicated data folder. The path wraps onto two lines in the graphic but is one continuous path. The browser address and storage folder have different jobs.
The source guide uses /volume1/docker/hastebin. Your NAS may use another volume path. Determine your actual path before copying the configuration. Keep /app/data unchanged: that is the publisher's storage location inside the app.
Use this address only from devices on your trusted home network. Do not configure a router or remote-access service to make Hastebin reachable from the internet. A private address binding is not access control, and this guide does not establish that DSM's firewall filters Docker-published ports.
Create the folder and Project
1. Prepare a dedicated data folder
In File Station, create a hastebin folder under docker on your chosen volume, then a data folder inside it. For the source volume example, this gives /volume1/docker/hastebin/data. Keep it separate from unrelated personal files. The project configuration will sit in the hastebin folder; the app's stored files belong in data.
To find the full data path, right-click the newly created data folder in File Station, open Properties > General, and copy the Location path. The leading volume component, such as /volume1, is part of the filesystem path; the visible folder names alone are not the full path. If Location does not give you the absolute path, stop and get help from your NAS administrator rather than guessing the volume.
The app needs write access to this dedicated data folder. Its runtime user ID and the exact DSM permission setting have not been established here. If it reports a permission error, use the troubleshooting section below instead of applying broad permissions.
2. Enter the configuration
Open Container Manager > Project > Create. Give the Project the name hastebin and select your hastebin folder as its path. Choose the editor source to create docker-compose.yml. Synology documents both uploading this file and creating it in the editor.
Stop here unless you have both the NAS's private IPv4 address and your data folder's full path. The following is a complete example configuration. Before starting it, replace 192.168.1.50 with your NAS's private IPv4 address and replace /volume1/docker/hastebin/data with the absolute path of the data folder you created. Those are values belonging to your NAS, not text to leave unresolved.
services:
  hastebin:
    image: rlister/hastebin:latest
    restart: unless-stopped
    environment:
      STORAGE_TYPE: file
    ports:
      - "192.168.1.50:7777:7777"
    volumes:
      - /volume1/docker/hastebin/data:/app/data
Here is what you are asking Container Manager to run:
imageselects the publisher's Hastebin package.latestis a tag, and tags can change; it does not mean the package is recently maintained.STORAGE_TYPE: fileselects the publisher's file-storage configuration.portsconnects port7777at your NAS address to port7777inside the container.volumesconnects only your dedicated data directory to/app/data, with write access.restart: unless-stoppedselects Docker's documented policy for restarting a container unless it has been stopped. It is an operational choice for this configuration, not a NAS-tested result.
Review the address and folder path, then review and start the configuration through the Project wizard. No exact sequence of later wizard button labels is assumed here.
Open Hastebin and save your first paste
From a computer on the same trusted LAN, open your NAS address with :7777 appended: for the example NAS, http://192.168.1.50:7777. Check that the page loads before continuing.
Enter a harmless, recognizable line such as “My NAS paste check” and use the displayed save control. This guide has not verified the exact icon or shortcut in this image. The result to look for is a saved page with its own URL: copy that complete URL into a separate note, including everything after the port number. Open it in a second tab and check that it retrieves the text. If you cannot identify a save control or retrieve the text at its saved URL, stop here and seek help. The sample line is illustrative; these are reader checks, not reported test results.
In File Station, look in your dedicated data folder for files written by the app; do not rename them. In Container Manager > Project, select hastebin, open Action (or right-click the Project), and choose Restart. Reopen the complete saved paste URL. The expected check is that the same text appears. If it does not, stop and investigate before adding more data.
This checks a restart. It does not demonstrate that the paste survives replacing its container, and this beginner exercise does not ask you to remove a working Project.
Do not rely on automatic expiry. This guide does not establish an expiry mechanism for the image. Plan as though files remain and storage grows; keep separate copies of text worth retaining and decide when to discard the experimental dataset.
Make a stopped backup
In Container Manager > Project, select hastebin, then choose Action > Stop (or right-click and choose Stop). This stops the Project's containers without removing them. Wait for it to stop before copying the data.
Copy the entire data folder and docker-compose.yml to a separate backup location, and keep the complete saved sample URL with them. Retain the original folder and configuration too. A copy is not a verified recovery: the assisted exercise below is needed before trusting it for replacement or updates.
To resume, select the hastebin Project and choose Action > Start (or right-click and choose Start). Reopen the saved URL. Keep the backup separate while you use the app.
Before replacement, recovery or an update
Optional assisted follow-up
These operations require more preparation than a restart. This guide has not established a beginner graphical route to obtain a complete immutable image identity, preserve the old image, or replace and restore the runtime safely. Leave your working Project in place and get help with those steps before deleting, rebuilding or updating it.
The helper must first identify the complete image digest and retain the old image together with the stopped data backup and Compose file. A digest identifies immutable image content; latest can change. Do not rely on a new download of latest being the original image, and do not use a shortened digest from a search result.
For an assisted recovery test, use a copy of the backup, a separate Project name and a separate data path. Keep the working Project's files untouched. The test must run the same image, with a different NAS port if the original service is present. For the example NAS address, the test configuration's port entry is:
    ports:
      - "192.168.1.50:7778:7777"
Use your actual NAS address in that line. Only the host port changes to 7778; the container port remains 7777. In the complete saved paste URL, change :7777 to :7778 and keep the entire suffix after the port unchanged. Check that this retrieves the sample text. This is a recovery exercise to perform, not a tested restore guarantee.
Attempt an update only after the helper has established that recovery path, retained the old image and stopped backup, and chosen an explicit replacement image version or complete verified digest. Recheck the saved paste after the update. If it fails, stop the new instance and use the retained old image, original configuration and pre-update data together for recovery; preserve the backup while investigating.
If you want to retire Hastebin now, use Action > Stop on its Project. For permanent runtime removal, first get help confirming exactly which object and files Container Manager will remove. Keep the NAS data folder and backups unless you intend to discard the pastes. Removing a container is not a backup or an expiry policy.
If a checkpoint fails
| Checkpoint | What to check next |
|---|---|
| Container Manager is unavailable, or the image reports an architecture mismatch | Consult Synology's package/model information and the publisher's image information. This guide makes no universal compatibility promise. |
| The Project cannot publish port 7777 | Check whether that NAS port is occupied. Choose an unused host port, for example 7778, while keeping the final container port 7777; use the chosen host port in your browser address. |
| The local page does not open | Recheck the NAS address and port in both the browser and configuration. If the NAS address changed, update the explicit address binding. |
| Logs show permission denied | Select the Project and use Action > Stop. To inspect container status and past events, go to Container Manager > Container, select the Hastebin container, open Details, and use the Log tab. Check the exact mounted path. Resolve access on the dedicated data folder for the actual runtime identity, with DSM/admin help if needed. Do not grant Everyone write access, use chmod 777, enable privileged mode or mount personal folders as a shortcut. |
| A saved paste disappears after replacement | Verify the actual NAS data path and its /app/data mapping before proceeding. Keep the failed instance stopped while investigating; retain the backup and get help with the recovery path above. |
If you need help, retain the redacted error, Compose settings and image identity, leaving out paste contents and credentials. Keep your working local address, data-folder location and your stopped backup copy together before storing more sample text or trying another image.
Sources and attribution
Configuration details come from the rlister Hastebin image publisher. Synology documents Project creation and controls, File Station folder properties, and container status and logs. These sources support the procedure; no physical NAS test is claimed.
Docker explains bind mounts, published ports, image digests, and Compose restart policies.
This original Huncode guide uses Marius Bogdan Lixandru's earlier Hastebin installation guide (updated January 11, 2025) as a historical starting point for the package and folder example. Its instructions were not independently executed on a NAS here. Documentation and publisher information were checked on November 4, 2026.