

How to install Pastefy on your Synology NAS
Install Pastefy with Portainer on your Synology NAS, save a sample, check database persistence after restart, and prepare a backup and recovery plan.
Eugene Gavrilov
14 min read- NAS & storage
Keep a reusable note or code snippet in Pastefy on your Synology NAS. This guide takes you from a local installation to saving a harmless sample, then reopening it after a restart. Pastefy stores and shares pasted text and code.
Start here once Portainer is installed and connected to your NAS as a Docker Standalone environment. Portainer installation is a separate prerequisite; its official installation documentation is the starting point if you have not set it up. The route below uses that existing installation. It adapts Pastefy's official two-service configuration for access from your home network. The procedure is based on documentation reviewed on 4 November 2026; it does not report a deployment or restore test on a physical NAS.
1. Check what you need
Before opening the configuration editor, have these ready:
- An administrator account for DSM, Synology's management interface, and access to File Station.
- A NAS with a supported container package. Check your model and DSM version in Control Panel > Info Center, then check Package Center for Container Manager. Package availability depends on the model; stop and consult Synology's support if yours cannot run the required containers.
- Portainer managing that NAS as a Docker Standalone environment. This guide begins inside an existing Portainer installation. Synology's own Container Manager Projects is another interface, but the instructions below use Portainer throughout.
- Your NAS's local IP address: the numbered address you use to reach it on your home network. For example, if your NAS were at
192.168.1.50, Pastefy's example address would behttp://192.168.1.50:9429. Substitute your actual NAS address. - An existing shared folder named
docker. If it is missing, create it through Control Panel > Shared Folder > Create > Create Shared Folder, following Synology’s shared-folder instructions. Return here after completing that wizard and confirm which volume contains it. Creating a nested File Station folder is a different operation. - A password manager for two new database passwords and a protected place to save your configuration and backups.
You do not need a public domain, router port forwarding or a reverse proxy for this local task. A domain gives an address a readable name; it does not need to be part of this installation. The URL above uses HTTP. Local access does not add a Pastefy login requirement or confidentiality: other permitted devices on your network can reach the published port. Use harmless text while setting up; leave passwords, private keys and confidential notes out of this installation.
2. Understand where your paste will live
An image is the downloaded application template. A container runs that image. This installation has two services: Pastefy provides the application, and MariaDB keeps its database. A Compose configuration, entered as a Portainer stack, describes how the two services run and connect.
A bind mount connects a folder on the NAS to a location inside a container. Here, /volume1/docker/pastefy/db on the NAS connects to /var/lib/mysql inside MariaDB. Keeping that same NAS folder is what lets a replacement database container use the existing data. The folder holds database files, rather than a collection of ordinary text notes for you to edit.
A port is the numbered entrance for a service. In 9429:80, the left number is the NAS port your browser uses; the right number is Pastefy's port inside its container. MariaDB uses db:3306 within the installation and does not publish a separate NAS port in this recipe. An environment variable is a named setting, such as the database password or the application's address.
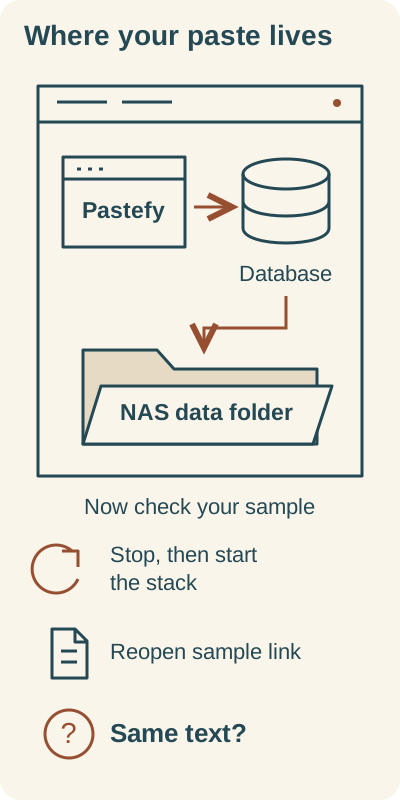
The NAS folder holds database files. Save a sample, restart the stack, then check the same link.
Pastefy uses a database. Its files map to your NAS data folder. Save a harmless sample and its link, stop and start the stack, then reopen that link and compare the text. This is a check for you to perform, not a reported result.
3. Create the folders and deploy the stack
Prepare storage and settings
- In File Station, open the
dockershared folder and create a folder namedpastefy. Inside it, createdbandbackup. The example full paths are/volume1/docker/pastefy/dband/volume1/docker/pastefy/backup. Check the actual location in the folder's properties. If your shared folder is on a different volume, use its real path in both mount lines below. - Keep access to the configuration and backup folder restricted to your administrator and backup accounts. Do not grant Everyone write access to solve a container error. Keep a separate backup outside the NAS as well.
- Open Portainer, select the NAS's Docker Standalone environment, then choose Stacks > Add stack. Name the stack
pastefyand select Web editor. - Below the Web editor, expand Environment variables. Use Add an environment variable for each row: enter the setting name from the first column in the name field and your chosen value in the value field. Repeat until all three rows are present. The official stack-creation guide shows this section. Add the three settings below. Save the settings in your password manager before deployment. Portainer substitutes their values into
${…}expressions in the configuration.
| Setting | Value to enter | Why it matters |
|---|---|---|
DB_PASSWORD | A new password generated by your password manager; use at least 32 random letters and digits for this recipe. | Shared by Pastefy and the database's application user. |
DB_ROOT_PASSWORD | A second, different generated password, using the same format. | The database administrator password, used for backup and recovery. |
PASTEFY_URL | Your full local URL, such as http://192.168.1.50:9429. Replace the example IP with your NAS's address. | The browser address used by Pastefy's URL and CORS settings. |
The password format is an installation recommendation that avoids punctuation with special meaning during substitution. These are database credentials; they do not create a login for the Pastefy website.
Enter the configuration
Paste this entire configuration into the Web editor. Replace the two /volume1/docker/pastefy prefixes if your real folder location differs. Leave ${DB_PASSWORD}, ${DB_ROOT_PASSWORD} and ${PASTEFY_URL} as written: their values come from the three Portainer settings.
services:
  db:
    image: mariadb:10.11
    restart: unless-stopped
    environment:
      MARIADB_DATABASE: pastefy
      MARIADB_USER: pastefy
      MARIADB_PASSWORD: ${DB_PASSWORD}
      MARIADB_ROOT_PASSWORD: ${DB_ROOT_PASSWORD}
    volumes:
      - /volume1/docker/pastefy/db:/var/lib/mysql
      - /volume1/docker/pastefy/backup:/backup
    healthcheck:
      test: ["CMD", "healthcheck.sh", "--connect", "--innodb_initialized"]
      interval: 10s
      timeout: 5s
      retries: 10
      start_period: 30s
  pastefy:
    image: interaapps/pastefy:latest
    restart: unless-stopped
    depends_on:
      db:
        condition: service_healthy
    ports:
      - "9429:80"
    environment:
      HTTP_SERVER_PORT: "80"
      HTTP_SERVER_CORS: ${PASTEFY_URL}
      DATABASE_DRIVER: mysql
      DATABASE_NAME: pastefy
      DATABASE_USER: pastefy
      DATABASE_PASSWORD: ${DB_PASSWORD}
      DATABASE_HOST: db
      DATABASE_PORT: "3306"
      SERVER_NAME: ${PASTEFY_URL}
The database name and user are both pastefy; keep their corresponding settings matched between the two services. The backup folder gives the database container somewhere to write an export. Its database files stay in the separate db folder.
The health check asks MariaDB whether it can accept a connection and has initialized its storage. service_healthy makes Pastefy wait for that check. The restart policy is unless-stopped; use Portainer's controls when deliberately stopping the installation.
The official initial-install configuration uses interaapps/pastefy:latest with MariaDB 10.11. latest can change; it is not a fixed release. A GitHub release number alone does not establish a matching container tag. Record the images you actually pull after the first successful check, as described below. Do not substitute a guessed version tag.
Click Deploy the stack. Then open Stacks > pastefy to see its containers. Generated names may include the stack name and a number; identify the database by its MariaDB image and the application by its Pastefy image rather than relying on a complete generated name. Expect the application to be running and the database to reach healthy status.
Use these documented container controls throughout the guide:
- Logs: open Containers, select the relevant container, then Logs. Review each service separately for startup errors.
- Stop or start one container: open Containers, select it, and use its stop or start action. For a full pause, stop the Pastefy application first and then the database. To resume, start the database, wait for healthy status, and then start Pastefy.
- Database console: open Containers, select the MariaDB container, then Console. Select
/bin/sh, using Use custom command if necessary, and click Connect. Use this only on the database container when the backup or recovery section asks for it.
Wait for the database health check and application startup. A deployment confirmation is only the first check; continue by saving a paste. If the image reports no matching manifest for your NAS architecture, stop and seek model-specific help rather than trying random tags.
4. Save and reopen a harmless sample
On a device on the same home network, open the exact address you entered as PASTEFY_URL. In the illustrative example that is http://192.168.1.50:9429. Use your NAS's IP address, not localhost: in a browser, localhost points to the device running that browser.
MariusHosting’s Pastefy installation guide describes an editor area on the opened app page and a Submit control (steps 16–18, updated 31 August 2026). Click inside that text/code entry area and paste the two lines below. This is a source-supported interface description, not a claim that every newer image has identical controls. If you cannot locate the editor, compare your page with the project’s interface examples before proceeding; do not enter confidential content while investigating.
Use this illustrative sample:
NAS persistence check
This is a harmless sample to reopen after a restart.
Choose Submit (or the equivalent save control in your version). When the saved-paste page opens, copy its full address from your browser’s address bar and save it, then reopen it and check that both lines appear. This URL is a local-network link in this setup; it does not configure access from outside your home.
5. Restart and check the same link
- Using the container controls above, stop the Pastefy application container, then the database container. Start the database again, wait for healthy status, then start the application. Keep the configuration and both folder mappings unchanged. Wait for the database and application to finish starting.
- Reopen the saved paste URL. The check succeeds only if your original sample text returns. Record your result; this guide does not prefill a successful outcome.
- In File Station, locate your
pastefy/dbfolder. This is the mapped database location to preserve. Do not edit its files or delete it to clear a startup problem.
If the sample is missing, pause before saving anything valuable and check the mount path and database logs. A working page alone does not show that you are using the intended database directory.
6. Back up, update and recover
Once your sample survives the restart, the first-install task is complete. Save the details and make a backup below; return to the update and recovery sections when you need them.
Save the installation details
After your sample survives the restart, save the stack configuration, its three environment settings, your storage paths and the sample URL in protected storage. Record each pulled image's RepoDigest from its image details in Portainer if available. A digest identifies that exact image, using a full repository@sha256:… reference. Replace both image: values with their full recorded references before subsequent redeployments. Copy the actual values rather than constructing a digest yourself.
If you cannot obtain the digests, retain the current images and postpone updates until you have a reproducible recovery plan. Keep the database image unchanged during a Pastefy application update.
Export a backup
A database export creates a SQL file that the database tool can later import. Keep it with the saved configuration and image references. Do not treat a File Station copy of a running database folder as a verified backup.
- If
backup/pastefy.sqlalready exists, rename or archive that previous export first. The command below overwrites that filename. - Stop only the Pastefy application container in Portainer. Leave
dbrunning so its export tool can work. This pauses application writes during the export. - Open the database container's console in Portainer and select
/bin/sh. This opens a shell inside MariaDB's container; it is not a command to run on your laptop. Enter:
mariadb-dump -u root -p"$MARIADB_ROOT_PASSWORD" --databases pastefy > /backup/pastefy.sql
- Check for errors and use File Station to confirm that
backup/pastefy.sqlexists and is nonempty. If the export failed, preserve any older good backup and investigate before updating. - Copy the SQL file, saved configuration, settings and image digests to protected separate storage, then start the application container again. A nonempty file is a basic export check; only a successful restore and application check demonstrate that a backup works for recovery. No restore test is claimed here.
Prepare for an application update
This subsection prepares an update; it does not choose a new release or walk through installing one. Read the Pastefy release notes, export a fresh backup and retain both old image references. Keep MariaDB at its recorded image.
For an update target, use an image reference actually published by the project. The upstream recipe identifies interaapps/pastefy:latest, a moving target rather than a fixed release. A numbered GitHub release does not prove that an identically numbered Docker tag exists. Do not guess a tag. If you require a particular release, establish its published image reference and compatibility before changing the installation; otherwise keep the working recorded digest.
When you have selected a supported target, use Portainer’s documented image-pull procedure and Web Editor stack-update procedure. They explain pulling from a selected registry and editing Stacks > pastefy > Editor, then Update the stack. Change only the application reference, retain its resulting digest and repeat the saved-link check after the update. If your Portainer version does not expose the image details needed to record that digest, postpone the update until you have a reproducible recovery reference. A database major-version upgrade is outside this guide.
Pastefy enables automatic database migration by default. Switching only the application image back may therefore leave an incompatible upgraded database. Use the matching old images and a pre-update export when recovering.
Restore into a separate database folder
This recovery sequence keeps the existing database folder intact and imports the backup before starting Pastefy. It is a source-grounded adaptation of MariaDB's documented import process, rather than a tested NAS recovery result.
- Preserve the current configuration and, if possible, make a separate current export before proceeding. Stop the original
pastefystack and leave it stopped throughout recovery. - In File Station, create a new empty
db-restoredfolder besidedb. Put a copy of the desired pre-update SQL export atbackup/pastefy.sql, preserving any other export under another name first. - Create a separate Portainer stack named
pastefy-recovery. Copy the saved pre-update configuration into its Web editor, but initially remove the entirepastefy:service block, from its heading throughSERVER_NAME. Keepservices:and the completedb:block. Set the databaseimage:to its saved full digest reference and change only the database mount source to/volume1/docker/pastefy/db-restored(or your equivalent real path). Keep the/backupmount. Add the savedDB_PASSWORDandDB_ROOT_PASSWORDenvironment values to this stack. - Deploy that database-only recovery stack and wait for its database to become healthy. Confirm that no Pastefy application container is running before import. Open the recovery database container's
/bin/shconsole and run:
mariadb -u root -p"$MARIADB_ROOT_PASSWORD" < /backup/pastefy.sql
- If the import reports errors, leave Pastefy stopped and investigate. After an error-free import, edit
pastefy-recoveryto add back the savedpastefy:service block at the same indentation asdb:. Use the saved pre-update application digest, add the savedPASTEFY_URLsetting, and retain the recovery database mount. Redeploy that stack and reopen the saved sample URL.
Keep the original stack stopped while recovery uses its browser port. If abandoning this recovery attempt, stop the recovery stack before starting the original one again. The original stack still points to its original db folder; it does not contain the separately restored data. Keep both folders until you have chosen which installation to retain.
Stop or remove the installation
To pause use, stop the stack and keep the database folder, backups, configuration and credentials. Before removing containers, protect your backup and read the manager's deletion options. Delete the NAS folders only when you deliberately want to erase their contents.
Find the next check when something fails
| Symptom | First check |
|---|---|
| Container package unavailable, or image has no matching manifest | Check support for your exact NAS model and architecture before continuing. |
| Stack editor rejects the YAML | Preserve indentation and check that the three Portainer environment variables are defined. |
| NAS port is already allocated | Choose an unused NAS port. Change the left side of ports and the port in PASTEFY_URL together. |
| Database stays unhealthy | Inspect db startup logs and the mapped directory's permissions. Do not open permissions to Everyone. |
| Database reports access denied | Compare the original database password with Pastefy's setting. Editing initialization variables does not reset a password in an existing database. |
| Browser cannot connect | Check the NAS's actual LAN address, selected port, database health and Pastefy startup logs. |
| Saved paste disappears after replacement or restart | Stop and check that the database still maps to the original NAS directory before creating more data. |
These checks follow the container, database and storage settings used above. Keep credentials and paste content out of logs you share for support. For help, use the Pastefy project, Portainer stack documentation or Synology support, and provide your NAS model, DSM version, exact image references and sanitized error message.
Keep your sample link and database path with the saved configuration. Add your own nonconfidential snippets after your restart check succeeds, and keep a backup you can check through recovery.