

Install Karakeep on a Synology NAS and Save Your First Bookmark
Install Karakeep, formerly Hoarder, with Synology Container Manager. Save a bookmark, restart the project and check persistent storage on your NAS.
Eugene Gavrilov
13 min read- NAS & storage
Keep saved links in a library on your NAS, then check that a bookmark survives a restart. This guide installs Karakeep, formerly Hoarder, through Synology's graphical Container Manager. You will create one project containing the app, a page-fetching browser and a search service. No terminal or Portainer is required. This is a fresh installation, not a migration of an existing Hoarder library.
You are finished when you can:
- Open Karakeep on your home network.
- Save a link.
- Restart the project and find that same link.
- Locate the app's saved-data folder on your NAS.
This is a documentation-based procedure, not a reported test on a physical Synology. It uses Karakeep 0.34.1 and the Meilisearch version in that release's official Compose file, v1.41.0. Sources were checked on November 4, 2026.
1. Check your NAS before creating anything
- Sign in to DSM, the NAS administration website, with an account allowed to install packages and create folders. Open Control Panel → Info Center → General and record the model name and DSM version.
- Find your exact model under Applied Models on Synology's Container Manager package page. In Package Center, find and install Container Manager if a compatible version is offered for your DSM. Open it and confirm Project is available. If only the older Docker package is available, stop here: this guide requires Project.
- Package support does not establish support for every application image. If startup later reports an image architecture error, use the compatibility stop in troubleshooting.
Use a computer on the same trusted home network as your NAS. You need internet access to download images and fetch saved pages. Keep this first installation on that network. Do not add router port forwarding, a public reverse proxy or a Web Station portal for it.
An image is the packaged software that Container Manager downloads. A container is a running instance. A project starts the related containers together. An environment variable is a named setting in the configuration. A persistent folder holds files outside the disposable container so replacing the software does not require starting with an empty library.
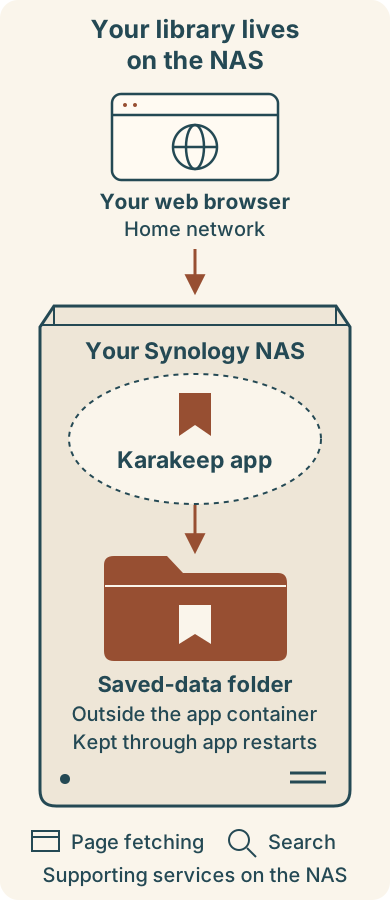
Open Karakeep from your home network. Its saved-data folder stays on the NAS when you restart the app. The setup also includes services for page fetching and search.
Text alternative: Your browser opens Karakeep on the NAS. The app stores its library in a persistent NAS folder outside its container; separate helpers fetch page details and support search.
2. Prepare storage and your local address
Before continuing, you need an existing docker shared folder whose access is restricted to administrators maintaining the app. Its configuration will contain secrets. If that share is absent, or you cannot confirm its permissions and storage volume, ask the NAS administrator to prepare it using Synology's shared-folder instructions. Creating and assigning permissions to a new shared folder is a prerequisite outside this walkthrough; do not create a broadly accessible share to get past this step.
In File Station, open that docker shared folder. Use its folder-creation action to create karakeep. Open karakeep and create two folders inside it: data and meili.
These examples assume the full folder path is /volume1/docker/karakeep. In File Station, right-click the karakeep folder and open Properties → General. Read its Location and use the full NAS path, including the volume name. If your interface does not show a full location, confirm the shared folder's storage volume in DSM before continuing; do not guess /volume1. If yours is on another volume, replace /volume1/docker/karakeep in both storage mappings below with its actual path. The data folder will hold Karakeep's database and saved assets; meili will hold its search data. Do not change the right-hand paths /data and /meili_data.
Open Control Panel → Info Center → Network → LAN and copy IP address for the NAS connection to your home network. Copy only the four-part numeric address: no http://, port or trailing path. Do not copy the gateway, DNS server or public internet address. If you have several connections and cannot identify the one on your home network, ask the NAS administrator before editing the recipe.
For example, if that field reads 192.168.1.50, your app address becomes http://192.168.1.50:3022. This address is illustrative; use your own. Here 3022 selects this app on the NAS; DSM's management port is separate. A domain is a readable name for an address, and DNS looks up that name. Neither is needed for this numeric local address.
Check before editing YAML: karakeep contains data and meili; you have recorded its actual full NAS path and the NAS's home-network IP address.
3. Generate two private secrets
Use the graphical password generator in your password manager. For a concrete browser option, open Bitwarden's official generator, select Password, set Length to 48, enable uppercase letters, lowercase letters and numbers, and disable special characters. Generate and save one value labeled Karakeep authentication secret, then generate a different value labeled Karakeep search key.
These are application secrets, separate from your future Karakeep account password. Use the first for NEXTAUTH_SECRET. Use the second for both occurrences of MEILI_MASTER_KEY. Keep them in your password manager and backup configuration. Do not reuse published example values or share an unredacted configuration.
Check: you have two different saved secrets, and know which is the search key that must be entered twice.
4. Create the project
- Open Container Manager → Project → Create. Set the project name to
karakeepand choosedocker/karakeepfor its working-directory Path. - For Source, choose the option to create a
docker-compose.ymlwith the editor. Compose is the text recipe that describes the three containers. Replace with your value: NAS IP, host folder paths and the two secrets. Keep matching: the search key in both services. Keep as written: internal addresses, internal ports and container folder paths. - Paste the following recipe, preserving indentation. Before continuing, replace
REPLACE_WITH_AUTH_SECRET, replace bothREPLACE_WITH_SEARCH_KEYvalues with the same search key, change the NAS IP inNEXTAUTH_URL, and correct the two left-hand folder paths if needed. These marked values are instructions to replace, not usable secrets.
services:
  web:
    image: ghcr.io/karakeep-app/karakeep:0.34.1
    restart: unless-stopped
    ports:
      - "3022:3000"
    volumes:
      - /volume1/docker/karakeep/data:/data
    environment:
      DATA_DIR: /data
      NEXTAUTH_URL: "http://192.168.1.50:3022"
      NEXTAUTH_SECRET: "REPLACE_WITH_AUTH_SECRET"
      MEILI_ADDR: "http://meilisearch:7700"
      MEILI_MASTER_KEY: "REPLACE_WITH_SEARCH_KEY"
      BROWSER_WEB_URL: "http://chrome:9222"
  chrome:
    image: ghcr.io/karakeep-app/karakeep-chrome:release
    restart: unless-stopped
    init: true
    command:
      - --disable-gpu
      - --disable-dev-shm-usage
      - --hide-scrollbars
      - --disable-blink-features=AutomationControlled
      - --window-size=1440,900
  meilisearch:
    image: getmeili/meilisearch:v1.41.0
    restart: unless-stopped
    volumes:
      - /volume1/docker/karakeep/meili:/meili_data
    environment:
      MEILI_MASTER_KEY: "REPLACE_WITH_SEARCH_KEY"
      MEILI_NO_ANALYTICS: "true"
In /volume1/docker/karakeep/data:/data, the part before the colon is the folder on your NAS; the part after the colon belongs to the container and stays /data. The same rule applies to the meili mapping.
Before starting: check that no REPLACE_WITH_ text remains, both search keys match, NEXTAUTH_URL uses your NAS's IP, and both left-hand storage paths match File Station.
The first port number is the NAS port; 3000 is the app's internal port. Only the app is published to the network. chrome:9222 and meilisearch:7700 are internal project addresses; do not enter them into your browser or publish those ports. DATA_DIR tells the app where to store its database. The volume mappings connect that location to the NAS folders you created. unless-stopped is the restart policy. The browser settings follow the official release recipe. Its release tag can download a newer browser image later, even if you leave that tag unchanged.
Leave the optional Web Station portal disabled. Continue to the summary, check your settings, click Done, and choose to start the project. Allow the image downloads and startup to finish; connection speed and the NAS affect the wait. Check that all three containers remain running, rather than repeatedly restarting.
5. Open the app and prove that your library persists
On the same home network, visit your actual address, for example http://192.168.1.50:3022. Use http, not https, for this setup. HTTP does not encrypt the connection; use it only on your trusted network. HTTPS adds encryption and requires appropriate certificate and server configuration, which this local installation does not configure.
- Choose Sign Up, enter your name, email and a separate account password, and create your account.
- Once signed in, open the bookmarks page by adding
/dashboard/bookmarksto your Karakeep address. For the illustrative NAS address used above, this ishttp://192.168.1.50:3022/dashboard/bookmarks; substitute your actual NAS IP and app port. On this page, find the NEW ITEM editor, whose empty input says Paste a link, write a note or drop an image… in English. The editor is already part of this page; you do not need an import menu or an Add button. - Paste only
https://www.synology.com/into that input, then click Save below it. The button may also show the keyboard shortcut after you enter text. These editor labels and the page route are supported by the official 0.34.1 source; this is not a claim of a physical NAS test.
Confirm that a saved entry for synology.com appears in your library and opens the URL you entered. A fetched title or image may appear later; it is not the confirmation that the link itself was stored. Automatic AI tagging is not configured by this recipe; do not enter a paid API key just to complete this check.
Return to Container Manager → Project, select karakeep, and choose Action → Restart. Once the containers are running again, reload Karakeep and sign in if requested. Confirm the same saved link is present. In File Station, confirm that docker/karakeep/data now contains app-created files.
Check: the bookmark is still present after restart, and the app has written files to your NAS data folder. If either check fails, resolve the storage problem before adding important links.
Optional: close account registration
DISABLE_SIGNUPS: "true" under the web service's environment settings disables new account registration. This requires applying changed project settings, not merely restarting. Before editing, read the configuration-change boundary below; this guide does not provide an independently verified save/rebuild dialog sequence for your Container Manager version. Keep using the working local installation until you have that sequence.
Back up before updating
Keep a backup outside the project directory and, preferably, on a separate device.
- In Container Manager → Project, select
karakeep, choose Action → Stop, and confirm all three containers have stopped. - In File Station, copy the entire
karakeepdirectory, includingdata,meili, anddocker-compose.yml, to your backup destination. If downloading to your computer, retain every downloaded file and check that the archive opens and contains those items. Protect the secrets in the configuration. - Select the original project and choose Action → Start after copying. A copy is not a verified backup until you have rehearsed restoration.
Restore to the existing, unchanged project
This procedure covers restoring a copy made by the steps above to the same project, with the same image versions, IP address and storage paths. It does not cover migration or rollback after an upgrade.
- Select
karakeepin Container Manager → Project → Action → Stop. Confirm all three containers are stopped. - Preserve the current folder in a separate location before replacing files.
- In File Station, restore the backed-up contents into the same
karakeepfolder. Confirm the saved Compose file and secrets are unchanged and thedataandmeilifolders are at their original full paths. - Select the existing project and choose Action → Start. Sign in, locate the same sample bookmark, open it, and check search. If anything is missing, stop and preserve both copies for investigation. Do not run two instances against the same data folders.
A changed IP, changed storage paths or changed image settings requires a different procedure. A rollback after an upgrade needs old data as well as old images: an older app may not understand a database migrated by a newer version. Seek a version-specific recovery plan before proceeding.
Before changing configuration or updating
Synology documents Project → select karakeep → Action → Details → YAML Configurations as the place to edit the recipe and deploy changed settings. Its public help does not name every subsequent save/rebuild dialog control. This walkthrough therefore stops before applying edits: consult Synology's Project documentation or Synology support for the exact deployment sequence for your installed Container Manager version. Do not substitute Restart, Clean or Delete for an unknown deployment step.
Before an update, read the intended Karakeep release notes and corresponding Compose file, make the stopped backup above, and obtain that deployment sequence. Keep app and search versions aligned with the intended release; search upgrades may require migration. The Chrome release tag can download a newer image later. Retain the backup until your bookmark and search checks pass. Applying an update is outside this first-install walkthrough.
Fix the first failure you see
Container Manager or Project is missing
Check package support for your exact model and installed DSM. This guide requires Project.
YAML cannot be accepted
Restore the indentation from the recipe; use spaces and retain straight quotes. Verify all replacement values.
Download fails or reports no matching manifest/platform
Check NAS internet access. For a platform error, stop and verify image architecture support; do not force another platform.
Port already allocated
Another app uses NAS port 3022. Choose an unused port, such as 3023, on the left of :3000, update NEXTAUTH_URL to match, and use that address. If this is an existing project, follow the configuration-change boundary above before applying edits.
Container repeatedly restarts
Open Container Manager → Container, select the affected container belonging to project karakeep, then Action → Details → Log. Identify it by its service/image: web is Karakeep, chrome fetches pages, and meilisearch handles search; generated container names may include a project prefix. Record the error text and any path it names. Check that path against File Station. For a write-permission error, preserve the exact error and path for the NAS administrator or support; do not improvise access changes or grant Everyone access.
Browser cannot connect
Confirm project/container status, the NAS IP, matching port and same network. Open Control Panel → Security → Firewall and record whether Enable firewall is checked and which firewall profile is selected. Do not change rules yet. A rule may need to allow this app's port for your home network, but its address range depends on your network. Use Synology's firewall instructions with the NAS administrator or Synology support, giving them the NAS address, app port and firewall status. Stop here if the allowed address range is unknown; do not guess a subnet, disable the firewall or forward a router port.
Sign-in fails or redirects unexpectedly
Compare the browser URL with NEXTAUTH_URL; check that you have not mixed HTTP and HTTPS. Use the configuration-change boundary above before applying corrected settings.
Bookmarks exist but search fails
Use the log-opening steps above for the meilisearch container and verify its key matches the web service's key. Do not delete search data as a first fix.
A link saves but its title or image does not appear
Saving a bookmark and fetching the target page are separate operations. Give processing time to finish, then use the log-opening steps above for the web and chrome containers. Some target sites may refuse automated access; do not treat one missing preview as proof that the stored bookmark is gone.
Fresh setup screen or missing library after a change
Stop and check whether the data mount now points to a new or empty folder. Preserve the original data before attempting recovery. These are diagnostic checks, not guarantees that a particular error has one cause.
Pause or remove it safely
Use Stop to pause the app while keeping its project available. Before uninstalling, make and verify a backup. Synology's Clean action removes project resources, and Delete is documented to remove project containers and data. Do not use either as a harmless restart or assume your folders will be retained. Read the confirmation for your installed version and proceed only when you intend to remove the project and have recovered anything you need.
For further help use Karakeep's installation documentation, its release notes, and Synology's Project documentation. Include your model, DSM version, image tags and relevant error text when asking for help; redact secrets and personal data.