

How to Install Invidious on Your UGREEN NAS
Install Invidious on a UGREEN NAS with Docker Project, open it locally, check playback and saved playlists, and plan database backups and updates.
Eugene Gavrilov
14 min read- NAS & storage
Install Invidious through the UGREEN Docker app, then open it from a browser on your home network. Invidious is an alternative website for browsing and watching YouTube, hosted on your NAS. Its companion retrieves video streams from YouTube; PostgreSQL stores your local account and playlist records.
This guide runs those three services together. A public domain, DDNS, Portainer and a reverse proxy are not required for this local setup.
The procedure follows current primary documentation reviewed on November 4, 2026. It has not been tested on a physical UGREEN NAS. YouTube can reject requests even when your installation is running, so finish with three separate checks:
- Open the Invidious interface at your NAS's local address.
- Try playing a public video.
- Save a playlist in a local account and confirm it survives a Project restart.
Check that your NAS is ready
Open your NAS App Center and check that Docker is available. You need permission to install it and manage a folder for the Project. Upstream specifies at least 20 GB of disk space and 2 GB of free RAM; those are installation requirements, not a performance promise for a particular NAS model. This guide does not establish compatibility with every UGREEN CPU.
The instructions use Docker > Project > Create. UGREEN's PC-client Docker reference applies to firmware 1.19.0.0042 and later, and its vendor tutorial also describes browser access. Labels may differ on your version. If Docker or the Project creation route is unavailable, resolve that with UGREEN before continuing.
Have these ready:
- A computer on the same trusted network as the NAS.
- The NAS's private IPv4 address: the address you use to reach UGOS, such as
192.168.1.50in the examples below. - A password manager that can generate and store random secrets.
- An empty folder for this new installation. Keep an existing Invidious database separate from this procedure.
An image is the downloaded application package; a container runs that package. Compose is the configuration text you will paste into Docker; a Project uses it to start the related containers together. A bind mount connects a NAS folder to a container folder. These mounts let the database remain on the NAS when a container is recreated. The pasted configuration also specifies how the three containers connect, their storage and their ports.
Your browser will connect to the NAS on port 7601. Inside the Project, Invidious will reach PostgreSQL as invidious-db and its helper as companion. Only Invidious gets a port that your browser can reach on the NAS. The database lives in the NAS's db folder; companion cache uses separate storage managed by Docker. Choosing a private IP does not replace network access controls: keep this setup on a trusted network and do not add router port forwarding.
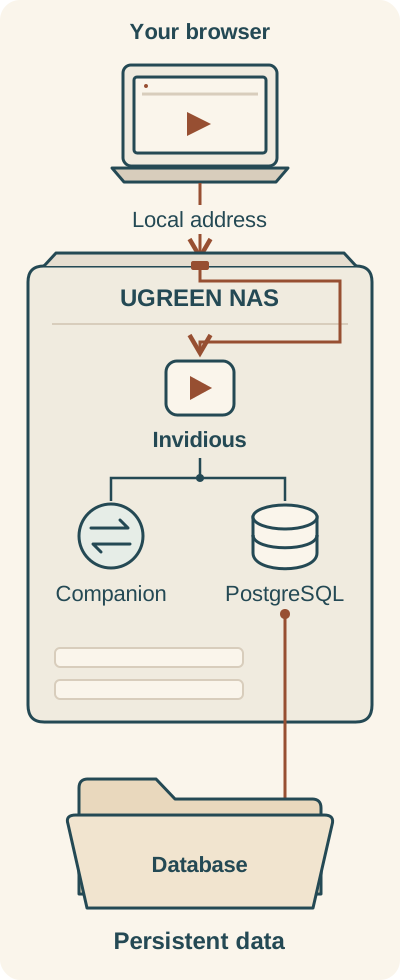
Open Invidious locally; keep its services and database storage distinct.
Your browser opens the NAS's configured local Invidious address. The installation runs Invidious, Companion and PostgreSQL. This setup routes Companion requests through Invidious, without publishing a separate Companion host port. PostgreSQL stores its database in the chosen NAS project folder; Invidious accounts can hold subscriptions and playlists.
Prepare the Project folder and database files
- In App Center, install Docker, then open it.
- In Files, create an
invidiousfolder in the Docker storage location you intend to use. Choose the actual location on your NAS; do not assume a path such as/volume1applies to it. - Inside
invidious, create emptydbandbackupfolders. The first will hold the live database; the second will receive database exports.
Download the database initialization files before deploying. The official production instructions require both an initialization script and the SQL directory. Using only the Compose text leaves those dependencies missing.
Open this upstream repository snapshot, choose Code > Download ZIP, and extract the archive on your computer. Upload its complete config/sql directory and its docker/init-invidious-db.sh file to the NAS, preserving those relative paths inside your invidious folder. Use the same snapshot for all ten files. The snapshot fixes the initialization-file source; it does not pin the container image build.
Check the result in Files:
invidious/
  db/                         ← empty for the first deployment
  backup/
  config/
    sql/
      channels.sql
      videos.sql
      channel_videos.sql
      users.sql
      session_ids.sql
      nonces.sql
      annotations.sql
      playlists.sql
      playlist_videos.sql
  docker/
    init-invidious-db.sh
Do not include the ZIP's enclosing repository folder as another level inside invidious. Confirm that init-invidious-db.sh is an actual file, not a directory or a downloaded GitHub web page. Do not import the repository's root docker-compose.yml: upstream identifies it as a development configuration. The complete production-based configuration for this guide is below.
Generate the secrets you will paste
Generate three different values in your password manager. For this setup, use random letters and numbers only; that avoids punctuation and $ substitution problems when pasting into Compose. The 32-character lengths below are this guide's choices. The companion key's exactly 16 characters is an upstream requirement.
| Value | Generate | Where it goes |
|---|---|---|
| Database password | 32 characters | Both REPLACE_DB_PASSWORD entries |
| Companion key | Exactly 16 characters | Both REPLACE_COMPANION_KEY entries |
| HMAC key | A separate 32-character value | The single REPLACE_HMAC_KEY entry |
The HMAC key is Invidious's private signing secret for checking security tokens and cookies; you do not enter it on the login form. It serves a different purpose from the companion communication key.
Store all three privately. The companion key must match between the two services and must differ from the HMAC key. Save your completed Compose privately too: it contains these secrets.
Create and deploy the Project
Open Docker > Project > Create, name the Project invidious, and select the invidious folder you prepared as its Project storage path. Relative paths such as ./db must resolve inside that folder.
Paste the following into the Compose editor. Before deploying:
- Replace
192.168.1.50with the NAS's actual private IPv4 address. - Replace both database-password placeholders with your one generated database password.
- Replace both companion-key placeholders with your one exactly-16-character key.
- Replace the HMAC placeholder with your separate HMAC key.
This adapts the official production Compose for direct local access. It binds the web port to your NAS IP, stores PostgreSQL in ./db, mounts a backup-export folder and waits for database health. It retains PostgreSQL major version 14 and the companion's Docker-managed cache volume. The moving latest tags match the documented production route; no unverified digest is supplied.
services:
  invidious:
    image: quay.io/invidious/invidious:latest
    restart: unless-stopped
    ports:
      - "192.168.1.50:7601:3000"
    environment:
      INVIDIOUS_CONFIG: |
        db:
          dbname: invidious
          user: kemal
          password: REPLACE_DB_PASSWORD
          host: invidious-db
          port: 5432
        check_tables: true
        external_port: 7601
        https_only: false
        invidious_companion:
          - private_url: "http://companion:8282/companion"
        invidious_companion_key: "REPLACE_COMPANION_KEY"
        hmac_key: "REPLACE_HMAC_KEY"
    healthcheck:
      test: wget -nv --tries=1 --spider http://127.0.0.1:3000/api/v1/stats || exit 1
      interval: 30s
      timeout: 5s
      retries: 2
    depends_on:
      invidious-db:
        condition: service_healthy
      companion:
        condition: service_started
    logging:
      options:
        max-size: "10m"
        max-file: "3"

  companion:
    image: quay.io/invidious/invidious-companion:latest
    restart: unless-stopped
    environment:
      SERVER_SECRET_KEY: "REPLACE_COMPANION_KEY"
    cap_drop:
      - ALL
    read_only: true
    volumes:
      - companioncache:/var/tmp/youtubei.js:rw
    security_opt:
      - no-new-privileges:true
    logging:
      options:
        max-size: "10m"
        max-file: "3"

  invidious-db:
    image: docker.io/library/postgres:14
    restart: unless-stopped
    volumes:
      - ./db:/var/lib/postgresql/data
      - ./config/sql:/config/sql:ro
      - ./docker/init-invidious-db.sh:/docker-entrypoint-initdb.d/init-invidious-db.sh:ro
      - ./backup:/backup
    environment:
      POSTGRES_DB: invidious
      POSTGRES_USER: kemal
      POSTGRES_PASSWORD: REPLACE_DB_PASSWORD
    healthcheck:
      test: ["CMD-SHELL", "pg_isready -U $$POSTGRES_USER -d $$POSTGRES_DB"]
      interval: 10s
      timeout: 5s
      retries: 10
    logging:
      options:
        max-size: "10m"
        max-file: "3"

volumes:
  companioncache:
Before deploying, search the completed configuration for REPLACE_: no placeholders should remain. Check that the two database passwords match and the two companion keys match.
The port mapping means NAS IP : NAS port : container port. Your browser uses port 7601; Invidious still listens on 3000 inside its container. If 7601 is occupied, choose an unused NAS port. Replace 7601 in the port mapping and in external_port: 7601 with that port number. Leave the last 3000 alone.
Do not replace invidious-db or companion with your NAS IP. They are service names for communication inside the Project. http://companion:8282/companion is an internal service address, not the URL you open in your browser. With public_url omitted, Invidious forwards companion requests; neither the database nor companion needs a published NAS port here.
Keep image-default users and permissions. Do not add the NAS account's UID/GID as a generic user: setting. Leave language defaults for the first run; if you later select US English in configuration, its locale is en-US, not us.
Save the configuration and click Deploy. Allow image downloads and database initialization to finish. In Docker > Container, check that the three services are running. If one exits, open its logs and use the troubleshooting section below before changing anything else. A running Project establishes only the first checkpoint; playback needs its own check.
Open the interface, then try a video
From your computer's browser, open:
http://YOUR_NAS_IP:7601
Replace YOUR_NAS_IP with your actual address. For the example NAS, the URL is http://192.168.1.50:7601. Use your chosen port if you changed it. This setup uses HTTP on a trusted local network; it does not configure HTTPS.
- Check the interface. Confirm the Invidious page opens. If it does not, check the NAS IP, published port and container status.
- Check playback separately. Search for a public video, open it and try playing it. If the interface loads but video playback fails, inspect both
invidiousandcompanionlogs. Upstream documents rate limits, bot detection, token failures and 403 errors that can interrupt playback on a running installation.
Confirm saved data survives a restart
Use Invidious's registration and login controls to create a local account with a unique password. Accounts can hold subscriptions and playlists without a Google account. Create a small test playlist and add one video.
In Docker > Project, stop the invidious Project, then start it again. Log back in and check that the playlist still contains the video. This is the persistence check for you to perform; it is not a test result from Huncode.
Next, inspect the database container's mounts. Confirm that /var/lib/postgresql/data maps to the db folder you prepared on your NAS. Locate that folder in Files so you know where the saved data lives, but do not edit its database files manually. Stopping and starting containers is different from deleting their persistent storage.
Back up before changing the installation
Back up the application database, not just the Compose text. Accounts and playlists belong to the database; companion cache is replaceable. A logical PostgreSQL dump avoids copying a running database directory, which is not a valid general file-copy backup procedure.
- Open Docker > Container, select this Project's
invidious-dbcontainer, and open Terminal. If asked for a shell command, use/bin/sh. - Run the following inside the database container. Use a fresh dated filename each time so the previous backup remains available.
pg_dump -U kemal -d invidious -Fc -f /backup/invidious-2026-11-04.dump
If the command reports an error, the backup has failed. After successful completion, find the dump in the NAS Project's backup folder and copy it to storage away from this NAS. Keep a private copy of the completed Compose, the initialization files and the running image references with it. The dump contains database data; the Compose contains secrets.
Restore a saved database
Use this section only to recover saved data; otherwise continue to the update section.
This command drops and restores the objects represented in the dump, overwriting their current data and losing later changes to those objects. Objects absent from the dump may remain or cause errors; this is not a guaranteed complete schema rollback after an upgrade. A failed restore may leave partly applied changes. First preserve a fresh dump of the current state if possible, and keep the current
dbfolder in place.
- Stop only the
invidiousandcompanioncontainers. Leaveinvidious-dbrunning. - Copy the backup dump you want to restore into the NAS Project's
backupfolder. - Open the database container's Terminal and run this command, using the actual dump filename.
pg_restore -U kemal -d invidious --clean --if-exists --exit-on-error /backup/invidious-2026-11-04.dump
Wait for completion without errors before starting the two application containers again. Then log in and check your playlist. If restore reports an error, keep the app containers stopped and preserve the pre-restore backup while investigating.
On a replacement installation, recreate the same folder layout and configuration with a fresh PostgreSQL database first. Stop the two application containers and restore as above. Keep the database and role names invidious and kemal unless you are deliberately planning a role migration. The logical dump protects the application database, not the NAS's complete settings.
Back up, then update
Before an update, export the database, copy the dump off the NAS and save the current Compose. Also preserve a record of the exact installed builds for all three services: their image names and immutable digests, not just the word latest. A moving tag can identify a different build later.
Use the documented controls to find your current configuration and check for updates:
- Open Docker > Container to identify the three services and their image sources.
- Open Docker > Project, select
invidiousand open Settings to inspect its Compose image references. Save that working configuration. - Open Docker > Management to check image update detection. UGREEN documents an available update option in the Project list when a newer image is detected. Follow the instructions for your UGOS version to download the replacements and recreate the Project; do not assume an ordinary redeploy alone refreshed its images.
Stop before taking the update action if you cannot record the exact installed builds or confirm the download/recreation procedure. The vendor pages do not establish a GUI location for immutable image digests or one update-button sequence across versions. A copied latest tag alone cannot identify the old build. Consult UGREEN's Docker reference and its Project update guidance, or ask UGREEN support how to preserve the running builds and update on your version. Keep old images and the working Project's folders.
The upstream update procedure uses image pull followed by container recreation. A full beginner walkthrough for NAS-shell access is outside this guide; use the verified controls for your version before proceeding.
Recheck interface access, playback, login and the saved playlist. Keep PostgreSQL on major version 14 for this setup. Changing its image to 18 and reusing the same data folder is not a routine update: PostgreSQL major versions require a migration plan, and the newer storage layout differs.
Rollback needs the saved application builds, configuration and database dump. After a schema-changing update, restoring the dump into the current database may leave newer objects or fail on their dependencies. Arrange recovery into a fresh database prepared for the saved application/database versions, validate it, then switch back. Preserve the existing database and backups while planning that recovery with the official PostgreSQL/Invidious guidance; this introductory procedure does not supply destructive reset commands. Keeping an old image alone does not guarantee a working rollback.
Upstream also recommends restarting Invidious at least daily. Use its container restart control or a scheduler you already manage. This guide does not document a UGOS scheduling screen.
Fix installation and playback problems
Image download fails or reports “no matching manifest”
Keep the exact error. Check NAS connectivity and the images' CPU-platform support before proceeding. Docker availability alone does not prove that all three images support your model.
Port is occupied or the bound address cannot be assigned
Correct the NAS IP or select an unused host port. Keep the published port, external_port and browser URL consistent.
Database initialization or mount fails
Confirm the selected Project folder and all nine SQL files plus docker/init-invidious-db.sh. A missing file can become an unintended directory mount. Init scripts run on an empty database directory only.
A container reports “permission denied”
Read its log and inspect the exact mount path. Remove any copied generic user: override and check that folder's permissions. Do not make the whole NAS world-writable.
Database authentication fails after a password edit
Changing POSTGRES_PASSWORD does not change an existing database role's password. Restore the matching saved settings or intentionally change the role password with PostgreSQL tools.
Companion or key errors appear
Confirm that the companion values match exactly, contain 16 characters and differ from the HMAC key. Redact secrets before sharing errors.
The page opens but a video fails
Read both app and companion logs, then consult the current upstream playback-error guidance. Lowering video quality is not a universal fix for 429, bot detection, token or 403 errors.
Do not delete an existing db folder to make initialization run again. If a never-used first deployment left a partial database, stop the Project and preserve or rename that partial folder before making an empty replacement for another attempt. Once the installation contains accounts or playlists, back it up and investigate the database error before attempting repairs.
For software errors, use Invidious's YouTube error guide. For Project controls and mounts, use UGREEN's Docker reference. Include your NAS model, UGOS/Docker versions, image references and redacted log text when seeking help.
Stop or remove it without losing your data
To pause use, stop the Project. To remove the running installation, first make a final dump if you want its accounts and playlists, copy it away from the NAS, then stop and remove this Project. Read removal dialogs carefully and preserve the db, backup and configuration folders. Do not select deletion of stored data merely to remove the containers.
Check your backups before permanently deleting this installation's folders and unused cache volume. Avoid shared Docker folders, other Projects' volumes and shared images. Public access can be a later, separate project: domain, HTTPS and companion routing settings must be designed together rather than added as prerequisites to this LAN installation.