

How to install Invidious on your Synology NAS
Install Invidious on a Synology NAS with Container Manager, check local access and playback, and preserve account data and images for recovery.
Eugene Gavrilov
14 min read- NAS & storage
Run your own Invidious page on your Synology NAS and open it from a browser at home. You will use Container Manager to start the web app, its video companion and a database, then check playback and saved subscriptions separately. A public domain and router changes are outside this setup.
Invidious is a different interface to YouTube, not a downloaded copy of YouTube. A page that opens successfully does not prove videos will play: YouTube can block requests and companion changes can interrupt playback. This procedure is based on current primary documentation, not a physical Synology test.
This is a fresh installation. Do not reuse an existing PostgreSQL 18 data folder with the PostgreSQL 14 recipe below.
Check your NAS before starting
Before continuing, check each item:
- Package and model: check your exact NAS model and DSM version against the Container Manager package listing. Install the package offered in Package Center for your model/DSM, then confirm it includes Project. Do not sideload another model's package.
- Compose: this route requires Compose v2. Container Manager releases have different DSM requirements; follow the package offered for your system.
- Processor architecture: this version of the guide is limited to x86-64, the 64-bit Intel/AMD processor architecture. Find your exact model on Synology's product specifications and check its processor. An ARM model requires a separately verified image selection; Container Manager alone does not prove every image fits.
- Resources: allow at least 20 GB free disk space and 2 GB free RAM for Invidious plus companion. These are upstream minimums, not a playback benchmark.
- Maintenance: upstream recommends restarting the Invidious web app at least daily, ideally hourly. The recipe's crash restart policy does not create a timed schedule. A manual restart is explained below.
The address you will open
Keep the NAS and computer on a trusted home network. Record the NAS LAN IP from the address you use for DSM: if DSM opens at https://192.168.1.20:5001, the IP is 192.168.1.20. The example IP is illustrative; use yours. An IP address identifies your NAS on the network; a port selects an application at that address. A domain is a readable name for an address. HTTPS encrypts the browser connection; this local setup uses HTTP instead. Do not add router port forwarding. HTTP sends login traffic without TLS encryption, so use only a unique Invidious password here, never a DSM or Google password. Default video delivery can still reveal your IP to Google.
An image is downloaded application code; a container is its running instance. A Project starts related containers together. A bind mount joins a NAS folder to a container folder, so deleting/recreating the application need not discard saved data. The port mapping 7601:3000 connects your NAS port 7601 to the application's internal port 3000.
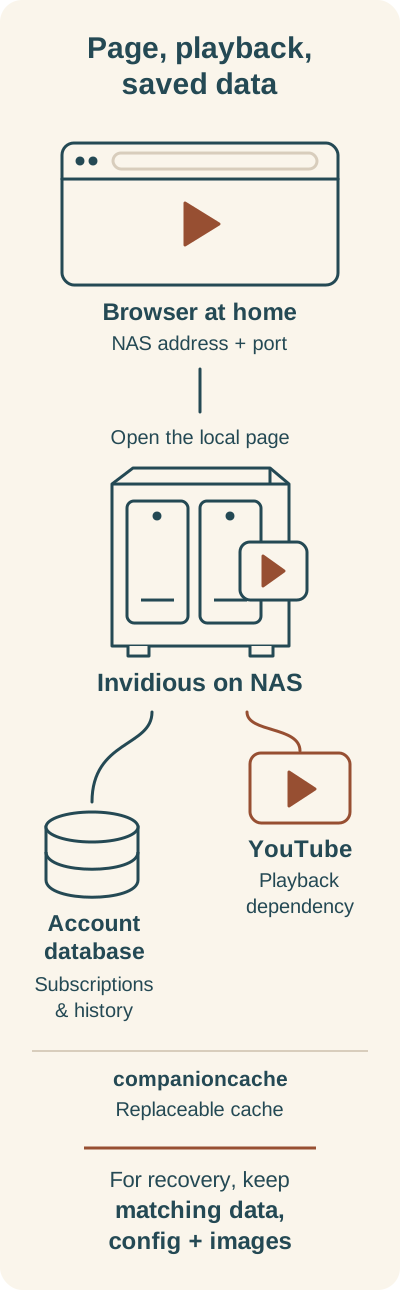
Conceptual dependencies, not a complete traffic map. Opening the local page and playing a video are separate checks.
Your browser opens the NAS address and application port. Invidious depends on YouTube for playback; this diagram does not show every traffic route, and default video delivery can expose your IP to Google. Subscriptions and watch history belong to the account database. The named companioncache volume is replaceable and is excluded from the account-data snapshot. Recovery requires the matching data and configuration snapshot plus saved container images, not the database alone.
Give the app a place to keep its files
- On your computer open the Invidious repository and choose Code > Download ZIP. Extract the archive. Open its outer invidious-master folder; its contents include config and docker. Do not deploy its original docker-compose.yml: that file is for building a development image.
- These steps use a shared folder named
docker. If you do not have one, open Control Panel > Shared Folder > Create > Create Shared Folder, name itdocker, select the storage volume and complete the permission wizard for your administrator account. Follow Synology’s shared-folder instructions if any choice is unfamiliar. Then open File Station and createinvidiousinsidedocker. An example full path is/volume1/docker/invidious; your volume number can differ. Upload the extracted config and docker folders into invidious (Chrome supports folder drag/drop in the documented File Station workflow). Confirminvidious/config/sqlexists andinvidious/docker/init-invidious-db.shis a file, not another nested directory. - Create an empty
dbfolder insideinvidiousfor the user database. Companion cache uses a Docker-managed named volume,companioncache; you do not create a companion folder in File Station. Cache is replaceable and is excluded from the account-data recovery snapshot below. Restrict the project folder to your administrator and backup users because the Compose file contains passwords. Do not make the share writable by Everyone. - Use an offline local password manager's random password generator, not an online key website. Generate three different values: DB_PASSWORD (32 letters/digits), HMAC_KEY (32 letters/digits), and COMPANION_KEY (exactly 16 letters/digits). Store them locally with your backup notes. The companion value appears twice and must match; HMAC must differ.
Create the Project
Open Container Manager > Project > Create. Set Project Name to invidious. Set Path to the invidious folder that directly contains config and docker, not its parent and not an extra invidious-master folder. For Source choose the option to create docker-compose.yml with the editor. Paste the configuration below. Replace DB_PASSWORD twice, COMPANION_KEY twice and HMAC_KEY once with your generated values before continuing. Keep the indentation and quotation marks unchanged.
| Label in the recipe | Your replacement | Where it must match |
|---|---|---|
| DB_PASSWORD | Locally generated 32-character letters/digits | Invidious db.password and Postgres POSTGRES_PASSWORD |
| COMPANION_KEY | Locally generated exactly 16-character letters/digits | Invidious invidious_companion_key and companion SERVER_SECRET_KEY |
| HMAC_KEY | A third, different random 32-character letters/digits | Invidious hmac_key only |
These are replacement labels, not ready-to-use credentials.
The following is an adaptation of the official production example: LAN host port, private generated credentials and an explicit database folder mount differ materially. Companion cache retains the upstream named volume. It retains upstream initialization files and Postgres 14. No user 1026 override or public-domain configuration is required.
services:
  invidious:
    image: quay.io/invidious/invidious:latest
    restart: unless-stopped
    ports:
      - "7601:3000"
    environment:
      INVIDIOUS_CONFIG: |
        db:
          dbname: invidious
          user: kemal
          password: "DB_PASSWORD"
          host: invidious-db
          port: 5432
        check_tables: true
        invidious_companion:
          - private_url: "http://companion:8282/companion"
        invidious_companion_key: "COMPANION_KEY"
        hmac_key: "HMAC_KEY"
    healthcheck:
      test: wget -nv --tries=1 --spider http://127.0.0.1:3000/api/v1/stats || exit 1
      interval: 30s
      timeout: 5s
      retries: 2
    logging:
      options:
        max-size: "1G"
        max-file: "4"
    depends_on:
      - invidious-db
  companion:
    image: quay.io/invidious/invidious-companion:latest
    environment:
      SERVER_SECRET_KEY: "COMPANION_KEY"
    restart: unless-stopped
    logging:
      options:
        max-size: "1G"
        max-file: "4"
    cap_drop:
      - ALL
    read_only: true
    volumes:
      - companioncache:/var/tmp/youtubei.js:rw
    security_opt:
      - no-new-privileges:true
  invidious-db:
    image: docker.io/library/postgres:14
    restart: unless-stopped
    volumes:
      - ./db:/var/lib/postgresql/data
      - ./config/sql:/config/sql
      - ./docker/init-invidious-db.sh:/docker-entrypoint-initdb.d/init-invidious-db.sh
    environment:
      POSTGRES_DB: invidious
      POSTGRES_USER: kemal
      POSTGRES_PASSWORD: "DB_PASSWORD"
    healthcheck:
      test: ["CMD-SHELL", "pg_isready -U $$POSTGRES_USER -d $$POSTGRES_DB"]
volumes:
  companioncache:
Leave optional Web Station portal disabled. Confirm the summary with Done and select starting the project. Inspect project Details > Containers: all three services should remain running; inspect their logs if they repeatedly restart. The database and companion have no published ports. The mapping 7601:3000 listens on NAS interfaces, so it is not an access-control rule: keep router forwarding disabled and restrict NAS firewall access to trusted LAN clients if required.
Check services, page and playback separately
- Services stay running. In Project Details > Containers, confirm all three services remain running. This establishes startup only; repeatedly restarting containers need log inspection.
- The local page opens. Open
http://NAS-LAN-IP:7601, replacingNAS-LAN-IPwith your recorded address. For the illustrative address192.168.1.20, usehttp://192.168.1.20:7601. Use HTTP and the app's port, not DSM's HTTPS port5001. This proves your browser can reach the web app. - A video plays. Search for a public video and try playback. This separately checks the dependency on YouTube. If it fails while the page opens, use the playback troubleshooting below.
Prove your saved data survives
Create a separate Invidious account if you want subscriptions, subscribe to one channel as a sample and record its name. This account is not a Google sign-in. In Container Manager's Project view select invidious and use Action > Restart. Reopen the same address, log in again if necessary and check the subscription remains. Find db inside the project folder; do not edit its internal files. A preference visible only in your browser is not a reliable database-persistence check.
Restart without updating
For the manual restart described earlier, select invidious in Container Manager’s Project view and use Action > Restart. This restarts the whole project, including companion and database; upstream's regular-restart recommendation concerns the Invidious web app. This guide configures no automatic schedule. A restart does not install new images.
Optional maintenance: make a recovery snapshot before updating
The installation above uses the graphical interface. This optional maintenance route also uses an SSH terminal: a text window that sends commands to your NAS. It is a source-supported procedure, not a demonstrated NAS backup or restore. You need Hyper Backup and separate backup storage. Do not replace images until you have a completed backup and know how to restore both the saved files and the previous images. If you cannot complete either part, leave the current installation in place.
Back up stopped account data and configuration
- Install Hyper Backup from Package Center if it is offered for your model. Open it and use + > Data backup task. Select a supported destination outside the
dockershared folder, preferably an external drive or another device. Choose Create backup task. In the source selection, include the entiredocker/invidiousfolder:db,config,dockerand your actualdocker-compose.yml. No application-package backup is needed for this file snapshot. Follow the official task wizard; labels can differ by installed version. - For this cold snapshot, disable automatic scheduling and decline any immediate initial backup until the project is stopped. In Container Manager select
invidiousand Action > Stop. Confirm all three containers have stopped, then select the backup task in Hyper Backup and Back up now. A live copy of the database folder is not this procedure. - Wait for completion. Open Version List and record the completed version's date/time. In Backup Explorer, check that the version contains
invidious/db, the initialization files and your final Compose file. Run Check backup integrity. These checks do not substitute for a restore test. Keep the repository and any encryption key protected: the Compose file contains secrets. The named companion cache is deliberately absent and can be recreated.
Keep the exact installed images
Save the running containers' image IDs, rather than assuming today's latest tag still points to them. A local recovery tag is a name attached to an image already on the NAS; it does not upload anything.
- Follow Synology's SSH instructions: Control Panel > Terminal & SNMP > Terminal > Enable SSH service, record its port and apply. On your computer open Windows PowerShell or macOS Terminal. Use
ssh YOUR-DSM-ADMIN@YOUR-NAS-IP -p YOUR-SSH-PORT, replacing all three labels with your administrator name, LAN address and configured SSH port. Enter the DSM password when prompted, then entersudo -iand the password again. Password characters need not appear while typing. Confirm a first-connection host-key prompt only for the NAS you intend to reach. - Commands below assume the project path is exactly
/volume1/docker/invidiousand Project Name isinvidious. If your volume differs, change that path everywhere first. Enter one command at a time. Stop if any command reports an error or any image-ID result below is empty. Ifcdfails, do not run the following commands.cdselects the project directory;docker composereads itsdocker-compose.yml.
cd /volume1/docker/invidious
docker compose -p invidious ps -a
docker compose -p invidious images -q invidious
docker compose -p invidious images -q companion
docker compose -p invidious images -q invidious-db
The ps -a result must show exactly the three expected services: invidious, companion, and invidious-db. They should be stopped for this snapshot. If the project is empty, lists other services, or uses another project name, stop; do not guess a name or create a second project.
- Record each image-ID result with its service name. Next create a new sibling directory for this snapshot. This example calls it
invidious-recovery-01; use a new suffix for each later snapshot, including in tag names and commands, so you never overwrite the last recovery set.mkdircreates the folder andchmod 700limits its access to its owner.
mkdir /volume1/docker/invidious-recovery-01
chmod 700 /volume1/docker/invidious-recovery-01
docker image tag "$(docker compose -p invidious images -q invidious)" local/invidious:recovery-01
docker image tag "$(docker compose -p invidious images -q companion)" local/companion:recovery-01
docker image tag "$(docker compose -p invidious images -q invidious-db)" local/postgres:recovery-01
docker image save -o /volume1/docker/invidious-recovery-01/images.tar local/invidious:recovery-01 local/companion:recovery-01 local/postgres:recovery-01
$(...) inserts the image ID from the inner command. docker image save writes those three images and tags into images.tar. Before leaving the terminal, give your DSM administrator ownership of the archive folder so File Station can read it. Replace YOUR-DSM-ADMIN below with the same actual username used for SSH; do not paste the label unchanged.
chown YOUR-DSM-ADMIN /volume1/docker/invidious-recovery-01 /volume1/docker/invidious-recovery-01/images.tar
Save your recorded IDs, project path/name and Hyper Backup version time beside this file. Copy the recovery folder to protected separate storage using File Station; it must not exist only on the NAS disk being protected. Do not run image cleanup until your recovery set is retained. You now have two parts: the Hyper Backup file snapshot and the image archive.
Update deliberately
After both recovery parts are complete, still in the project directory, download only Invidious and companion and recreate the project with the downloaded images. The database major remains 14; database upgrades are a separate task.
docker compose -p invidious pull invidious companion
docker compose -p invidious up -d
Repeat the three checks and subscription persistence check. Keep the pre-update snapshot even if the first page opens. When finished, enter exit twice to close the root shell and SSH session, then disable SSH in DSM if you enabled it only for maintenance.
Recover files and previous images together
This recovery returns all account data to the recorded snapshot time; later changes are lost. Stop invidious again. Keep its failed state separately before restoring; in File Station right-click the stopped invidious folder, choose Rename, and rename it to a fresh name such as invidious-failed-01. Do not start the project while its normal path is missing.
In Hyper Backup use its Restore control and select Data, select your backup task, choose the recorded completed version and restore only the docker/invidious folder to its original path. Skip unrelated system settings and packages. Confirm the summary and Apply. Inspect the restored tree before continuing. This is file restoration, not just downloading individual database tables.
Reconnect through SSH as above, become root with sudo -i, and run the following. The first command reloads the saved images with their recovery names. The next three attach those saved images to the original recipe's names; the last command recreates containers without downloading newer images. Use the archive and suffix matching the same data snapshot.
docker image load -i /volume1/docker/invidious-recovery-01/images.tar
docker image tag local/invidious:recovery-01 quay.io/invidious/invidious:latest
docker image tag local/companion:recovery-01 quay.io/invidious/invidious-companion:latest
docker image tag local/postgres:recovery-01 docker.io/library/postgres:14
cd /volume1/docker/invidious
docker compose -p invidious up -d --pull never --force-recreate
Repeat startup, page, playback and saved-subscription checks. A successful restore is established only when you perform and check it. If it fails, stop and retain both backups and failed-state folders; do not delete the database to force a fresh installation. Close SSH and disable it when finished.
To undo without deleting data, Stop the Project. For permanent removal, first keep an independent verified backup outside its folder. Synology documents Clean and Delete as destructive operations; do not treat either as a safe pause. Review the removal dialog before accepting any data deletion, and remove stored folders only when you deliberately want the accounts and configuration erased.
Problems in the order you might see them
- Image cannot download / no matching manifest: check internet/DNS, available disk and CPU compatibility. Do not substitute an arbitrary unofficial image.
- Project fails before opening: check YAML indentation, that no credential label remains, and the exact config/sql and init script locations. Check database logs before changing permissions. A missing file accidentally mounted as a directory means the working directory/upload is wrong.
- Port already allocated: change only the left side to a free NAS port, for example
7602:3000, then use that same number in your browser URL. - Database authentication fails: check both password entries match. An existing initialized db cannot be repaired simply by changing POSTGRES_PASSWORD; preserve data and investigate rather than delete it.
- Companion error: check companion logs, matching 16-character keys, internal service URL and companion cache-volume errors.
- Page opens but videos fail: distinguish YouTube bot/rate-limit/token/player errors from local container failures. Check the official YouTube error guide, update both relevant images, and seek project community help with secrets redacted. Changing quality or exposing a public port is not a guaranteed fix.
For help, use the Invidious installation documentation, YouTube error guide and Synology Project help.