

Back up a supported Synology NAS to a second NAS with Hyper Backup
Create an Entire System backup from a supported Synology NAS to a second NAS, download one sample file, and plan recovery with Hyper Backup.
Eugene Gavrilov
9 min read- NAS & storage
Create an entire-system backup on a second Synology NAS, then download one sample file to check that you can open it. This guide is for owners of a source NAS that supports Hyper Backup’s Entire System task and a second Synology NAS to receive the backup. Entire System covers configurations, packages and user data; installing Hyper Backup alone does not establish that your model supports it.
For this guide, use two initialized NAS devices and a computer on the same local network. The steps do not cover setting up a connection over the public Internet.
Your first useful checkpoint is concrete: a completed backup, a downloaded file whose contents you recognize, and a recorded next run. The file check gives you practice retrieving data without replacing anything on the working NAS. It does not demonstrate that you could restore the entire system.
Know which NAS does what
The source is the NAS you want to protect. It runs Hyper Backup. The destination is the second NAS that receives the backup; it needs Hyper Backup Vault. In this guide, “destination” always means that receiving NAS unless we explicitly discuss a full-system restoration destination.
A version is the saved state of a backup at a particular time. The version you choose to recover from is your recovery point. Retention, also called rotation, controls which historical points remain; that history is finite. Plan the space on the receiving NAS around the history you want to retain: rotation determines what stays, rather than adding storage capacity.
Keep two recovery operations separate. Backup Explorer lets you retrieve a sample file from an entire-system backup. Restoring the entire system is a different operation that irrecoverably overwrites its restoration destination. You will use the single-file Download operation for the check below.
Sync keeps current data aligned between locations, so deletion can propagate to another copy. A versioned backup instead keeps historical states for recovery; individual sync products may also offer versioning features. RAID is another separate concept: redundant RAID tolerates specified drive failures, but does not create an independent historical backup. Keep the separate backup even if the source NAS uses redundant RAID. See Synology’s sync and backup explanation and NAS backup guidance.
Check support and prepare both devices
DSM is the Synology NAS operating system you manage in a browser. Package Center is where you install and manage its software packages. A shared folder is a top-level storage location on the NAS; the new backup directory is the folder you create inside the selected receiving share for this task.
Identify the receiving NAS before opening the backup wizard. Its IP address is its numeric network address; its server name is a readable device identifier. If you do not know these details, use Synology’s NAS discovery instructions: on a computer on the same local network, open Synology Web Assistant, which requires Internet access, or use Synology Assistant from Download Center > your device > Desktop Utilities. Identify the receiving device and note its name or IP. Enter that value in Hyper Backup, not find.synology.com: the website finds the NAS; it is not the backup destination.
Before creating a task:
- Record both NAS model names and their installed DSM versions. For the source model, open Synology Download Center, select the model, then look under Documents > Product Specifications for Entire System support. The documented minimums are DSM 7.2 and Hyper Backup 4.1.0; those are minimum requirements, not a claim about the latest versions.
- On the source NAS, install the compatible released Hyper Backup package offered in Package Center. On the receiving NAS, install Hyper Backup Vault.
- Have the receiving NAS’s address and administrator sign-in ready, and identify the destination shared folder. You will select that folder and create a new backup directory during setup.
- Check free space on the receiving NAS and decide how much version history you need. If you cannot establish that enough space is available for your planned backup and retained versions, resolve that before starting. Entire-system backups support incremental block-level deduplication, but that does not establish a storage ratio or completion time for your data.
Put a harmless file with contents you recognize in a source shared folder before the first run. For example, create a small text file containing a sentence you can compare later; this is a suggested reader check, not a reported test result. Store backup credentials and any encryption password or recovery key somewhere safe outside the NAS.
If your source model does not support Entire System, stop here. This procedure does not establish an alternative selected-folder backup workflow.
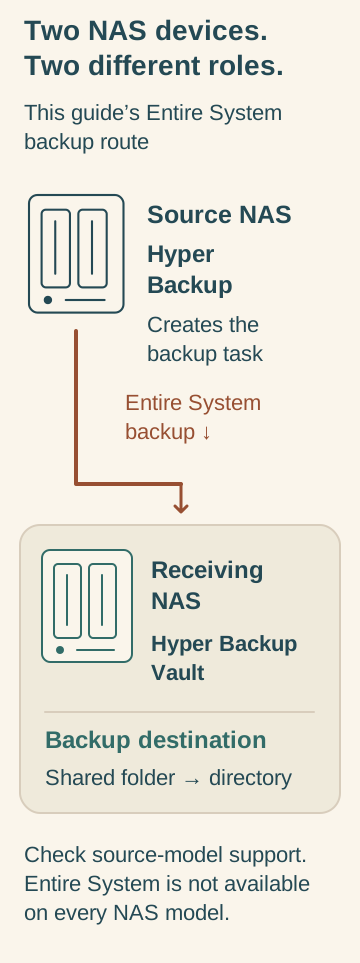
Text alternative: Use Hyper Backup on the supported source NAS to create the Entire System task. Install Hyper Backup Vault on the receiving NAS. In the source NAS task wizard, select the receiving NAS’s shared folder and create a new directory inside it. Check source-model support before starting.
Create the entire-system backup task
Follow Synology’s entire-system NAS-to-NAS backup instructions for this route.
On the source NAS:
- Open Hyper Backup, select +, then Entire System. Choose Remote NAS device and continue with Next.
- Enter the receiving NAS’s address and authenticate with its administrator sign-in.
- Select the destination shared folder and a new backup directory. Check that these refer to the receiving NAS you prepared.
- Choose the backup schedule. This determines when the task is meant to run; you will check the next scheduled run after the first backup.
- Configure rotation for the versions you want to retain. Review it alongside available destination space, because the policy controls which older recovery points remain.
- Review the task settings and select Done. If your installed wizard requests a restart, complete that prompt before continuing.
Run the backup and download your sample
If the task is waiting rather than running, the original guide describes starting it with Back up now. Let it finish, inspect its completion status and task log, and check the next scheduled run. These are checks for you to perform on your installation.
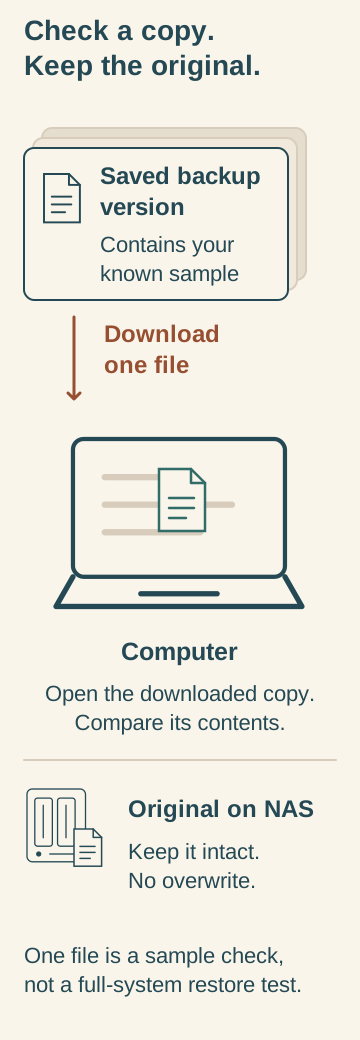
Text alternative: Select the backup task, open Backup Explorer and choose the completed saved version containing the harmless known sample. Download that one file to the computer, saving it separately from the working copy. Open the downloaded copy and compare its contents with the original. Keep the original and backup intact. One sample is not a whole-system restore test.
Next, retrieve the file you prepared using Synology’s file-recovery help:
- Select the backup task in Hyper Backup’s left panel, then open Backup Explorer.
- Choose the completed backup version containing the sample file.
- Locate and select that one file, then use Download to save a copy to your computer. Save it separately from your working copy.
- Open the downloaded file and compare its contents with the original. Record which version you selected and whether the contents match.
Use one file for this check.
A completed task and a readable downloaded sample establish that this file could be retrieved from that backup version. They do not prove every file is recoverable or validate whole-system disaster recovery. If the sample does not open or its contents differ, follow the checks below and preserve the working source and existing backup.
Keep a recovery note
Write down the source and receiving NAS names, the destination shared folder and backup directory, the task you created, the sample version checked and the next scheduled run. Record where you keep the access credentials and any encryption recovery material; keep the secrets themselves safely outside the NAS.
Get help changing the schedule
To prevent future automatic backups, open the selected task’s settings and consult the installed Hyper Backup Help for changing its schedule. The exact Entire System disable-and-save controls are not established in this guide. If you cannot identify them, use the support route below before changing the task. Keep the existing backup archive and its credentials; do not delete backup data to pause future runs. Changing a schedule is separate from interrupting a backup already running.
If setup or the sample check fails
Work through these checks in the order you encounter the problem. They identify what to inspect; they are not guaranteed repairs.
- Entire System is missing: recheck the source model’s eligibility and both software minimums before proceeding.
- The receiving NAS cannot be reached or sign-in fails: recheck that you identified the correct receiving NAS, used its administrator sign-in and installed Hyper Backup Vault there.
- The run fails or remains incomplete: record its actual status. On the receiving NAS, open Hyper Backup Vault, hover over the task and select Log to inspect that task’s backup log. Synology’s Vault log instructions explain this view.
- The downloaded sample is unreadable or differs: confirm that you selected the completed version containing the known file. Preserve the original and backup history; record what you downloaded and the difference you observed before asking for help. A failed sample check is not a reason to try a full-system restore.
For an unresolved problem, sign in as administrator and open Support Center > Support Services. Under Log Generation, select the relevant package and choose Generate Logs. Attach that diagnostic file privately to a Synology support ticket, with the exact error, NAS model names and software versions. Follow Synology’s guide to generating and uploading support logs; do not publish the diagnostic file.
Leave full-system restore for a separate recovery plan
Before whole-system recovery, check model compatibility, drive count, available capacity, drive types and slot arrangement against Synology’s Entire System requirements. Do not assume that any newer NAS qualifies: official guidance describes the same model or a compatible successor, with additional drive and capacity requirements.
On an initialized NAS, Hyper Backup > Restore > Entire System leads to Control Panel > Restore System. A fresh NAS offers Restore the System on its welcome page. Those routes irrecoverably overwrite the restoration destination’s data. Protect that destination’s existing files before considering them; they are not part of the sample-file check.
For now, finish with three observations: the backup completed, your downloaded sample opens with the expected contents, and the next run is recorded. Keep those observations distinct from a full-system restore test.
Documentation note: checked November 4, 2026 against DSM 7 help and DSM 7.3 specifications; no physical NAS backup or recovery test was performed. Use compatible released packages rather than historical beta instructions, and restart only if your wizard requests it. This guide limits the file check to single-file Download because official help and newer specifications describe different recovery breadth.