

Install Kaunta on a Synology NAS: Start with Local Access
Install Kaunta and PostgreSQL through Synology Container Manager, open the local dashboard, save a website record, and check it after a restart.
Eugene Gavrilov
13 min read- NAS & storage
Install Kaunta's analytics app and database, open the dashboard from your home network, and save a website record. Then restart the installation and check that the record is still there. Those are the completion checks for this guide; collecting visits from a real website comes afterward.
This procedure is based on Kaunta v0.122.1 and primary-source research dated 4 November 2026. It has not been run on a physical Synology NAS. Check your model's Container Manager support before proceeding.
Understand what you are installing
The installation has two running parts: Kaunta, which provides the dashboard, and PostgreSQL, which stores administrator, website and analytics records. Container Manager groups them into a project. Each part uses an image, a packaged copy of its software, to create a running container.
The storage has two parts too. PostgreSQL uses a normal NAS folder named db. Kaunta keeps its application files and saved configuration in a Docker-managed named volume, kaunta_appdata. That volume is separate from the folders you see in File Station. Keep both when backing up or retaining this installation.
Your browser opens the app at the NAS's local address, with a port number selecting the service. In the illustrative address http://192.168.1.50:3106, 192.168.1.50 is the NAS and 3106 selects Kaunta. The app connects to PostgreSQL within the project; you do not open the database in your browser.
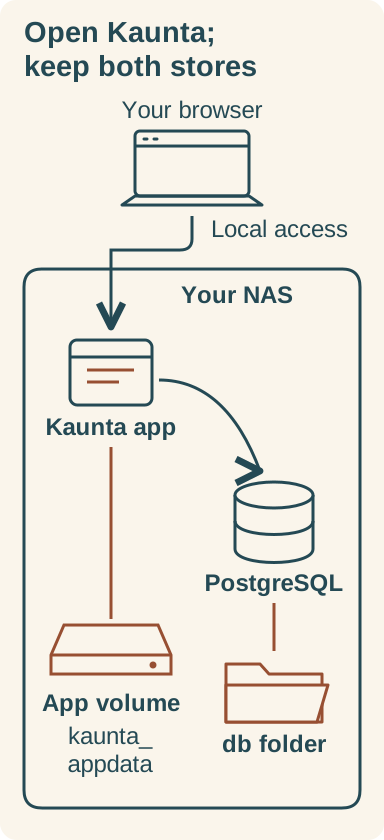
Your browser opens Kaunta. The app and database keep different files in two separate stores.
Your browser opens Kaunta, and Kaunta connects to PostgreSQL inside the project. PostgreSQL uses your recorded db folder. Kaunta uses the separate named volume kaunta_appdata, which does not appear as a File Station subfolder. Keep both stores.
Use this HTTP setup only on a trusted home network: HTTP does not encrypt the connection. Leave router port forwarding, DDNS, reverse proxies and the optional Web Station portal out of this first installation. Binding the app to a LAN address does not establish what your existing router or firewall permits. Public website collection needs a separate reachable HTTPS deployment.
1. Check the package and prepare storage
Use an authorized DSM administrator account with permission to install/manage Container Manager and read/write the chosen folders. If someone else administers this NAS, have them perform these actions.
- Find the model name on the NAS or in its product documentation, then check it against the Applied Models list on Synology's official Container Manager package page. In Package Center, confirm that Container Manager is available, install or open it, and check that it has a Project section. The selected Kaunta image provides Linux
amd64andarm64variants; that alone does not establish compatibility with your NAS. Check the model’s official specifications for an Intel/AMD64 or 64-bit ARM CPU. If you cannot determine the architecture, ask Synology support with the model name before proceeding. Stop here if the package or CPU architecture is unsupported. - In Control Panel → Network → Network Interface, select the connected LAN interface and read its IPv4 address. Record it without changing the network configuration. The examples below use
192.168.1.50; replace it with your address throughout. Do not enterlocalhostin a laptop's browser: that points to the laptop. - Open File Station and select your
dockershared folder. If it does not exist, use Control Panel → Shared Folder → Create → Create Shared Folder and follow Synology's shared-folder guide to create an ordinary shared folder on your intended volume. Its name need not bedocker; do not grant blanket Everyone write access. Inside the share, createkaunta, thendbandbackupsinsidekaunta. - In File Station, right-click
kaunta, open Properties → General, and copy Location. This full path is your Project Path. The example is/volume1/docker/kaunta; replace every corresponding example path with your actual location. - Generate a fresh, long random database password using letters and digits for this recipe. This avoids additional YAML and connection-URL escaping. Keep it in a password manager. You will choose a separate strong password for the dashboard administrator later.
Keep the project YAML and private settings restricted to your administrator account: they contain the database password. PostgreSQL will use db; backups is reserved for the backup procedure later in this guide.
2. Create the Kaunta project
Open Container Manager → Project → Create. Set Project Name to kaunta, select your kaunta folder as Path, and choose the Source option that creates docker-compose.yml in the editor. YAML is the configuration text pasted into the editor; it describes the two services and their storage. Its environment entries are named settings passed to a container.
Before deploying the following configuration, make these replacements:
- Replace both occurrences of
CHOOSE_A_LONG_RANDOM_DB_PASSWORDwith the same database password. - Replace both occurrences of
192.168.1.50with your NAS's actual LAN IPv4 address. InTRUSTED_ORIGINS, use the address withouthttp://or a port. - If necessary, replace
/volume1/docker/kaunta/dbwith the actualdbpath you recorded. Keep the container-side path after the colon as/var/lib/postgresql.
This block scrolls sideways on narrow screens; keep its long executable lines intact. The image references below are pinned to registry-verified digests. Keep the complete references, including the long sha256 values, rather than replacing them with latest.
services:
  postgres:
    image: postgres:18-alpine@sha256:10a5c69a83035ab5239f5620d708520e8b28f5aa1f2b20143e6024532edadfb5
    restart: unless-stopped
    environment:
      POSTGRES_DB: kaunta
      POSTGRES_USER: kaunta
      POSTGRES_PASSWORD: "CHOOSE_A_LONG_RANDOM_DB_PASSWORD"
    volumes:
      - /volume1/docker/kaunta/db:/var/lib/postgresql
    healthcheck:
      test: ["CMD-SHELL", "pg_isready -U kaunta -d kaunta"]
      interval: 10s
      timeout: 5s
      retries: 10

  kaunta:
    image: ghcr.io/seuros/kaunta:0.122.1@sha256:6dff3c12f628d5af32f630f46e359e3484efe1cdb322a87b0e382ec411eda883
    restart: unless-stopped
    environment:
      DATABASE_URL: "postgresql://kaunta:CHOOSE_A_LONG_RANDOM_DB_PASSWORD@postgres:5432/kaunta?sslmode=disable"
      PORT: "3000"
      DATA_DIR: /var/lib/kaunta
      XDG_CONFIG_HOME: /var/lib/kaunta/config
      SECURE_COOKIES: "false"
      TRUSTED_ORIGINS: "192.168.1.50"
    volumes:
      - appdata:/var/lib/kaunta
    ports:
      - "192.168.1.50:3106:3000"
    depends_on:
      postgres:
        condition: service_healthy

volumes:
  appdata:
    name: kaunta_appdata
Check the values before starting
Database. POSTGRES_DB creates the database named kaunta; POSTGRES_USER supplies its user. DATABASE_URL gives the app the matching user, password and database. Its hostname, postgres, is the database service name within this project, and 5432 is that service's internal port. The database has no published browser-facing port.
Ports. The mapping ending in 3106:3000 sends browser connections on NAS port 3106 to app port 3000. Keep PORT: "3000" and the final 3000 in that mapping together. If 3106 is already occupied, choose another unused external port and use that replacement in every browser address below; keep the internal app port at 3000.
Storage. The PostgreSQL storage target /var/lib/postgresql is intentional for PostgreSQL 18. Do not change it to /var/lib/postgresql/data. The app's DATA_DIR and XDG_CONFIG_HOME keep its files and saved configuration within kaunta_appdata. This named volume avoids guessing permissions for an arbitrary NAS folder used by the unprivileged app.
HTTP settings. SECURE_COOKIES: "false" is the setting for this local HTTP trial. TRUSTED_ORIGINS must match the NAS address you use. The database health check and dependency are included in the supplied configuration; leave them in place.
The restart: unless-stopped policy lets Docker restart eligible services after exits or daemon restarts, while leaving manually stopped services stopped.
Leave the optional Web Station portal disabled, review the summary, select Done, and start the project. In Container Manager → Container, select the project's postgres container and open Details to inspect its status, then Log for its messages. Repeat for kaunta. Both main services should remain running. Repeated stopping/restarting is a problem to resolve before continuing, not normal readiness. There is no promised ready message or waiting time.
3. Open the setup page and create your administrator
From a computer on the same LAN, open http://192.168.1.50:3106/setup, replacing the address and, if you changed it, the external port.
If the setup page does not open, first confirm both main containers remain running, then check the actual LAN address and selected external port in the browser. Next inspect the affected container under Details → Log. If these checks fail, stop here and retain the project and data for diagnosis. Record the NAS model, DSM/Container Manager versions, image references, failing container name and a short log excerpt. Remove passwords, connection URLs and session tokens before sharing it.
Fill in the database fields explicitly, even if the form already contains defaults:
| Database field | Enter |
|---|---|
| Host | postgres |
| Port | 5432 |
| Database Name | kaunta |
| Username | kaunta |
| Password | The database password used twice in your YAML |
| SSL Mode | Disable, for this internal project connection |
These values connect the app to the database service you just created. They are not your DSM login or your dashboard administrator credentials.
Set Server Port to 3000 and Data Directory to /var/lib/kaunta. The server port is the app's internal port, so do not enter the browser-facing 3106 here. Do not leave the data directory at ./data.
Under Administrator Account, enter a Username of 3–30 letters, numbers or underscores. Full Name is optional. Enter a separate strong password in Password and Confirm Password; eight characters is the application's minimum, not the password strength to aim for. Save this login separately from the database password.
Select Test Database Connection. Resolve any error before selecting Complete Setup. Completion writes the configuration and creates the administrator; the current app then continues into its main service. If the redirect does not complete, inspect the logs and try http://192.168.1.50:3106/dashboard with your actual address.
At this point, the dashboard opening confirms access to the app. The next step checks whether it keeps a change you make.
4. Save a record, restart, and look for it again
- Open Websites, at
/dashboard/websites. - In Add website, enter Name
Installation checkand Domainexample.test. - Select Add website and confirm that the record appears. This is an illustrative saved configuration, not a live public website or evidence of visitor tracking.
- In Container Manager → Project, select
kaunta, then Action → Restart. - Reopen the local dashboard, sign in if asked, and return to Websites. Look for
Installation checkagain. - In File Station, locate the
dbfolder you recorded earlier. Do not edit PostgreSQL's files. Remember thatkaunta_appdatais a separate named volume and will not appear as another subfolder here.
If the setup wizard returns unexpectedly or the website record disappears, pause and inspect the storage mounts and paths before adding more configuration.
Back up both kinds of storage before changing versions
The installation check ends above. Before a later update, back up both storage locations. A copy of db alone omits the app's saved configuration. The following GUI-based helper archives the database folder and the named app volume together. It adapts documented Docker backup mechanisms; it has not been tested on a physical NAS.
Stop the main project and prepare the helper
- In the main
kauntaproject's actions, choose Stop. Confirm that both containers are stopped, and keep this project stopped throughout the archive operation. Copying a running PostgreSQL cluster's files does not produce a consistent file backup. - In File Station, create a separate working folder, for example
/volume1/docker/kaunta-backup. In Project → Create, create a separate project namedkaunta-backup, using that folder and the compose editor. Find its full path through Properties → General → Location, as before. - Paste the helper below. Replace its two
/volume1/docker/kaunta/…host paths with your actualdbandbackupspaths. Leave the container-side/source/db,/source/appand/backuppaths unchanged. Keepname: kaunta_appdatato select the main project's named volume. - For each subsequent backup, change
kaunta-cold.tarto a new filename before running it, so you retain the earlier archive.
services:
  archive:
    image: postgres:18-alpine@sha256:10a5c69a83035ab5239f5620d708520e8b28f5aa1f2b20143e6024532edadfb5
    user: "0:0"
    network_mode: none
    entrypoint: ["/bin/sh", "-c"]
    command:
      - 'umask 077; tar -cpf /backup/kaunta-cold.tar -C /source db app && echo KAUNTA_BACKUP_ARCHIVE_COMPLETE'
    volumes:
      - /volume1/docker/kaunta/db:/source/db:ro
      - appdata:/source/app:ro
      - /volume1/docker/kaunta/backups:/backup
volumes:
  appdata:
    external: true
    name: kaunta_appdata
Run the helper and check this run's result
The helper uses the PostgreSQL Alpine image as an archive utility; it does not start a second database. The :ro suffix makes each source mount read-only, and the helper has no network connection. Its user: "0:0" runs only this archive helper as root so it can read all owners' files; do not copy that setting into the Kaunta service.
Start the backup project. Open Container Manager → Container, select its archive container, and open Details → Log. Unlike the main services, this helper should finish and stop. Check the messages from this run for KAUNTA_BACKUP_ARCHIVE_COMPLETE and no tar errors. The command emits that marker only when the archive operation reports success; a stopped container or an older run's marker is insufficient.
In File Station, find the actual nonempty archive under backups, using the filename you chose. A missing current-run marker, an archive error, or a missing/empty file means the backup has not met these checks. Preserve the original data and previous valid archives.
Give your backup operator access and copy it off the NAS
The root helper and umask 077 normally create a root-owned archive readable only by its owner. An authorized DSM administrator must hand off access to this archive file only:
- In File Station, right-click the archive and open Properties → General → Owner. Select your own DSM account and save.
- If additional permission is needed, open Properties → Permission → Create, choose only that DSM account, set Type to Allow and grant Read, then select Done and Save. Check Permission Inspector if needed.
- Verify that an actual copy/download of the archive succeeds. Retain the main project's YAML/settings and copy these off the NAS too. They contain credentials and analytics, so restrict access to the intended administrator.
Do not grant Everyone access or change database/app ownership recursively. If you cannot complete the handoff or download, keep the data and archive and ask the NAS administrator for help. A failed off-NAS copy means the backup has not met these checks.
Restart the main project and retain recovery information
Once the helper has finished, Start the original kaunta project and check its saved website record, whether the backup succeeded or failed. Resolve any backup failure before updating.
An archive appearing in File Station is not a verified restoration. Recovery requires PostgreSQL to be stopped, a matching PostgreSQL major version, the original app image/settings, and complete permission-preserving extraction into empty destinations. Do not extract over live data or erase the original folder or volume before recovery is verified. Arrange a separate restoration check before relying on this backup for a risky upgrade. Kaunta's full pg_dump-format backup is another documented approach; a period CSV archive is not a full restorable backup.
Recover from a problem or stop the installation
Use the symptom you actually see to choose the next check:
Container Manager or Project is unavailable
Check your exact model's package support.
Image pull is denied or fails over the network
Check registry connectivity and the complete image reference.
“No matching manifest” appears
Check whether the image architecture matches the NAS CPU.
The external port is already allocated
Choose an unused external port, update the port mapping and browser addresses, and keep internal app port 3000.
The database connection test fails
Check host postgres, port 5432, database/user kaunta, and the matching password. Changing POSTGRES_PASSWORD after initialization does not reset an existing database's password.
A permission error appears
Check the exact failed path and existing ownership. Do not grant blanket Everyone write access.
Login or origin checks fail
Check the actual NAS address in TRUSTED_ORIGINS; SECURE_COOKIES=false applies to this HTTP setup.
Saved setup is missing
Check database and app storage mounts, including their actual paths and named volume.
If you need help, share versions and redacted logs with the project maintainers or Synology support. Remove passwords, connection URLs and session tokens first.
Stop now or plan an update
To put the installation aside while retaining its records, select the main project's Action → Stop and remove any test tracking snippet you added to a website. Keep db, kaunta_appdata and your backups. Action → Start reverses the stop. Clean and Delete can remove project resources or data; reserve them for intentional removal after verified backups.
When you later update, keep the old image reference and a verified backup, read the release changes, and edit the explicit app version/digest under Details → YAML Configurations. Redeploy and repeat the login and saved-record checks. Avoid binary self-update inside this container and treat a PostgreSQL major-version change as separate work. Application migrations can change the database, so returning only to an older app image is not a guaranteed rollback.
Optional: connect a website after the installation check
This local installation verifies the dashboard and saved settings. To connect a website you control, follow the pinned Kaunta tracker reference. Real collection needs the website ID, allowed page origin and a collector reachable by each visitor's browser. An off-LAN browser cannot use this private collector. Public HTTPS collection needs a separate supported deployment; do not forward router ports just to complete this installation check.
For the installation task, finish by reopening your local dashboard and finding Installation check after the restart.