

How to install Miniflux on your Synology NAS
Install Miniflux with Container Manager on your Synology NAS, add a feed, check saved data after restart, and prepare a database backup.
Eugene Gavrilov
9 min read- NAS & storage
Collect the feeds you follow in one browser page on your NAS. Miniflux is an RSS reader: subscribe to a site’s feed to collect its new articles in one place. This guide creates a Miniflux reader and its PostgreSQL database through Container Manager's graphical Project interface, then checks that a saved feed and an article’s read status survive a restart. No terminal or Portainer is required. Miniflux manual. Synology’s Project instructions.
The configuration below pins Miniflux 2.3.5 and PostgreSQL 18.6, the versions listed by their official sources when checked on November 4, 2026. It is a documentation-based procedure; it has not been tested on a physical NAS for this article. Miniflux releases. PostgreSQL image documentation.
Before you begin
Sign in to DSM with an account allowed to install packages and manage containers. In Package Center, look for Container Manager and install it if available. If your NAS does not offer the package, stop here: this procedure requires Container Manager and its Project screen. It does not establish compatibility for every Synology model or older Docker package.
Use a computer connected to the same trusted home network as the NAS. Note the NAS address from the DSM address you normally open. For example, if DSM is at https://192.168.1.50:5001, the NAS address is 192.168.1.50; your actual number may differ. A port is a numbered doorway to an application: we will use 8645 for Miniflux, separately from DSM.
An image is a packaged application download; a container is a running instance of it. A project describes the reader and database together. The database needs storage outside the disposable container, so we will connect it to a folder you can find in File Station. Docker storage documentation.
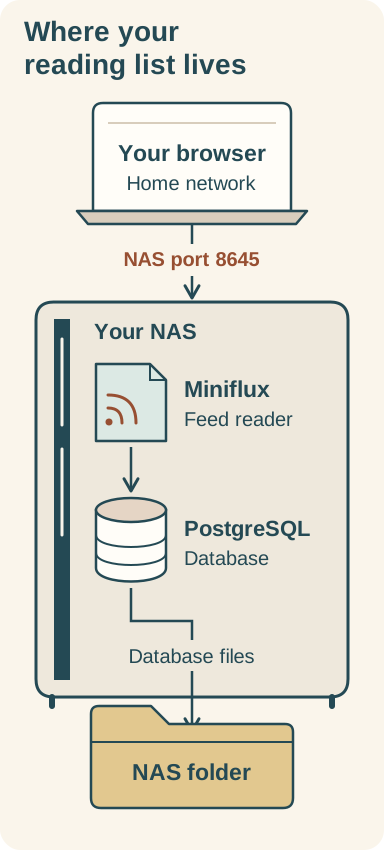
Miniflux uses PostgreSQL, which writes its database files to the attached NAS folder. A restart check is not a backup check.
Your browser opens Miniflux at the NAS address and port 8645. Miniflux connects to PostgreSQL. The database writes to docker/miniflux/db on the NAS; /volume1 is only the example volume used below.
Keep this first installation on your trusted local network. Do not add router port forwarding or a public reverse proxy. The local HTTP connection is unencrypted: avoid untrusted Wi-Fi and use a password unique to this reader. A domain is a name for an address; DNS looks up that address. Neither a domain nor a certificate is needed for this local check. HTTPS and certificates belong to a separate remote-access setup. Publishing a container port does not itself restrict access to your local subnet; existing firewall and router rules still matter.
1. Make the project and database folders
In File Station, open the docker shared folder and create a folder named miniflux. Inside it, create an empty folder named db. Do not reuse an existing database folder.
This article uses /volume1/docker/miniflux as the project path. Check your folder's actual location in File Station; if the shared folder lives on another volume, replace /volume1 throughout the configuration with that volume's actual name. Keep the db folder dedicated to PostgreSQL. Folder access controls determine who can read the configuration and change the database files: restrict the project folder to administrators rather than giving everyone write access. Do not open or edit files inside db while the database is running.
2. Prepare two private passwords
Use a password manager to generate and save two different random passwords of at least 24 characters using uppercase letters, lowercase letters and numbers: one for the database and one for your Miniflux login. This limited alphabet keeps the pasted database connection address straightforward; it is a choice for this example, not a Miniflux ban on punctuation.
In the YAML below, replace REPLACE_DATABASE_PASSWORD in both places with the same database password, and replace REPLACE_LOGIN_PASSWORD with your separate login password. These are editing markers, not working credentials. Do not deploy until none remain. Keep the single quotation marks. The login name will be readeradmin; you can choose another simple name before deploying. Miniflux Docker instructions.
3. Create the project
Open Container Manager → Project → Create. Use these values:
| Field | Value |
|---|---|
| Project Name | miniflux |
| Path | Select the docker/miniflux folder you just made |
| Source | Choose the option to create docker-compose.yml with the editor |
The entries under environment are startup settings passed to each application. Paste this configuration, then make the password and path edits described above. Preserve indentation; spaces determine which settings belong to each service.
services:
  db:
    image: postgres:18.6
    restart: unless-stopped
    environment:
      POSTGRES_DB: miniflux
      POSTGRES_USER: miniflux
      POSTGRES_PASSWORD: 'REPLACE_DATABASE_PASSWORD'
    volumes:
      - /volume1/docker/miniflux/db:/var/lib/postgresql
    healthcheck:
      test: ["CMD", "pg_isready", "-U", "miniflux", "-d", "miniflux"]
      interval: 10s
      timeout: 5s
      start_period: 30s
      retries: 10
  miniflux:
    image: miniflux/miniflux:2.3.5
    restart: unless-stopped
    depends_on:
      db:
        condition: service_healthy
    ports:
      - "8645:8080"
    environment:
      DATABASE_URL: 'postgres://miniflux:REPLACE_DATABASE_PASSWORD@db/miniflux?sslmode=disable'
      RUN_MIGRATIONS: '1'
      CREATE_ADMIN: '1'
      ADMIN_USERNAME: 'readeradmin'
      ADMIN_PASSWORD: 'REPLACE_LOGIN_PASSWORD'
POSTGRES_DB and POSTGRES_USER create the database and database account on the first empty-folder start. DATABASE_URL lets the reader connect to the db service on the project's private container network. There is deliberately no database port published to the NAS. sslmode=disable concerns that container-to-container connection, not browser HTTPS. Compose networking documentation.
The mount pairs your NAS db folder with /var/lib/postgresql inside PostgreSQL 18. Do not substitute the older /var/lib/postgresql/data mount from PostgreSQL 17 examples. service_healthy waits for the database readiness check before starting Miniflux. RUN_MIGRATIONS prepares the database tables, and the three admin settings create your first login. The restart policy brings containers back unless you deliberately stop them.
Leave the optional Web Station web portal disabled. Confirm the summary, click Done, and choose to start the project when the wizard finishes. Allow the image downloads and initial database preparation to finish. In the project's Details → Containers, check that both services are running. If a service exits repeatedly, use its container log before retrying.
4. Open your reader and add a feed
Open http://YOUR-NAS-ADDRESS:8645 in the browser, replacing YOUR-NAS-ADDRESS with the address you noted earlier. For the illustrative NAS address above, this is http://192.168.1.50:8645. Use http, the NAS address, and port 8645; do not reuse DSM's 5001 port or type localhost on your computer.
Sign in with readeradmin and the login password you saved. In Settings, choose your timezone and preferred theme and save the change. Open Feeds (+), enter the address of a public website or RSS feed you follow, and select Find a feed. Follow the offered subscription step and confirm that it appears in your feed list. Exact feed and settings labels here are supported by the supplied article and may differ with language or release. A site without a discoverable feed will need its actual feed address. Supplied installation source.
5. Check that your data survives
Note the new feed’s title. Open one article and mark it as read; note its title too. In Container Manager's Project screen, select miniflux and choose Action → Restart. Wait for the services, refresh your reader, and confirm the same feed, the article’s read status and timezone setting remain. You may need to sign in again. If the reader is empty, investigate the path and database logs before adding everything again. This tests persistence through a restart; it does not verify your backup or restore. It is your check, not a result we have measured on your NAS.
In File Station, locate docker/miniflux/db. PostgreSQL 18 stores its cluster beneath that mounted folder, normally under 18/docker. The files are the database's working storage, not documents to edit.
6. Remove the first-login settings
After a successful first login, open the project's Details → YAML Configurations and remove CREATE_ADMIN, ADMIN_USERNAME and ADMIN_PASSWORD. Save and use the interface's deployment option to apply the updated configuration. Leave RUN_MIGRATIONS and the database credentials in place. The existing account lives in the database; these removed variables are bootstrap settings. Keep the remaining YAML private because it still contains the database password.
If something does not work
Container Manager or Project is unavailable
This route does not apply to your installed package/model. Check Synology's package availability for your model before continuing.
Port already allocated
Another service uses NAS port 8645. Change only the left number in 8645:8080, for example to 8646:8080, redeploy and use the new number in your browser.
Database authentication failure
Confirm both database-password entries match. Editing POSTGRES_PASSWORD does not change a password already initialized in an existing db folder. Restore the original saved value; do not delete existing data to fix authentication.
Database unhealthy, permission or directory errors
Check the database log, the actual volume path, and that the dedicated folder was empty on first use. Do not grant everyone access or copy another user's UID/GID.
Login rejected after editing YAML
Use the originally created account. Bootstrap variables are not a password-reset tool.
Browser cannot connect
Check both services are running, the NAS address and port are correct, and your computer is on the trusted network. Review existing DSM firewall rules; do not disable the firewall wholesale.
A feed fails but the reader opens
Try another public feed. Current Miniflux defaults refuse private-network feed fetches; do not remove that protection merely to test a public feed.
These are diagnostic directions, not guaranteed fixes. Share the relevant error and versions with Miniflux's issue tracker, removing passwords and connection strings first. Miniflux configuration documentation.
Back up before updating
Follow PostgreSQL’s file-backup requirements and Miniflux’s upgrade instructions before changing versions.
Save your passwords, a private copy of the project YAML, and the database together. For a file-copy backup, stop the entire project with Action → Stop, confirm both containers have stopped, then back up the complete db folder with a method that preserves its ownership and permissions. Keep the backup outside the project folder and preferably on separate storage. Start the project afterwards. PostgreSQL requires a stopped server for an ordinary file-copy backup; copying its live files is insufficient. A feed-list export alone is not a complete reader database backup. PostgreSQL file-backup requirements.
Before relying on the backup, restore a copy into a separate project and folder using the same image versions and another NAS port, then check login, feeds and saved settings. Keep the original stopped during a recovery. If your graphical backup method cannot preserve the database files' access rights, use a supported database-aware backup workflow rather than assuming the copy is restorable. No restore test is claimed here.
For a Miniflux update, read its release notes, make and verify the backup, then change the Miniflux image tag under YAML Configurations and deploy the project with the new configuration so it obtains and uses that image. Keep RUN_MIGRATIONS: '1'. An ordinary Restart does not substitute a new image. Verify the displayed version and repeat your feed check. Do not change the PostgreSQL major version as part of this routine update. Miniflux upgrade instructions.
If an upgrade fails after database migration, preserve the failed state and recover the pre-upgrade backup with its matching old image versions. Merely changing the Miniflux tag backwards is not a reliable database rollback.
To pause Miniflux, use Stop. To uninstall, make and verify your backup first, then use the project's Delete action only when you are ready to remove the project and its data. Synology documents Clean and Delete as removal operations; neither is a persistence test. Read the confirmation before accepting, and retain your separate backup until you are certain you no longer need it.