

How to Install Tiny Tiny RSS on Your Synology NAS
Set up a local Tiny Tiny RSS inbox with Synology Container Manager, add a feed, check saved state, and prepare a stopped backup and rollback.
Eugene Gavrilov
15 min read- NAS & storage
Collect updates from sites you follow in your own reading inbox on your NAS. Sites can publish a feed—an address carrying their updates in RSS or Atom format—which Tiny Tiny RSS collects for you. You will add one feed, then check that your subscription survives a restart.
You will finish with:
- A local browser address for Tiny Tiny RSS.
- One subscribed feed and a check that its saved state survives a restart.
- A recorded location for the application files, database and project settings.
Check that your NAS supports this route
Sign in to DSM with administrator access and look for Container Manager in Package Center. This guide uses its Project interface. If the package is unavailable for your NAS, stop here: this route does not establish compatibility for your model. The current application images support linux/amd64 and linux/arm64; that is not a promise that every Synology can run them. You also need a modern browser and internet access for image downloads and feed fetching.
The procedure below is assembled from documentation, including Synology's project controls. It has not been run on a physical NAS. The supplied article supports the feed-subscription menu wording; that wording has not been independently checked in the current reader interface.
In File Station, identify the storage volume and shared folder where you will keep this installation. The example uses /volume1/docker/tinyrss; use your actual location throughout. Check that the chosen location has free space for application and database files; this guide does not give a model-specific storage requirement.
Keep this first installation on a trusted home network. Its example address uses HTTP, which does not encrypt browser traffic. Do not add router port forwarding as part of this guide.
Understand what you are installing
Tiny Tiny RSS runs on the NAS; you read its inbox in a browser.
An image is a packaged application template. A container runs an image. A project groups the four containers in this installation so their settings and connections can be managed together:
web-nginxaccepts requests from your browser.appruns the reader application.updaterfetches feeds.dbruns PostgreSQL, the database holding saved account and reading data.
Your browser reaches web-nginx through a port on the NAS. The application uses PostgreSQL, while the updater fetches feeds without needing the browser to remain open. Application files and database files occupy separate NAS folders mounted into the containers. Those folders remain outside the replaceable containers; persistence alone is not a backup.
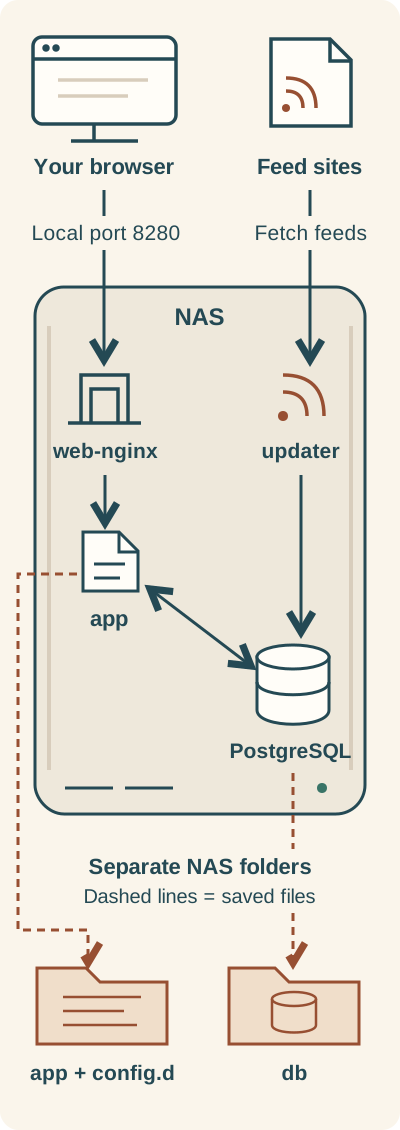
The browser enters through web-nginx; the updater fetches feeds. Separate NAS folders keep application files and database data outside replaceable containers.
Diagram in words: Your browser reaches web-nginx through NAS port 8280. The app and updater use PostgreSQL; the updater fetches feeds without an open browser. The app and updater share application files and config.d; web-nginx reads application files. Database files live in a separate db folder. These persistent folders are not a backup.
Choose where the data will live
A bind mount connects a folder on the NAS to a folder inside a container. Create an administrator-controlled tinyrss folder in your chosen container shared folder, then create three folders inside it:
| Folder in this example | Purpose |
|---|---|
/volume1/docker/tinyrss/app | Shared application files |
/volume1/docker/tinyrss/db | PostgreSQL data; begin with an empty folder |
/volume1/docker/tinyrss/config.d | Additional application configuration |
Record your real full paths before continuing. Do not connect this project to database files from another installation. Keep access limited to administrators. A complete backup must include the project configuration and all three data folders, not just app.
Files also have owners and permissions controlling who can access them. This configuration does not require you to invent user or group numbers: the application image uses its documented defaults and prepares its application directory at startup. NAS permissions can still prevent access. If that happens, inspect the specific mounted folder; do not grant Everyone write access or change ownership across an entire shared folder.
Fill in your own settings
A port selects a service at a device's address. Here NAS port 8280 leads to the reader. For example, if you normally open DSM at https://192.168.1.20:5001, the NAS address in that example is 192.168.1.20; DSM's port 5001 is separate. localhost means the device opening the address, so it would point at your computer when entered there.
The complete reader URL has four parts: http:// is the connection scheme, 192.168.1.20 is the illustrative NAS address, :8280 selects the reader port, and /tt-rss/ is the application path. Keep all four parts when setting TTRSS_SELF_URL_PATH. A domain is a readable name for an address; DNS looks up addresses for names. This local reader URL uses an IP address, so you do not need to register a domain.
Save these settings in a password manager or another private record before creating the project:
| Setting | What it does | Your value |
|---|---|---|
| NAS address | Identifies your NAS on the home network | Replace illustrative 192.168.1.20 |
| Storage prefix | Locates this installation's folders | Replace /volume1/docker/tinyrss if yours differs |
| Database password | Lets the application connect to PostgreSQL | Generate a private password; use it in both database-password fields |
| Reader password | Signs you into the reader as admin | Generate a different private password |
| Reader URL | Tells the application its complete browser address | http://YOUR_NAS_ADDRESS:8280/tt-rss/ |
For each password, choose at least 24 random letters and digits. This is a recommendation for this example, not an upstream minimum. Restricting the character set avoids special YAML quoting and Compose's interpretation of dollar expressions. Generate another password if it contains $ or punctuation.
Create the project
Open Container Manager → Project → Create. Name the project tinyrss, select your tinyrss folder as its path, and choose the source option that lets you create docker-compose.yml in the editor. That file describes the project's containers. Leave the optional Web Station portal disabled; this configuration supplies its own browser port.
An environment variable supplies a named setting to a container. &reader-settings names the shared settings block; *reader-settings reuses it for the updater. Change the shared block once. The two database-password entries must still match each other.
The published port entry means “NAS address, NAS port 8280, container port 80.” Only the web container publishes a port; PostgreSQL port 5432 stays inside the project. If 8280 is already occupied, choose an unused port and change it in both this entry and TTRSS_SELF_URL_PATH. ro means read-only for that particular mount. unless-stopped allows automatic restarts except after a deliberate stop.
Paste the YAML below, then make these edits before starting the project. The editing tokens are required setup inputs, not default passwords:
- Set
POSTGRES_PASSWORDandTTRSS_DB_PASSto the same private database password, replacing bothSET_DATABASE_PASSWORDtokens. - Set
ADMIN_USER_PASSto your different reader password, replacingSET_READER_PASSWORD. - Replace the NAS address in both
TTRSS_SELF_URL_PATHandports; both must identify your NAS. - Replace every
/volume1/docker/tinyrssprefix if your storage path differs. - Keep the service names, database name/user, container paths, image names and other settings as supplied. If you change the example port, change it in both the published port entry and self URL.
services:
  db:
    image: postgres:17-alpine
    restart: unless-stopped
    environment:
      POSTGRES_USER: ttrss
      POSTGRES_DB: ttrss
      POSTGRES_PASSWORD: 'SET_DATABASE_PASSWORD'
    volumes:
      - /volume1/docker/tinyrss/db:/var/lib/postgresql/data
  app:
    image: ghcr.io/tt-rss/tt-rss:latest
    restart: unless-stopped
    environment: &reader-settings
      TTRSS_DB_TYPE: pgsql
      TTRSS_DB_HOST: db
      TTRSS_DB_PORT: '5432'
      TTRSS_DB_NAME: ttrss
      TTRSS_DB_USER: ttrss
      TTRSS_DB_PASS: 'SET_DATABASE_PASSWORD'
      TTRSS_SELF_URL_PATH: 'http://192.168.1.20:8280/tt-rss/'
      ADMIN_USER_PASS: 'SET_READER_PASSWORD'
    volumes:
      - /volume1/docker/tinyrss/app:/var/www/html
      - /volume1/docker/tinyrss/config.d:/opt/tt-rss/config.d:ro
    depends_on:
      - db
  updater:
    image: ghcr.io/tt-rss/tt-rss:latest
    restart: unless-stopped
    environment: *reader-settings
    volumes:
      - /volume1/docker/tinyrss/app:/var/www/html
      - /volume1/docker/tinyrss/config.d:/opt/tt-rss/config.d:ro
    depends_on:
      - app
    command: /opt/tt-rss/updater.sh
  web-nginx:
    image: ghcr.io/tt-rss/tt-rss-web-nginx:latest
    restart: unless-stopped
    ports:
      - '192.168.1.20:8280:80'
    volumes:
      - /volume1/docker/tinyrss/app:/var/www/html:ro
    depends_on:
      - app
The database image and wiring follow the documented production example. The application and updater share the same settings and files; the web container reads the application files.
Review the wizard summary, finish and start the project. Open its Details, inspect container states and read logs if a component does not start. The application waits for the database during startup; finishing the wizard alone does not prove readiness. Continue when the project is running without recurring startup errors.
Open your reading inbox
Open your edited reader URL, for example http://192.168.1.20:8280/tt-rss/. Its parts are http:// for the connection scheme, your NAS address, :8280 for the published reader port, and /tt-rss/ for the application path. Keep the complete address identical to TTRSS_SELF_URL_PATH, including that path.
Sign in as admin using the reader password you chose. ADMIN_USER_PASS is applied again at startup: if you change the administrator password, keep the saved project setting consistent with the password you intend to use.
Subscribe and check a feed
First obtain a feed address from a site you already follow. As a concrete discovery exercise, open that site's homepage and look in its navigation or footer for RSS, Atom or Feeds. If it offers several feeds, choose one topic you recognize. Open that feed link and copy the resulting address from your browser's address bar. If you cannot find a feed link, choose another site that visibly supplies one rather than guessing a URL. This is a discovery exercise, not a guarantee that every site publishes feeds.
In Tiny Tiny RSS, use Subscribe to feed in the reader menu. Paste the copied feed address into the subscription field, then subscribe. Paste the feed link's address, not the site's homepage address.
Give the updater time to fetch the feed, then refresh the inbox and look for articles. There is no fixed refresh-time promise here. Record the subscription name and make a visible read/unread change to an article if one is available.
Restart and check your saved state
In Container Manager, use Project → Action → Restart for tinyrss. Reopen the same reader URL and check that your subscription and recorded read/unread state remain. This is the acceptance check for your installation.
Return to File Station and locate your app, db and config.d folders. If the saved state is missing, investigate the mount paths before creating another installation or deleting anything.
Back up, update or undo the installation
An OPML export from Preferences → Feeds → OPML gives you an additional subscription copy. It does not replace a complete backup or preserve the database's complete article history.
Use Hyper Backup for the data backup below; it supports folders and their permission settings. You will also save the installed images separately so a rollback can restore the application version as well as its data.
Save a stopped backup
Connect an already prepared USB backup drive, separate from the installation's source folder. Install Hyper Backup from Package Center if needed. Do not format a drive containing data you want to keep.
- In Container Manager, select
tinyrssunder Project and choose Stop. Confirm all four containers have stopped. Keep them stopped until the backup finishes. - In Hyper Backup, choose + → Folders and Packages → Next → Local Shared Folder or USB → Next. Choose Multiple versions, then Create backup task. Select the USB destination and a directory for this backup.
- Select the entire source
docker/tinyrssfolder, using your actual shared folder and path. Include its Compose file,app,dbandconfig.d. Skip unrelated application packages; these containers' mounted data are in the selected folder. - Name the task
tinyrss-stopped. Disable Enable backup schedule for this manual workflow: an unattended scheduled run could otherwise copy the database while it is running. Choose Apply, then Yes to run the backup immediately. - Wait for the green success check. Open Backup Explorer and inspect this backup version for the Compose file and all three data folders. The success check reports the backup job's result; it does not prove a restore has been tested.
- Return to Container Manager and Start the project. For later backups, stop all four containers first, use the existing Hyper Backup task's Back Up Now, and keep them stopped until it succeeds.
Keep this backup outside the project folder and keep an additional copy off the NAS. An OPML export and an image archive are useful companions, but neither replaces this stopped data backup.
Save the images before an update
An image is separate from the files it works on. In Container Manager → Image, select the installed application image and choose Action → Export. Save the archive outside the project folder, alongside your backup record. Repeat for the web-nginx and PostgreSQL images. The application and updater share one application image, so that image needs only one export. Label the archives with their image names and the matching stopped-backup date.
The latest tag can point to a different image revision later. These archives retain the previous images. Keep the saved Compose configuration with them.
Plan an update only after those copies are safe
Take a fresh stopped backup and export the current images first. In Image, select the application image and look for Action → Update, or Update available in its Tag column. If available, choose it and confirm. Repeat for the web-nginx image. Keep PostgreSQL on major version 17: changing it to 18 requires a database migration.
Synology documents these update controls, but the available evidence does not establish that they appear for these GHCR images. If the update action is unavailable, stop the update here and ask an experienced operator to follow the project's documented Compose pull-and-recreate procedure. Do not guess an alternative button or remove the installation to force an update.
After successfully fetching the application and web image updates, select tinyrss under Project, then use Stop → Build → Start. Build prepares the containers from the project's configuration; Build alone is not a promise to fetch a new image. Check states and logs, follow any application schema-update prompt, then repeat the saved-feed check. A restart by itself does not fetch a new image.
Restore the matching data and images
For a rollback on this same NAS, first select tinyrss under Project, choose Stop, and confirm that all four containers have stopped. Keep them stopped throughout the data restore. In File Station, move or rename the entire failed tinyrss directory to a separate sibling location—for example, /volume1/docker/tinyrss-failed-20261104, using your actual volume and an unused name. Preserve that failed-state folder. Confirm that the original /volume1/docker/tinyrss path is now absent. Do not copy the backup over an existing directory: that could leave newer database files mixed with the restored files.
In Hyper Backup select the saved task, open Backup Explorer, choose the timestamp of your stopped backup, and select the complete tinyrss folder. Choose Restore to restore it to its original location. Do not use Copy to or Download for this procedure: Synology says those options lose original permission settings. Wait for restoration to finish, then check in File Station that the original project path, Compose file, app, db and config.d have all been restored. Do not Build or Start the project while restoration is incomplete or any expected path is missing.
In Container Manager's Image page, use Action → Import → Add from file to bring back the matching exported application, web-nginx and PostgreSQL images. Use the saved configuration to Build, then Start the project. The previous application must be restored together with its matching database backup; using an older image against a database already changed by an update is not a safe rollback.
Check container states and logs, sign in, and repeat the subscription and saved-state checks. Check access to the restored folders if logs report permission errors. The backup and restore controls are documentation-supported; the reader checks establish whether recovery worked on this installation.
To pause: stop the project.
Before deleting the project: make and verify a complete backup outside the project folder. Synology describes Delete as deleting project containers and data; do not assume it preserves your files. This guide therefore does not offer Delete as a data-retaining cleanup shortcut.
To erase the installation intentionally: treat project deletion and any remaining data-folder removal as destructive. Proceed only after deciding whether to retain the external backup. Deleting the data removes the saved inbox represented by those files.
Fix the first thing that did not work
Container Manager is unavailable. Check: Package availability for your NAS. Next: Stop this route; architecture support alone does not certify a model.
Project creation or image download fails. Check: YAML indentation, mandatory replacements, NAS internet/DNS and image architecture. Next: Correct the failed input or download condition, then retry creation.
Startup reports database or permission errors. Check: Open the project's Details, inspect container states and review db and app logs. Compare the mount prefixes in the saved YAML with your recorded File Station folder paths. Next: If you cannot identify the mismatch, stop the project, retain the YAML and data folders, and request help with sanitized log excerpts. Do not change permissions across the shared folder.
Browser cannot connect. Check: Inspect project state, current NAS address, port conflicts and trusted-network firewall access to TCP 8280. Next: Correct the address or specific firewall rule; do not disable the firewall globally.
URL or sign-in behaves unexpectedly. Check: Compare the full self URL, /tt-rss/ path and configured reader password. Next: Make the browser address and configuration agree; use the configured reader password.
Page returns 502. Check: Open project Details and review app and db logs. Next: Keep the error excerpts and project settings for help if the cause is unclear; do not delete the database as a troubleshooting step.
Feed stays empty. Check: Open the feed address you copied and confirm it is still the site's published feed link. Review updater logs through project Details. Next: Retry with a different site-provided feed. If neither works, retain the feed addresses and sanitized updater errors for help; preserve the existing data.
Subscription disappears after restart. Check: Compare the saved YAML's app and db paths with the original recorded paths in File Station. Next: Stop the project if they differ. Preserve both the original folders and any newly created folders, then seek help identifying the correct mounts before starting again.
When asking for help, retain the service name, its state and the relevant error lines. Remove passwords and other private values from shared logs or configuration. Keep the original unshared configuration and all data folders available for recovery.
For application updates and recovery prerequisites, use the official Tiny Tiny RSS installation guide. For current project help, start at the Tiny Tiny RSS site and follow its support links.
For backup and recovery controls, consult Synology's Hyper Backup restore documentation. Its Container Manager image documentation describes image export, import and update.