

How to Install NZBHydra2 on a Synology NAS
Install NZBHydra2 through Synology Container Manager, map a settings folder, open it locally and check saved settings after a restart.
Eugene Gavrilov
11 min read- NAS & storage
NZBHydra2 gives you one place to search your configured indexers—the services that supply searchable listings of NZB files. On your Synology NAS, you can keep that search page on your home network and store its settings in a folder you control. This guide takes you through installation and a saved-setting check after a restart. Indexer accounts remain your responsibility, and downloading content requires a separate download client.
This is a documentation-based procedure checked on November 4, 2026, not a report of an installation on physical Synology hardware. Complete the checks below on your own NAS before relying on it.
Check your NAS and prepare its address
Sign in to DSM, Synology's management interface, with an administrator account. In Package Center, check whether your NAS offers Container Manager. This guide uses its Project page. If you only have the older Docker package, this particular set of instructions does not apply.
Also check your model's processor specification against the LinuxServer image documentation. The current image supports x86-64 and arm64; the former 32-bit ARM image has been retired. Package availability and processor compatibility both matter.
Find the NAS's local numeric IPv4 address in DSM, even if you normally sign in through a hostname or remote access address:
- Open Control Panel > Network > Network Interface.
- Select the connected LAN interface serving your home network. If you already use a combined Bond interface, inspect that interface instead.
- Read its IPv4 IP address. If needed, open Edit > IPv4 to inspect that field, then close without changing or applying network settings. Record the NAS IP address—not the gateway, DNS server or subnet mask. If multiple interfaces are connected and you cannot identify the home-network one, resolve that before creating the project.
If your DSM browser address already contains the NAS's local IP, that is a convenient shortcut: copy the number without DSM's port. For illustration, a NAS might use 192.168.1.20; do not copy this example address. Use the address you found. A hostname or domain is a readable name that resolves to an address. You do not need to buy one or change DNS for this local setup.
A port identifies the service you want at that address. This guide uses port 5076 for NZBHydra2, so the illustrative app address is http://192.168.1.20:5076. The NAS address comes before the colon and the app's port comes after it. Keep your computer on the same trusted network. This HTTP connection is unencrypted; do not add a router port forward or public reverse proxy as part of this installation.
Give saved settings a permanent home
An image is the packaged application template. A container is a running instance created from that image. You can replace the container while retaining a mapped NAS folder: the app sees that folder at its internal path /config. That separation is what you will check after installation.
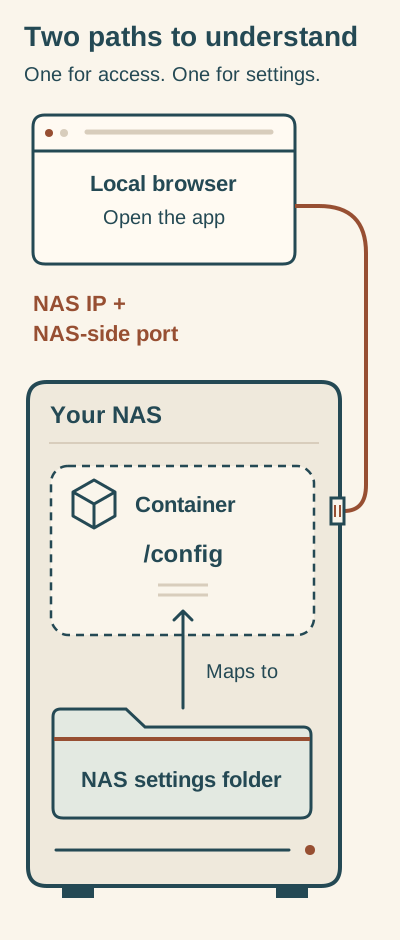
Saved settings use the mapped NAS folder. Open the app through the NAS address and published port.
The NAS settings folder maps to /config inside the NZBHydra2 container. Your browser uses the NAS IP address and the NAS-side port chosen in the recipe. /config is storage, not a browser address. Back up the host folder before removal: deleting a Project can remove its data.
A shared folder is a top-level place DSM provides for storing files. If docker already appears in File Station, use it. If it is missing, open Control Panel > Shared Folder > Create > Create Shared Folder, name the new folder docker, select a storage volume in Location, and complete the wizard. If you already have another suitable shared folder you prefer, use it instead; the later recipe must use its actual path.
In File Station, open that shared folder, create nzbhydra2 inside it, and create config inside nzbhydra2. Right-click the new config folder, choose Properties > General, and copy the complete Location path. Record the nzbhydra2 folder's Location too: that parent folder will be the Project's working path.
The example recipe uses /volume1/docker/nzbhydra2/config. Replace it with your recorded config path wherever it differs, including the volume name. The final /config after the colon in the recipe is a separate, internal container path and stays unchanged.
Choose the DSM account that will own this new application's files. Open the new config folder's Properties, set Owner to that account, and open Permission. Choose Create, select that account, and create an Allow entry with Read and Write access for the folder and its descendants. Save the changes. Keep this change within the dedicated app folder.
If access is unclear, use Permission > Advanced options > Permission Inspector to inspect effective permissions. An existing Deny rule can still prevent access even when you add an Allow entry.
Read the account's real user and group numbers
LinuxServer uses two numeric identity values to match the app's file access to your chosen account. PUID is its user ID; PGID is its primary group ID. Read both from your NAS instead of copying somebody else's numbers.
You can run the read-only id command through DSM without enabling SSH:
- Open Control Panel > Task Scheduler and create Scheduled Task > User-defined script.
- Name it
Read Hydra IDs. For User, select the account you chose for the config folder. Leave the task disabled so it has no automatic run. - In Task Settings, enter the command below, then save and close the task.
- Back on the Task Scheduler main page, open Settings, enable Save output results, choose an output folder you can read, and save the output settings.
- Select the saved task and click Run. Open Action > View Result to read its output.
id
For an illustrative result of uid=1035(name) gid=100(users), write down 1035 for PUID and 100 for PGID. Your result supplies your values. Ignore the additional numbers under groups=. Delete this diagnostic task when you have recorded the two numbers. If DSM does not let you select the account or view the result, resolve that before continuing; do not guess the IDs or switch the task to root. This procedure combines documented DSM task controls with LinuxServer's ID lookup and has not been tested on a physical NAS for this article.
Create the Container Manager Project
A Project uses a Compose file: a text recipe describing the image, settings, folder connection and ports. Install Container Manager from Package Center if needed, then open Project > Create. Give the project the name nzbhydra2, set Path to the nzbhydra2 folder you created, and choose the Source editor to create docker-compose.yml.
Before pasting the recipe, prepare these values:
| Recipe value | What to use |
|---|---|
YOUR_UID | The number immediately after uid= in your task result. |
YOUR_GID | The number immediately after gid=. |
YOUR_NAS_LAN_IP | Your NAS's local numeric IPv4 address. |
/volume1/docker/nzbhydra2/config | Your actual full path to the new config folder. |
Etc/UTC | A valid timezone setting; keep UTC or substitute your own valid timezone name. |
These identity and timezone settings are environment variables, named values supplied to the container when it starts. The image reference ends in :latest, which selects LinuxServer's stable channel; the build behind that tag can change.
services:
  nzbhydra2:
    image: lscr.io/linuxserver/nzbhydra2:latest
    environment:
      PUID: "YOUR_UID"
      PGID: "YOUR_GID"
      TZ: Etc/UTC
    volumes:
      - /volume1/docker/nzbhydra2/config:/config
    ports:
      - "YOUR_NAS_LAN_IP:5076:5076"
    restart: unless-stopped
Replace all three YOUR_… values before starting and correct the NAS folder path if necessary. Keep the indentation, quotation marks and internal /config path. In the folder line, the part before the colon is your NAS folder; /config is where the app accesses it inside the container. restart: unless-stopped asks the container to resume after interruptions unless you deliberately stopped it.
The port line has three parts: NAS IP : NAS port : container port. Keep the final 5076. If the NAS already uses port 5076 for another service, select an unused NAS port, such as 5077, and change the line to "YOUR_NAS_LAN_IP:5077:5076". You would then open port 5077 in your browser. Binding to the NAS's LAN IP narrows the listening interfaces; it does not authenticate visitors or guarantee isolation from other routed networks. If the NAS's IP changes later, the recipe must change too.
This recipe does not need host networking. Leave the optional Web Station web portal disabled, finish the wizard, and choose to start the project. Allow time for the image download and startup. If startup fails, inspect the project's output before trying again.
You do not need a /downloads mapping for this installation check. That optional mapping is for NZB files saved by NZBHydra2. It does not automatically represent your media library or a download client's completed files.
Open the app and check one saved setting
In your browser, enter http://YOUR_NAS_LAN_IP:5076, replacing the address and using your chosen NAS-side port. For the earlier illustration, that is http://192.168.1.20:5076. This opens NZBHydra2, whose authentication is separate from DSM's login. Set up the app's authentication before allowing other people to access it.
Use a small configuration change to check that the setup retains settings. You do not need an indexer account or a download for this check:
- Open Config > Main > UI. Find Show indexer groups in separate section, a setting documented in the application's release notes. Record its starting state, change it to the other state, and save the configuration.
- In File Station, check that the NAS
configfolder now contains application-created data. - In Container Manager, select the project and use Restart.
- Reopen the app at the same address, return to that setting, and compare it with the value you saved. You can restore its original state and save again afterward.
The setting controls how configured indexer groups appear on the search page. You are checking the saved configuration value, so you do not need to create a group or obtain search results. If your installed release does not show the documented setting, check its version and release notes before proceeding. A running container alone does not establish that configuration survives a restart.
Once the saved value survives your check, add an indexer you already use through the app's configuration, using the API details supplied by that indexer. An API key is a credential allowing the app to access that service; keep it private. Installation does not supply an indexer subscription.
Resolve problems in the order they appear
| Symptom | Check next |
|---|---|
| Container Manager or Project is unavailable | Recheck your model's package availability and the required Project workflow. |
| Project fails during startup | Read its output. Compare CPU architecture with image support; check for a conflicting NAS port or a binding address that is not the NAS's current address. |
| Browser cannot open the app | Confirm the project is running, then compare the browser's IP and port with the recipe. Check that the same computer can reach DSM on that network. Review network/firewall policy without publishing the app to the internet. |
| The app opens but cannot save | Recheck PUID, PGID, the actual mapped folder, and effective Read/Write permission for the selected account. |
| A setting disappears after restart | Check that the host folder maps to /config, then repeat the permissions and save/restart checks. |
Back up before updating
Stop the project before copying its data. Copy the entire config folder and the project's Compose file to a backup location away from the NAS, then start the project again. Protect that copy: configuration may contain indexer credentials. A copy stored only on this NAS cannot protect you from losing the NAS itself. This stopped-copy procedure is a recommended workflow derived from the documented configuration mapping, not a restore test performed for this guide.
Before changing the running image, record its current reference and use Container Manager Image > Action > Export to keep a copy of it. A reference is the image name and tag shown by the manager; latest alone is not a permanent identifier for the old build. Keep the exported image with the matching pre-update configuration backup.
Updating is a separate maintenance task. Before changing the image, read LinuxServer's update procedure, Synology's Project operations, and the image/app release notes. LinuxServer's procedure explains why updating requires replacing the container. Synology documents a Project Build action separately from Start and Restart; merely restarting the existing container is not an update. This guide stops at backup preparation rather than supplying a complete GUI update or rollback sequence. Do not start the replacement until you have a procedure matching your installed package and know how to restore the exported image with its matching configuration.
If an attempted update fails, stop the project and copy the failed configuration to a separate location before seeking recovery help. Retain the untouched pre-update backup and exported image. Do not overwrite your only backup or assume an older app can read configuration/database data changed by a newer one. Use the linked provider instructions and support to establish the restoration steps before changing those copies. After a supported update or recovery, repeat the local browser and saved-setting checks.
Stop or remove the installation deliberately
To take NZBHydra2 out of service while retaining its files, Stop the project. Keep your backup and exported image until you decide you no longer need them.
Treat Project Delete as destructive: Synology documents that it can remove containers and project data. Use it only when you intend to remove the project, and remove the dedicated folders only when you intend to discard their contents. A backup outside the project is your safeguard before deletion.
For image startup or identity/permission problems, consult LinuxServer's image documentation. For application problems, use the NZBHydra2 project. Share relevant logs with credentials removed.