

How to Install Ollama on Your Synology NAS and Keep Your Data
Set up bundled Ollama and Open WebUI through Synology Container Manager, save model and chat data in NAS folders, and check both after a restart.
Eugene Gavrilov
12 min read- NAS & storage
Run a small local AI experiment on your Synology NAS: ask a question in your browser, keep the conversation, then check that it survives a restart. This guide uses the official Open WebUI image that bundles Ollama and has a CPU-only installation example. The configuration below combines documented components, but it has not been installed or benchmarked on a physical NAS for this article. Compatibility and usable speed on your particular NAS remain unverified.
Check your NAS before installing
DSM is the management screen you already use for your Synology.
- Open Control Panel > Info Center > General and write down your NAS model, installed memory and DSM version.
- Open Package Center > All Packages, find Container Manager, and install it. This guide requires its Project feature. If Container Manager is unavailable for your NAS, or Project is absent, stop here. Package availability depends on the model and DSM.
Container Manager availability is only the first check. The application image must also support your NAS's processor type, sometimes called its CPU architecture. We have not verified the exact bundled image against every NAS processor. Do not assume that every NAS with Container Manager can run it. If downloading reports “no matching architecture,” or startup reports an “illegal instruction,” stop this attempt: these errors can indicate that the package cannot run on that processor. Use the CPU image below; an AMD processor alone is no reason to select a version intended for AMD graphics hardware.
Have permission to create folders and projects in DSM, spare storage beyond the model download, and Internet access for the application and model downloads. Use a trusted home network: your NAS and computer should be on a private network you control. This procedure does not establish remote access. Do not add router port forwarding, a public domain or a public reverse proxy for it. The browser connection below uses HTTP, so keep it on that trusted network. Using a private NAS address in the configuration does not, by itself, control who can connect to the application.
There is no tested memory minimum or speed promise here. The first model's listed download size is not its memory requirement. If you need guaranteed response times or compatibility for a specific NAS, this untested procedure cannot supply them.
Understand the three parts
Ollama runs the model. A model is the downloaded set of files used to generate an answer. Open WebUI provides the browser page where you sign in and type. In this guide both applications come in one bundled image. An image is the downloaded application package; a container is a running instance of it.
The application needs a place to save data outside its container. We will connect two ordinary NAS folders to it. These connections are called bind mounts. One folder will hold the model files; the other will hold the interface data. Keep these folders and their configuration when recreating the application.
Create a home for the installation
In File Station, open an existing shared folder where your DSM account can create files. Create a folder named ollama-local. Open it, then create two folders inside it: models and webui. Use the folder-creation control; its precise toolbar placement can vary with DSM. Record which shared folder contains ollama-local. You will select this same folder as the Project Path.
Folder inside ollama-local | What this setup keeps there |
|---|---|
models | Ollama's downloaded model files, attached at /root/.ollama inside the container. |
webui | Open WebUI data, including accounts, settings and conversations, attached at /app/backend/data. |
These folder connections follow the official bundled example and documentation for saving application data.
The configuration will use ./models and ./webui. Here ./ means “beside this project's Compose file.” This avoids guessing whether your NAS uses a path such as /volume1/docker. Docker Compose documents these relative binds for a local container runtime; Synology defines Project Path as the project working directory. Keep the Compose file and the two child folders together in your chosen ollama-local folder. See Docker's relative-bind documentation and Synology's Project help.
Before continuing, prepare two values:
-
Your NAS's private numeric IP address. A hostname is a name used to identify a device; QuickConnect is Synology's ID/address-based way to reach a NAS. If you use either to open DSM, do not paste that name or ID into this configuration. Obtain the numeric address from DSM instead.
Open Control Panel > Network > Network Interface. Choose the connected LAN connection that joins the NAS to the same trusted home network as your computer, and read its displayed IP address. Use its IPv4 address—the dotted-number format shown in our example. If the address is not visible in your DSM version's interface view, Control Panel > Info Center > Network also displays IP information. Do not change network settings.
If several connections appear, do not simply choose the first “Connected” entry: a VPN or Internet connection is not automatically your home-network connection. Use the connection you know goes to your home router/network. If you cannot identify it, pause and ask the person who manages that network. Record the address without
http://,https://or a port.192.168.1.50below is only an example. A port is the number that selects a service at that address; this guide uses3000for the chat interface. -
A unique random secret. Use your password manager's generator to make a 64-character alphanumeric value and save it securely. This is the application's
WEBUI_SECRET_KEY, not your future sign-in password. Keep it unchanged when recreating the container.
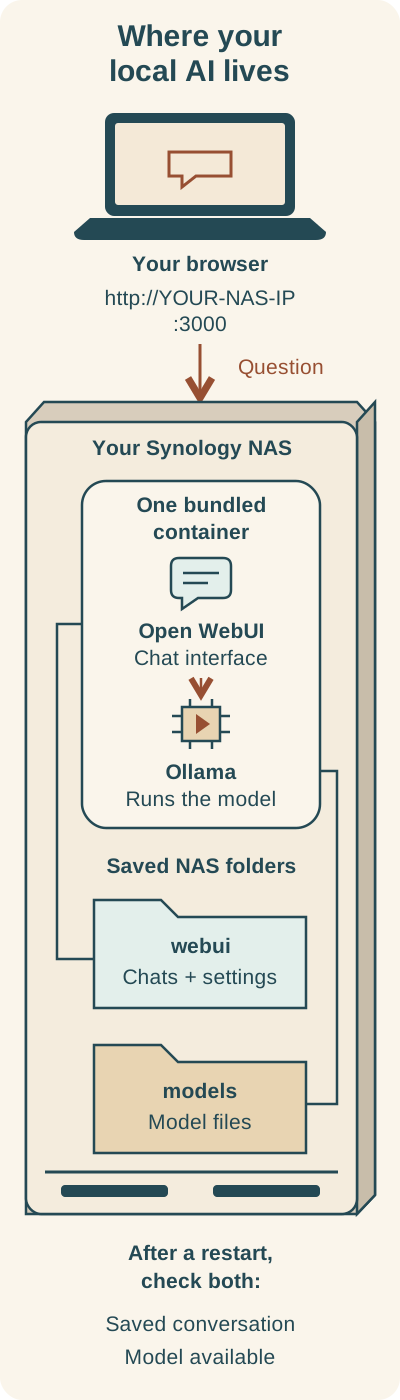
One bundled container runs both applications. Two separate NAS folders hold model files and interface data. After restarting, check your saved conversation and model availability.
Diagram text alternative: The browser address in the diagram uses http://YOUR-NAS-IP:3000 on the trusted home network, with your NAS's private numeric IP. In this recipe Open WebUI and Ollama run in one bundled container. Open WebUI provides the chat page; Ollama runs the model. Inside the NAS but outside the container, ollama-local/models stores model files and ollama-local/webui stores interface data, including accounts, conversations and settings. After restarting the project, check the same saved conversation and confirm the model is still available. These are checks for you to perform; this installation was not tested on a physical NAS for the article.
Create the project in Container Manager
Open Container Manager > Project > Create. A project holds the configuration for this application. Complete the wizard fields as follows.
| Field | Enter or select | Meaning |
|---|---|---|
| Name | ollama-local | A label for finding this installation in Container Manager. |
| Path | The ollama-local folder you just created | The working folder containing the configuration and two data folders. |
| Source | Create docker-compose.yml using the editor | Opens the configuration editor. |
Paste the following YAML, the text format used for this configuration. Preserve the indentation. Replace 192.168.1.50 with your NAS's private IP and replace the entire secret placeholder with your generated value before starting. Leave ./models and ./webui unchanged when you have selected the folder described above. This is a Compose translation of the official bundled CPU example, not a tested Synology vendor recipe.
services:
  open-webui:
    image: ghcr.io/open-webui/open-webui:ollama
    ports:
      - "192.168.1.50:3000:8080"
    volumes:
      - ./models:/root/.ollama
      - ./webui:/app/backend/data
    environment:
      WEBUI_SECRET_KEY: "REPLACE_WITH_YOUR_UNIQUE_RANDOM_SECRET"
    restart: unless-stopped
Here is what each part does.
| Setting | Purpose |
|---|---|
services / open-webui | Defines the one application service in this project. The bundled image includes Ollama. |
image | Selects the application package from the publisher's registry. :ollama is a rolling tag: its contents can change over time. It does not pin an exact software release. |
ports | Makes the interface's internal port 8080 available at port 3000 on the specified NAS address. Ollama's API port 11434 is not published by this file. |
volumes | Attaches the two NAS folders to their application storage locations. The left side of each colon is the NAS folder; the right side is the location inside the container. |
environment / WEBUI_SECRET_KEY | Supplies the saved application secret. |
restart: unless-stopped | Requests automatic restarts, while keeping a manually stopped container stopped even after the Docker service restarts. This deliberate change from the official example makes Stop a useful pause. |
Leave the optional Web Station portal disabled. Review the wizard summary, click Done, and choose to start the project. Downloading an image, starting a container and being ready to answer a question are separate stages. Do not expect a fixed completion time.
Open the interface and create your account
From your computer on the trusted home network, open http://YOUR-NAS-IP:3000, replacing YOUR-NAS-IP with the same address used above. For the example address, that would be http://192.168.1.50:3000. This is a different service from DSM, so do not append DSM's port.
As soon as the page opens, create the first account using the setup form. The first account becomes administrator, so do this only while the fresh installation is accessible to trusted people. This procedure does not protect an unclaimed setup from a malicious user who can reach it first. Save the account credentials in your password manager.
Open Settings > Admin > Authentication and verify New Sign Ups is off. Current documentation says it turns off after the first administrator is created; check it explicitly for this personal installation.
Download one model and ask one question
Open Settings > Admin > Connections. Find the Ollama connection under Manage Ollama API Connections, then click Manage (the download icon). In the field labelled Pull a model from Ollama.com, enter llama3.2:1b and use its download action.
The official documentation names this field but does not establish a fixed label for its submit button or a named “download complete” indicator. If your screen differs, the same docs also support typing llama3.2:1b into a new chat's Model Selector and confirming its download prompt. See the official model-management instructions.
The official Ollama library lists this text model as a 1.3 GB download; that number is not a guarantee of its memory needs or suitability for your NAS. Allow the download to finish. Use the next check—selecting the model and getting an answer—to confirm it is usable; no specific success message is promised here.
Start a chat and select llama3.2:1b. Type this harmless test prompt:
Reply with one short greeting.
Check that an answer appears, and keep the conversation so you can recognize it later. A running-project status alone does not show that a model can load and answer. This is a check for you to perform, not a result measured for this article.
Now test persistence:
- In Container Manager > Project, select
ollama-local, then choose Action > Restart. - Reopen the same browser address and sign in. Check that your saved greeting conversation remains.
- Check that
llama3.2:1bis still available, select it, and send another greeting. This checks that the model files were kept as well as the conversation. - In File Station, confirm you can locate the original
modelsandwebuifolders inside the selected project folder. Keep that location with your installation notes.
If a step fails
| What you see | Next check |
|---|---|
| Project creation fails | Recheck YAML indentation, your actual NAS address, and that the selected Project Path contains models and webui. If the error says port 3000 is already in use, choose an unused host port such as 3001 in the middle position of the port mapping and use that number in your browser address too. |
| No matching architecture or “illegal instruction” | Stop. Image or processor compatibility has not been established for this NAS. Do not substitute an image intended for graphics hardware or enable emulation as a troubleshooting shortcut. |
| Browser page will not open | Check the project is running, startup has completed, and the address and port match your configuration. Stay on the trusted home network; public forwarding is not a fix for this local procedure. |
| No model is available | Check the download completed and inspect the Ollama connection under Admin > Connections. |
| The model stops answering, but DSM still opens | Stop this project using Action > Stop. There is no verified performance or memory guarantee; do not respond by selecting a larger model. |
| DSM itself will not open or is frozen | The project Stop action may be unavailable. Do not pull the NAS power as a guessed fix. Follow Synology’s unresponsive-NAS recovery guide for checks appropriate to that situation. |
| A new first-account form appears after restart | Stop and check the original project folder and storage mappings before creating another account. The original interface data may not be attached. |
When seeking help, record the NAS model, DSM version and error text. Keep your application secret and account password out of anything you share.
Stop for now
For an immediate reversible undo, select the project and choose Action > Stop. Keep its folders and configuration; Action > Start lets you try it again. The unless-stopped policy keeps this manual pause in place across a restart of Docker.
Before an update
Before updating or removing the application, stop the project and use File Station to make a separate copy of the entire ollama-local folder, including models, webui and docker-compose.yml. Keep the secret securely with your recovery information. Check that the copy completed and contains the expected files and both folders before proceeding. A copy on the same NAS disk is a recovery copy, not protection from losing that disk. Backup restoration has not been tested for this article.
Restarting does not itself update the application. This guide establishes installation and data-preservation checks; a complete update walkthrough needs verified instructions for your DSM version. Keep the existing installation until you have those instructions. Before any update, make the stopped copy described above and review the official Open WebUI update guidance alongside Synology's Project help. Keep the same two data-folder connections and the saved secret. After an update, repeat the conversation and model checks.
If an update fails, stop before making more changes. An update can change the format of saved data, a process called a database migration. Returning to an old application image may then require restoring the pre-update data as well. Use the saved configuration and complete stopped copy with the official update/recovery guidance; there is no tested one-click rollback here.
Remove later
For removal, decide first whether you want to retain your models and conversations. Synology describes Delete as including project data. Read its confirmation carefully and keep a separate verified copy before choosing it. Do not treat Delete or Clean as a guaranteed way to preserve these folders. Leaving the project stopped is the reversible stopping point.
Your installation check is complete when you have received an answer, found the same conversation after a restart, and confirmed that the downloaded model is still available.