

Install OpenSpeedTest on your Synology NAS
Set up OpenSpeedTest on a supported Synology NAS with Container Manager, open its local test page, and check, update or remove the installation.
Eugene Gavrilov
10 min read- NAS & storage
Set up OpenSpeedTest on your NAS, then open its speed-test page from a browser on your local network. With the NAS hosting the test, the result describes the connection between your browser device and the NAS. It does not establish the speed of your internet plan.
This walkthrough uses the graphical Container Manager interface on DSM 7.2 or later, with a local HTTP address. You do not need terminal commands. The steps are based on documentation; they have not been tested on a physical NAS for this article.
Check your NAS before you begin
Open Package Center on your NAS and search for Container Manager. Install it if it is available for your model. If it is missing, stop here and check Synology’s package compatibility information for your NAS. DSM 7.1.1 and earlier use the older Docker package; that interface is outside this walkthrough.
Find your NAS’s local IP address before installing:
- In DSM, open Control Panel → Info Center → Network.
- Find the IP address for the LAN interface connected to your home network. Copy that value, rather than the DNS server or gateway address.
- If several interfaces appear and you cannot identify the right one, ask whoever configured the NAS before continuing.
The IP address is the numeric address that identifies your NAS on the network. Local here means reaching it from a device on the same home network. Remote means reaching it from outside that network, often across the internet. Use a computer or phone on your home network; a phone using mobile data is outside this walkthrough’s route.
A domain name, such as example.com, is a readable dotted name identifying a server. The hostname part of a URL can contain a domain name or a numeric IP address. This guide uses your NAS’s numeric address, so you do not need to register a domain or configure DNS for it. Later examples use 192.168.1.20 only to show where your own NAS address belongs.
A port is a numbered endpoint for a connection. In this installation, the browser connects to NAS port 8004, and Container Manager sends that connection to OpenSpeedTest’s internal HTTP port, 3000. Port 8004 is our chosen example, not a guaranteed free port. If another NAS service already uses it, choose a different unused NAS port and use that number throughout the guide. Keep the container port at 3000.
Download OpenSpeedTest
An image is a packaged application with the dependencies it needs. A container is the application instance you create from that image. First download the image; then configure the container that will run it.
-
Open Container Manager → Registry.
-
Search for
openspeedtest/latestand select that exact repository. The wordlatestis part of the repository name; it is not a numbered release. -
Choose Download. If a tag chooser appears, select
latestand confirm the download. A tag is an image-selection label:openspeedtest/latestis the repository name, while the selected tag is also calledlatest. No numbered release is implied. Wait for the download to finish. -
Open Image and find the downloaded OpenSpeedTest image.
Check: The image should appear in Image before you continue. If downloading fails, follow the image download checks.
Create and start the container
Select the downloaded image in Image and choose Run. Work through the creation wizard using the settings below. Synology’s documented labels are used here; wording can vary between versions.
-
Name the container
openspeedtest. Enable auto-restart if you want it to start again automatically after service restarts. Leave the Web Station portal option off for this direct-address setup. -
Open the advanced settings. A bridge network is Docker’s software network for containers on the NAS. Publishing a port forwards connections from the NAS address to a container. TCP, short for Transmission Control Protocol, is the connection protocol to select for this app’s HTTP traffic.
Set the network and port fields as follows:
- Network: bridge.
- Protocol: TCP.
- Local/NAS port:
8004, or the unused NAS port you chose earlier. - Container port:
3000.
Keep only that port mapping for this HTTP-only setup; remove other suggested port mappings. Do not change the container port when substituting a NAS-side port.
-
Add no folder or volume mappings and no environment variables for this basic installation. Keep the supplied execution command and leave high privilege disabled.
-
Review the summary, choose Done, and start the container. In the Container list, you can also select it and use Action → Start.
A mapped folder, also called a volume mapping, connects a folder outside the container to a location inside it. The basic OpenSpeedTest deployment does not require a results database or a mapped application-data folder. You do not need to create a /config folder or give this container access to your photo library.
Check: Find openspeedtest in Container and confirm that it is running. If creation reports an occupied port, change only the NAS-side port to an unused number. If the container stops, follow the container start checks, including Action → Details → Log.
Open the test page on your network
Your browser needs two pieces of information: the NAS’s local IP address and the NAS-side port you configured. The address identifies the NAS; the port selects the OpenSpeedTest connection. The http:// prefix selects the HTTP endpoint used in this guide.
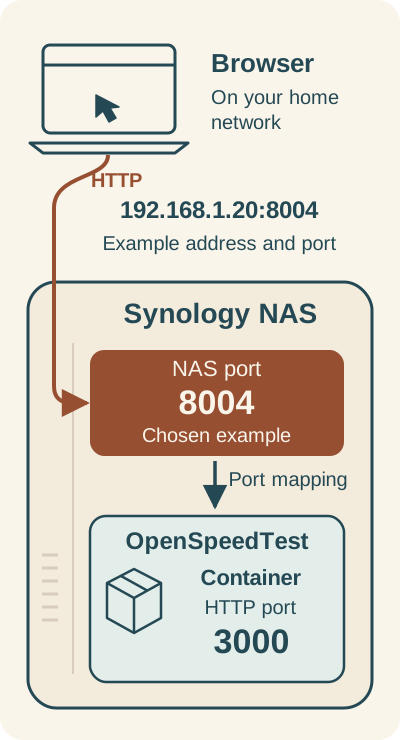
Local connection, two ports: chosen NAS port 8004 maps to container HTTP port 3000. Address and NAS port shown are examples.
On your home network, your browser opens http:// plus the NAS address and the NAS-side port. In this guide’s example, NAS port 8004 maps to HTTP port 3000 inside the OpenSpeedTest container. Replace the example address and any changed NAS-side port.
Enter this example in your browser’s address bar, replacing 192.168.1.20 with your NAS’s address:
http://192.168.1.20:8004
If you chose another NAS-side port, replace 8004 as well. This is an illustrative address, not a server supplied by this article. Do not change the prefix to https:// while using this HTTP mapping.
Check: The OpenSpeedTest page should open with a Start control. A running container alone is not the complete check: confirm that the browser can actually open its test page. If it cannot, follow the local-page checks.
Keep this walkthrough on your local network. Router port forwarding, a public domain and a reverse proxy are outside the installation described here.
Run your first test
Choose Start and let the test finish. The useful check is that the test completes and displays results; this guide does not promise a particular speed. For this setup, read those results as measurements of the browser-to-NAS path.
If you want a comparison record, save a screenshot or note the date, device, connection type and displayed results outside the container. You can compare Wi-Fi and Ethernet if both are available, recording the conditions for each run.
Check that it works after a restart
In Container, select openspeedtest and choose Action → Restart. Open the same address again, choose Start, and wait for another completed test. This checks that the page and test return after restarting the app.
This installation does not configure saved test history or a results database. OpenSpeedTest documents database saving as a separate customization. Keep comparison notes or screenshots outside the container. A restart and a deletion are different operations: deleting a container removes changes stored only inside it.
If something does not work
Container Manager is unavailable
Check the package support for your NAS model and DSM version. Stop if Package Center does not offer the supported package; this guide does not provide an alternative installation for an incompatible model or the older Docker interface.
The image will not download
Check the NAS’s internet connection, available storage, clock and access to the registry. Synology’s download troubleshooting also covers firewall or proxy restrictions and Docker Hub rate limits. Use those checks to investigate the reported failure before retrying the download.
The container will not start or stay running
If the error names a port conflict, choose an unused NAS-side port, keeping container port 3000. Otherwise, select the container and open Action → Details → Log. Use the error text when consulting the project documentation. Adding high privilege or changing unrelated folder permissions is not a supported fix in this procedure.
The local page does not open
Check these items in order:
- Confirm that
openspeedtestis running in Container. - Confirm that the browser device can reach your NAS’s local address.
- Check that the browser address uses
http://, the correct NAS IP address and the NAS-side port shown in your mapping. - If the NAS firewall is enabled, inspect whether its rules allow that port from your local client. Investigate the relevant rule rather than disabling the firewall globally.
The test fails or a result looks unexpectedly low
For a failed test, inspect the container log and consult the OpenSpeedTest documentation with any error text. For an unexpectedly low result, try another browser or a private window: the project notes that browser extensions can affect measurements. Keep the browser-to-NAS measurement path in mind; one result is not a diagnosis of your internet connection.
Update OpenSpeedTest with a way back
Before updating, record the image reference, port mapping and other container settings. Retain the old container and image, and export the old image using Image → select the image → Action → Export before refreshing it. A tag can point to a different image over time, so downloading the same tag later is not a reliable way to recover the old build.
Obtain the updated image
- Open Image and select the OpenSpeedTest image.
- Choose Action → Update, or select Update available in the Tag column if shown.
- Read the confirmation before accepting. This documented action updates the image’s tag version; its effects on linked containers are not established for every package version. Do not assume that it leaves the running container unchanged. If the confirmation would replace the old container you intend to retain for rollback, stop and consult Synology’s image help before proceeding.
If the update option is absent, repeat Download OpenSpeedTest using the same openspeedtest/latest repository and the latest tag if prompted. This is an alternative download attempt, not a guarantee that an existing tag will refresh. If Container Manager refuses to download it, stop and consult Synology’s image help; do not delete the old image or container to force the download.
Create and check a replacement
The following rollback approach depends on retaining the old container and its old image. Check that they are still available before continuing.
- Select the old
openspeedtestcontainer and choose Action → Stop. Keep it rather than deleting it. - In Image, select the updated OpenSpeedTest image and choose Run. Follow Create and start the container, giving the replacement a different name and using the same port mapping and other settings.
- Start the replacement, open your local test address and run a test. If the page fails, use the local-page checks.
- If the replacement does not work, stop it before starting the retained old container. Both must not try to use the same NAS port at once. Reopen the address and check the old service again. Keep the old image until you accept the replacement.
Remove the installation
Deletion removes the container and any changes stored only inside it. This walkthrough created no mapped application-data folder to clean up.
In Container, select the OpenSpeedTest container, choose Action → Stop, then delete it using Action → Delete. Confirm that it is no longer listed. If you retained an old container during an update, handle that separately when you no longer need it. Remove an unused image only when you no longer need it for recovery; leave unrelated containers, images and NAS folders alone.