

Set Up Speedtest Tracker on Synology and Verify the Schedule
Install Speedtest Tracker on Synology with Container Manager and SQLite. Save a result, verify scheduled tests, check history and prepare a backup.
Eugene Gavrilov
14 min read- NAS & storage
Install Speedtest Tracker on your Synology NAS to keep dated internet-speed results. You will open its dashboard on your home network, save a manual result, check that a scheduled result appears, and confirm the history survives a restart. This guide uses Container Manager and SQLite, with one application container.
The procedure combines current official documentation; it has not been run on a physical NAS for this article. The image name ends in latest, which can point to a different release when downloaded again. Save its exact image reference before future updates. Documentation was checked on November 4, 2026.
On this page
- Know which connection you are measuring
- Build the local recorder
- Sign in and save a first result
- Check that the schedule runs
- Keep the history and recover safely
Know which connection you are measuring
The test starts at the NAS and contacts Ookla’s internet speed-test service. It does not measure your NAS disks or directly test a phone’s Wi-Fi connection. A low result is an observation to investigate, rather than proof of a particular cause.
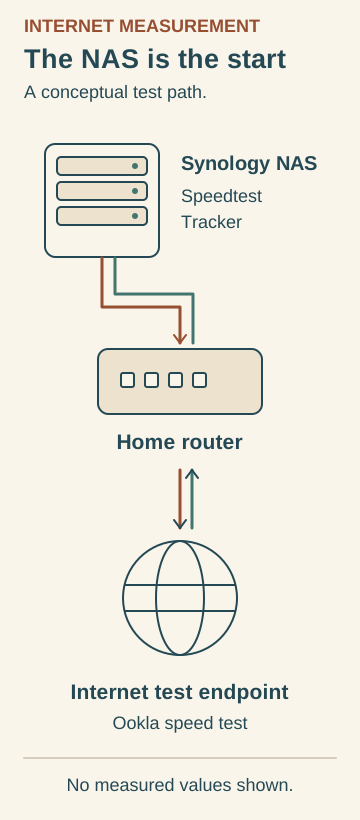
The internet measurement starts at the NAS. Original Huncode conceptual route, not a measured topology or speed result. Based on the LinuxServer Speedtest Tracker documentation.
The test starts at Speedtest Tracker on the NAS and reaches an Ookla internet endpoint through the home router shown conceptually here. It does not measure NAS disks or directly test a phone’s Wi-Fi connection. The drawing supplies no speed values or diagnosis of a slow connection.
Build the local recorder
Check your NAS and prepare a folder
In DSM, open Package Center and look for Container Manager. Check your model against Synology’s package availability. Install the version offered for your NAS and DSM. The image supports x86-64 and arm64, but CPU architecture alone does not establish package compatibility. If Container Manager is unavailable, stop here and check the model and DSM requirements; this guide uses its Project feature.
An image is the application template you download; a container runs it. Your results need a separate NAS folder so they remain available when a container is replaced. The folder mapping below connects that folder to /config inside the container. SQLite keeps the database there, so a second database container is unnecessary.
If File Station has no docker shared folder, create one first at Control Panel → Shared Folder → Create → Create Shared Folder, choosing the volume where you want the app data and completing the wizard. See Synology’s shared-folder instructions.
In File Station, create speedtest-tracker inside docker, then config inside that new folder. Right-click each folder and choose Properties → General to read Location. Record the full project-folder path and full config-folder path. Check whether the folder name is already included; do not append it twice. The examples below use /volume1/docker/speedtest-tracker and /volume1/docker/speedtest-tracker/config; substitute the paths you recorded. Keep the project directory separate from other applications.
Choose the local address
A local address such as http://192.168.1.50:8999 has three parts: http:// chooses the connection protocol, 192.168.1.50 is an illustrative NAS address on your home network, and 8999 is the host port assigned to this app. Use your NAS’s real address. Do not use localhost in your computer’s browser: that would refer to the computer.
Before SSH, find your NAS’s local IPv4 address under Control Panel → Network → Network Interface. Use the address of the connected home-network interface. If DSM is already open at a numeric local address, the number before its port is the address you need. A QuickConnect URL or domain does not supply that number. Record it; SSH and the browser will use the same NAS IP with different surrounding syntax. Do not change network settings just to read the address.
This first installation uses HTTP on a trusted home network. A domain, public reverse proxy, certificate, Portainer and Web Station portal are not prerequisites. Leave router port forwarding for this service off. The Compose port mapping makes the app reachable through the NAS; it is not a guarantee that an existing router or firewall configuration keeps it private.
Get the account IDs and generate your key
The app needs permission to write its data folder. Choose a DSM account that will own this folder. Its numeric user ID becomes PUID; its primary group ID becomes PGID. These are NAS account identifiers, separate from the login you will use inside Speedtest Tracker.
For these two setup commands, temporarily enable Control Panel → Terminal & SNMP → Terminal → Enable SSH Service. SSH lets a terminal on your computer run commands on the NAS. Open Terminal on macOS/Linux or PowerShell on Windows. Replace DSM_USER with a DSM administrator username and NAS_IP with the local address you use to reach your NAS; retain the punctuation. 22 is the default example SSH port; use the port shown in your DSM Terminal settings if different:
ssh DSM_USER@NAS_IP -p 22
On your first connection, verify that any host-identity prompt is for the NAS you intended to reach before accepting it. Use your DSM password when prompted; no characters may appear while you type. If login fails, check the address, configured SSH port, enabled SSH service and administrator account rather than weakening access controls. You do not need to become root for these setup commands. Replace YOUR_CHOSEN_DSM_USER below with the DSM username you chose for folder ownership:
id YOUR_CHOSEN_DSM_USER
In its output, copy the number after uid= for PUID, and after the first gid= for PGID. Do not take a number from the later groups= list. Do not assume somebody else’s example IDs apply to your NAS.
Next, in the same NAS terminal, generate the application encryption key with the official command:
echo "base64:$(openssl rand -base64 32 2>/dev/null)"
Save the entire output, starting with base64:, privately. If the output is just base64: or an error appears, stop and resolve the command failure; you do not yet have a usable key. The key encrypts application information; it is not your login password. Keep it with the saved deployment configuration and backup.
Type exit to leave the SSH session, then disable SSH again if you enabled it only for this setup.
In File Station, right-click your config folder and open Properties. Under General, select your chosen account as Owner. Under Permission → Create, select that account, Allow, and give it Read and Write access covering the folder and its contents. Save the change. Check the account also has access through the parent folders; do not solve permission errors by giving everyone access. See Synology’s permissions instructions.
Understand the schedule before starting
The template starts a test at minute 17 of every hour. It uses UTC (Coordinated Universal Time), a common time reference that may differ from your local clock. Read the app’s recorded timestamps as UTC; compare them with a clock displaying UTC rather than assuming they are local time. In the current upstream 1.x implementation, DISPLAY_TIMEZONE affects both displayed timestamps and schedule checks.
Speed tests transfer real download and upload traffic. Repeated tests can consume a metered allowance and occupy your connection while running; this guide supplies no fixed data-use estimate. If hourly tests are too frequent, use "17 */6 * * *" for 00:17, 06:17, 12:17 and 18:17 UTC instead. An empty quoted schedule ("") disables scheduled tests in the current 1.x implementation. Choose before deploying. Leave scheduling enabled if you want to complete the automatic-test check below; if you disable it, only manual results are expected.
Create the project
Open Container Manager → Project → Create. Set the name to speedtest-tracker, choose your dedicated project folder as Path, and use the Source option that creates docker-compose.yml in the editor. Synology also supports uploading that file.
Paste this template after making these substitutions:
- Replace
YOUR_UIDandYOUR_GIDwith the two numbers you recorded. - Replace
YOUR_FULL_GENERATED_KEYwith the complete output includingbase64:. - Replace
192.168.1.50with your NAS’s local address. - Replace
/volume1/docker/speedtest-tracker/configif your real folder path differs. - If port
8999is already used, choose an unused host port and change both8999:80and the port inAPP_URL. Keep container port80.
services:
  speedtest-tracker:
    image: lscr.io/linuxserver/speedtest-tracker:latest
    container_name: speedtest-tracker
    restart: unless-stopped
    ports:
      - "8999:80"
    environment:
      PUID: "YOUR_UID"
      PGID: "YOUR_GID"
      APP_KEY: "YOUR_FULL_GENERATED_KEY"
      APP_URL: "http://192.168.1.50:8999"
      DB_CONNECTION: "sqlite"
      TZ: "Etc/UTC"
      APP_TIMEZONE: "UTC"
      DISPLAY_TIMEZONE: "Etc/UTC"
      SPEEDTEST_SCHEDULE: "17 * * * *"
    volumes:
      - /volume1/docker/speedtest-tracker/config:/config
DB_CONNECTION selects SQLite. The folder before the colon is the NAS data folder; /config after it is the location inside the container. Environment variables are named settings read by the app. Keep the UTC time settings while checking the schedule. Preserve YAML indentation. Save a private copy of the completed file: it contains your encryption key.
Skip the optional Web Station portal, review the summary, click Done, and choose to start the project. Wait for startup and inspect the project/container logs if it fails. The official Project help describes these fields and actions.
Sign in and save a first result
On a computer connected to the same home network, open the address you put in APP_URL. Use the initial app account [email protected] with password password. Immediately open the user icon at the top right, choose Profile, and change the email and password. These are the documented initial credentials and profile steps. Changing ADMIN_PASSWORD in an existing deployment is not a password-reset procedure.
Start a manual test using the dashboard’s speedtest action. Look for Speedtest or Queue Speedtest and follow any server-selection prompt; the label depends on the image version. Wait for a completed saved result and note its timestamp. If it fails, read the error before trying again; an empty dashboard is not proof that the installation saved data.
Record the result’s timestamp and UTC time zone along with these fields. Read the units printed beside the values; do not confuse megabits with megabytes.
| Field | Meaning |
|---|---|
| Download | Transfer rate from the internet test server to the NAS. Mbps means megabits per second. |
| Upload | Transfer rate from the NAS to the internet test server, also commonly shown in Mbps. |
| Ping / latency | Response delay; ms means milliseconds. |
These definitions describe speed-test measurements; they are not targets your connection is expected to reach.
Check that the schedule runs
The template uses SPEEDTEST_SCHEDULE: "17 * * * *": run at minute 17 of every hour, rather than one hour after startup. The five cron fields represent minute, hour, day of month, month and day of week. The asterisks here mean every value for those fields.
All time settings in this example use UTC. In the current upstream 1.x scheduling implementation, DISPLAY_TIMEZONE also affects cron due-time checks, so it is not merely a cosmetic display preference. Keep the UTC baseline while verifying the first schedule; if you later change display timezone, account for its effect on scheduled times and restart the container.
After the next due time for your chosen schedule, allow the test to finish, then look for a second, later saved result. Compare the timestamp against the intended schedule. A manual test alone does not verify automatic testing. To change configuration later, use the project’s Details → YAML Configurations editor and deploy the changes.
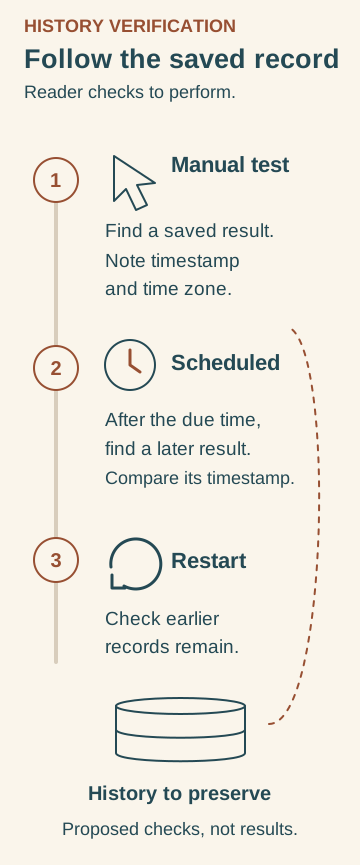
Follow a manual result, a later result if scheduling is enabled, and earlier records after restart. Original Huncode diagram of proposed reader checks; no saved result or successful restart is claimed. Documentary grounding: account access, environment variables and Synology Project actions.
First save a manual result and note its timestamp and time zone. If scheduling is enabled, wait until after the chosen due time and find a later saved result with the expected timestamp. Restart the project and check that the earlier history remains. These are checks for the reader to perform; they have not been performed for this article.
Keep the history and recover safely
Use your saved timestamps as observations. Neither this guide nor an isolated result establishes why a connection slowed down. Keep the measurement boundary in mind when deciding what to investigate.
Check persistence
In Container Manager, select the project and choose Restart. Open the app again and check the earlier records remain. In File Station, locate the config folder you mapped; it is the data you must preserve.
Back up before an update
Stop the project and wait for the container to stop. Copy the entire config folder and your completed Compose file, including the original APP_KEY, to a backup location outside the project directory; preferably keep a further copy off the NAS. Then start the project again. Copy the whole folder, including any database journal or WAL files, rather than selecting a database file from a running application. SQLite documents the risk of copying an active transaction.
Save the exact old image and update
Before downloading an update, enable SSH temporarily and sign in with the same administrator method and configured port described above. Docker administration needs extra authorization. Follow Synology’s root-login procedure: run sudo -i and enter that administrator password again. This opens a privileged shell; run only the commands shown here. ID/key generation earlier did not need this step. If elevation is refused, stop and resolve the administrator permissions; do not change Docker socket permissions.
First identify the image actually used by this container, before pulling anything:
docker container inspect --format '{{.Image}}' speedtest-tracker
Copy the returned image ID. Replace IMAGE_ID_FROM_PREVIOUS_COMMAND below with that entire value, then run:
docker image inspect --format '{{json .RepoDigests}}' IMAGE_ID_FROM_PREVIOUS_COMMAND
Save the full matching lscr.io/linuxserver/speedtest-tracker@sha256:… reference from the output, without the surrounding JSON quotes or brackets. The ellipsis here describes the digest shape; copy your complete real value. In your backup copy of Compose, replace the entire image: value with that reference. A local image ID and a descriptive version label are different from this reusable repository digest. If the list is empty or contains no matching repository reference, stop before updating and obtain help retaining an exact old image; do not invent a digest or rely on latest for rollback. Keep the previous image and stopped data backup.
For the update itself:
-
Stop the project in Container Manager if it is running. Complete the cold backup above.
-
Open Image, select the Speedtest Tracker image, and choose Action → Update or Update available in its Tag column. Confirm and wait for the download. These actions are documented in Synology’s Image help.
-
If no update action is offered for this registry image, use the still-open privileged SSH shell to run the documented pull command below. If it fails, leave the old data and image intact and check the error; stop rather than deleting them.
docker pull lscr.io/linuxserver/speedtest-tracker:latest -
In Project, select
speedtest-tracker, choose Action → Build, then Start if it remains stopped. Build uses the project’s saved Compose configuration; keep the original data mapping and key. Downloading an image and rebuilding the project are separate operations. -
Check login, the old saved records, a manual result and a later scheduled result. Retain the old image and backup until these checks pass.
Type exit once to leave the root shell and again to leave SSH. Disable SSH if you enabled it only for maintenance.
Restore or remove the installation
If an update fails, stop the project and leave its failed data folder untouched. Restore the complete pre-update backup to a new folder, then edit the Compose mapping to that restored folder and use the matching old image reference and original key. In Details → YAML Configurations, save that restored-folder mapping and replace image: with the exact repository digest in your pre-update backup. Deploy the edited configuration; use Start if it remains stopped. Check login and saved records before scheduling more tests. This is a conservative recovery plan, not a verified restore result; changing only the image may leave incompatible migrated data.
To stop using the app, Stop the project first. Back up outside its directory before deleting it: Synology describes Delete as deleting containers and project data. Do not use Clean or Delete as an error-recovery shortcut. Remove the dedicated data folder only when you deliberately want to discard its history.
If setup does not work
| Symptom | Check first |
|---|---|
| Container Manager unavailable | Your exact model and DSM package support. |
| Project will not start | YAML indentation, substituted values and image-download errors in logs. |
| Port already in use | Change the host port in the mapping and APP_URL; use the changed browser address. |
| Key/encryption warning | Complete generated APP_KEY, including base64:. Keep an existing deployment’s original key. |
| Permission or database-write error | Real config path, chosen owner, PUID/PGID and Read/Write permission. |
| Browser cannot reach the app | NAS LAN address, host port, running container and applicable NAS firewall rules. Do not disable the firewall broadly. |
| Manual test works, scheduled result missing | Cron expression, UTC timestamp and project logs; check after the next due time. |
These checks preserve data while you correct configuration. Consult the upstream FAQ, image reference and Synology Project help for the affected component.
You have completed the reader checks when you can find a manual result, a later scheduled result, the same history after restart, and the NAS folder containing the persistent data. Keep the completed configuration and a stopped backup before making further changes.