

How to Install qBittorrent on a Synology NAS
Install qBittorrent with Synology Container Manager, map settings and download folders, open the local Web UI, and check a download and restart.
Eugene Gavrilov
13 min read- NAS & storage
Set up qBittorrent on your NAS, open it from a browser on your home network, and save downloads in a folder you can find in File Station. This guide uses a Container Manager Project: a small configuration file that describes the app, its folders, and its ports. It also includes one short SSH connection to look up the account numbers the container needs.
The procedure follows the documentation listed below; it has not been run on a physical NAS for this article. Container Manager must support your particular NAS and DSM version. Keep the setup local: you do not need a domain, router port forwarding, or a public login page.
Before you begin
Sign in to DSM with an administrator account. Check your exact model and DSM version against Synology's Container Manager information, then look for Container Manager in Package Center. Install it if it is available. This guide requires its Project interface; the older package named Docker is outside this procedure. Stop here if Container Manager is unavailable for your NAS. LinuxServer's qBittorrent image supports x86-64 and arm64, but image architecture support alone does not establish NAS compatibility.
You will also need enough free space for the downloads you choose, permission to create dedicated NAS folders, and a computer on the same trusted home network. Choose an existing NAS account to own qBittorrent's folders. It can be different from the administrator account used to configure DSM; give it access to the dedicated folders it needs.
Write down your NAS's local IP address. For example, if you open DSM at https://192.168.1.50:5001, the IP address is 192.168.1.50. That is an illustrative address: use your own. The number after the colon is a port, which selects a service at that address. qBittorrent will have its own port.
Understand the address and the folders
The browser address opens qBittorrent's Web UI, its browser-based controls. It does not tell qBittorrent where to store downloaded files. For storage, you will connect two NAS folders to the container: one for settings and one for downloads.
An image is the packaged app. A container is a running instance of that image. A folder mapping, also called a bind mount, connects a real NAS folder to a path inside the container. Keeping settings and downloads in mapped folders lets them remain outside the running instance. You will check this yourself after installation by restarting the project.
Use the local address to open the Web UI. In the illustration, Settings means the NAS config folder; Downloads means the NAS downloads folder. Use File Station to find those folders. The address pattern http://NAS_LAN_IP:9865 means you must replace NAS_LAN_IP with your own NAS address.
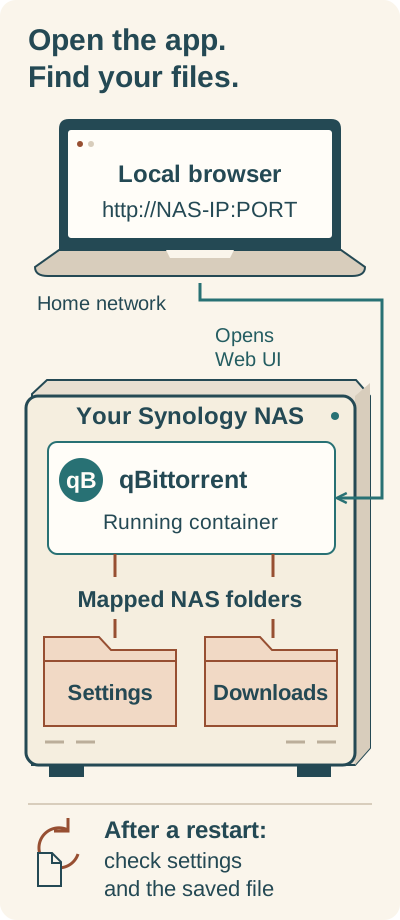
The local address opens qBittorrent. Mapped folders on the NAS hold its settings and downloads.
NAS-IP and PORT in the diagram are placeholders for your NAS’s local address and configured Web UI port. Use that address to open qBittorrent. Find downloaded files in the NAS folder mapped to /downloads; the separate configuration folder holds app settings. After restarting the container, check your settings and sample file.
1. Look up the file owner's account numbers
The LinuxServer image uses two settings, PUID and PGID, to identify the account and group that should own its files. These are numbers, and they must match the account you choose. Do not copy someone else's example values.
SSH opens a text-based connection to the NAS so you can run the identity lookup. You do not need to install qBittorrent through that connection. Synology requires an account in the local administrators group for SSH login.
-
In DSM, open Control Panel > Terminal & SNMP > Terminal. Enable SSH service, note the configured port, and select Apply.
-
On your computer, open Terminal on macOS or Linux, or PowerShell on Windows. Enter the following command, replacing
DSM_ADMINwith your DSM administrator username andNAS_LAN_IPwith your NAS's local address:ssh DSM_ADMIN@NAS_LAN_IPIf the SSH port you noted is different from 22, use this form, replacing
SSH_PORTtoo:ssh -p SSH_PORT DSM_ADMIN@NAS_LAN_IP -
At a first-connection host-key prompt, check that the address shown matches the NAS address you entered. The prompt alone does not prove the server’s identity; stop if the address or connection is unexpected. Enter the administrator password when requested. Password characters normally do not appear while you type.
-
Run this command, replacing
FILE_OWNERwith the NAS account that will own the dedicated folders:id FILE_OWNER -
Record the number after
uid=as PUID, and the number aftergid=as PGID. Ignore names in parentheses and the additional groups listed afterward. -
Enter
exitto close the connection. If you enabled SSH only for this lookup and nothing else needs it, disable the SSH service again in DSM.
Before continuing, you should have recorded both numeric values for your chosen file-owner account. The lookup reads account information; it does not change permissions. If SSH login fails, resolve the account and service requirements before continuing. You do not need to enable Telnet for this task.
2. Create the settings and download folders
Open File Station and select an existing local shared folder where you can create folders and where the chosen file-owner account can have access. If a suitable docker share already exists, you can use it; its name is not a requirement. If you have no suitable share, ask your NAS administrator to prepare one before continuing.
Inside that share, select Create > Create folder, enter qbittorrent, and select OK. Open the new folder and repeat the same action to create config and downloads inside it.
To find each complete NAS path, right-click the config folder, open Properties > General, and copy Location. Repeat for downloads. Check that the recorded paths include their actual volume and end in /qbittorrent/config and /qbittorrent/downloads, respectively. Use those Location values rather than assuming the File Station breadcrumb is the full filesystem path.
For example, if you used a docker share on volume 1, the paths could be:
/volume1/docker/qbittorrent/config
/volume1/docker/qbittorrent/downloads
Those paths are examples. Record the actual paths on your NAS, including the volume name. You will paste them into the project configuration.
Give the account from step 1 ownership and access to these dedicated folders:
- Right-click the folder in File Station and open Properties.
- Under General, select the chosen account as its owner where DSM permits this.
- Under Permission > Create, select that account, choose Allow, and grant Read and Write for the folder and its descendants.
- Save the permission entry and the folder properties. Repeat for the other dedicated folder as needed.
Check access through the parent folders as well. An inherited deny can prevent access even when the account owns the folder. Keep permission changes scoped to this dedicated location; do not grant Everyone access or change an entire volume. If you cannot make the required changes, have the NAS administrator resolve them before you start the container. Continue only when you have both real paths and have confirmed the selected account’s access to both folders.
3. Create the qBittorrent project
Open Container Manager > Project > Create. Enter qbittorrent as the project name and select the dedicated qbittorrent folder you created as its path. For the source, choose to create a docker-compose.yml using the editor. This file is the project's settings recipe.
Paste the configuration below. Before starting the project, replace YOUR_UID, YOUR_GID, both left-hand NAS folder paths, and YOUR_NAS_LAN_IP with your own values. Leave names such as PUID and WEBUI_PORT unchanged. Keep the indentation and quotation marks.
services:
  qbittorrent:
    image: lscr.io/linuxserver/qbittorrent:latest
    container_name: qbittorrent
    environment:
      - PUID=YOUR_UID
      - PGID=YOUR_GID
      - TZ=Etc/UTC
      - WEBUI_PORT=9865
      - TORRENTING_PORT=6881
    volumes:
      - /YOUR_REAL_NAS_PATH/config:/config
      - /YOUR_REAL_NAS_PATH/downloads:/downloads
    ports:
      - "YOUR_NAS_LAN_IP:9865:9865"
      - "6881:6881"
      - "6881:6881/udp"
    restart: unless-stopped
Here is what to change and what each setting does:
| Setting | What to enter or understand |
|---|---|
PUID=YOUR_UID | Replace YOUR_UID with the number after uid= from your lookup. |
PGID=YOUR_GID | Replace YOUR_GID with the number after gid=. |
TZ=Etc/UTC | Uses UTC. You can substitute a valid time-zone identifier for your location. |
/YOUR_REAL_NAS_PATH/config:/config | Replace the left side with the real NAS config folder, such as /volume1/docker/qbittorrent/config. The right side stays /config. |
/YOUR_REAL_NAS_PATH/downloads:/downloads | Replace the left side with the real NAS downloads folder. The right side stays /downloads. |
YOUR_NAS_LAN_IP:9865:9865 | Replace YOUR_NAS_LAN_IP with your NAS's LAN IPv4 address. This binds the browser interface to that address and port 9865. |
6881 TCP and UDP mappings | These carry torrent traffic; they are separate from the browser login port. |
The latest image tag can point to a different version on a future pull; read the update section before replacing the image. The names under environment are environment variables, settings given to the container when it starts. In each folder mapping, the left side is on the NAS and the right side is inside the container. Both mapped folders need write access.
If another service uses port 9865, choose an unused Web UI port and change all three matching values: WEBUI_PORT and both port numbers in its mapping. For a torrent-port conflict, change TORRENTING_PORT and both numbers in each TCP and UDP mapping together. You do not need to uninstall Download Station simply to follow this procedure.
Because the Web UI mapping uses a specific NAS address, an address change can require editing the mapping. A router address reservation can help keep the NAS address stable.
Leave the optional Web Station portal disabled. Review the wizard's summary, finish with Done, and choose to start the project when offered. Inspect the project output for errors. The image download and startup can take different amounts of time; wait for startup information rather than a fixed countdown. Continue when the container is running and you can read its startup log.
4. Open the Web UI and set your credentials
LinuxServer's image prints a temporary password for the admin user in the container's startup log. In Container Manager, select the qBittorrent container and look under Details > Log. The supplied installation source supports these log and authentication labels; they may vary with your version.
On your computer, open:
http://NAS_LAN_IP:9865
Replace NAS_LAN_IP with the same NAS address used in your configuration. If you changed the Web UI port, change 9865 too. Do not enter localhost: on your computer, that points to the computer itself. This guide uses unencrypted HTTP on a trusted home network. Do not forward the Web UI port through your router or publish it through a reverse proxy.
Sign in with username admin and the temporary password from the latest startup log. In qBittorrent's settings, open Web UI, find Authentication, enter your own username and strong password, and select Save. Keep authentication enabled. If you leave the temporary password unchanged, the container generates a fresh temporary password at its next startup.
Open Tools > Options, select Downloads, and set Default Save Path to the following value. Select Save to apply the change. These labels are supported by the official Web UI source; your installed version may differ.
/downloads
That is the container-side path. The NAS-side path, such as /volume1/docker/qbittorrent/downloads, belongs in the Compose file.
In Options > Connection, clear the option for using UPnP/NAT-PMP port forwarding from your router. In Options > Web UI, clear its separate UPnP/NAT-PMP forwarding option, then select Save. These features can ask the router to open ports automatically; leave that automatic access disabled for this setup. If your version’s wording differs, consult the project’s options guide before changing another setting.
5. Check a download and a restart
For an official sample, open Ubuntu’s alternative downloads page. Under BitTorrent, choose an Ubuntu Desktop download link and save its .torrent file to your computer. This is an operating-system image, so check the listed download size and NAS free space before proceeding; it is not a tiny test file.
In qBittorrent, select File > Add Torrent File…, then choose the .torrent file you saved. In the add-torrent window, check that the save location is /downloads, enable Start torrent if necessary, and select Download. If your version adds it without a confirmation window, the default path you saved in the previous step applies; check the torrent’s destination before letting it continue. The official Web UI source supports the add-file route and these dialog controls, but the dialog can differ by version and settings.
Perform these checks on your NAS:
- After the transfer finishes, open your dedicated NAS
downloadsfolder in File Station. Confirm that the downloaded file is there. Open it from your computer if appropriate. - Pause or stop the torrent if you do not intend to keep sharing it.
- In Container Manager, select the project and use Action > Restart.
- Reopen the Web UI and sign in with the credentials you saved. Check that the torrent entry, save-path setting, and downloaded file remain.
If any check fails, resolve it before relying on the installation.
If something goes wrong
Work from the first failed stage. Avoid changing unrelated settings while diagnosing one problem.
| Symptom | Check and recovery |
|---|---|
| Container Manager is unavailable | Recheck your exact model and DSM support. Stop this procedure if the required package or Project interface is unavailable. |
| The project does not start | Read its output. Check YAML indentation, unreplaced placeholders, actual folder paths, occupied ports, supported architecture, and connectivity for the image download. Correct the reported problem before starting again. |
| The browser cannot open qBittorrent | Confirm that the container is running, your computer is on the same LAN, and the address and port match the Compose configuration. If the NAS firewall is enabled, ask its administrator to allow only the required service traffic from the trusted LAN. Do not apply a blanket Docker-subnet allow rule. |
| The initial password fails | Read the latest startup log; a restart may have replaced an unchanged temporary password. This recovery applies before you have saved permanent credentials. |
| A download reports permission denied | Compare the configured PUID/PGID with the selected account, then check ownership, inherited permissions, parent-folder access, and the /downloads mapping. Correct access for the dedicated folders before retrying. |
| The torrent has no peers or stays at zero speed | Check that the authorized sample torrent is active before changing network settings. Zero speed alone does not show that container installation failed. |
Stop, back up, and plan updates
For a reversible stop, select the project and choose Action > Stop. Leave its folders and Compose file in place; use Start when you want to resume.
Before an update, stop the project and copy its config folder, Compose file, and any irreplaceable downloads to a separate backup location. The Compose file records the folder and port mappings; config holds the application's saved settings.
Restarting the project reuses the existing image; it does not update qBittorrent. LinuxServer documents updates through image replacement and container recreation. Follow the current LinuxServer update instructions when you are ready. A specific Synology GUI image-pull sequence was not verified for this guide.
The example uses latest, a tag whose target can change when you pull it again. For a repeatable update, choose and record an actual published stable version tag or digest from the image's official registry before editing the image line. Keep the previous image reference with the pre-update backup: an older application may not read settings changed by a newer version. No particular current version is asserted here.
Remove qBittorrent without confusing the app and its files
Stop the project first. Before permanent removal, copy everything you want to keep outside the project folder, including configuration and downloads. Check that the separate copy contains the data you need.
Synology describes Project Delete as deleting containers and project data. Do not assume Delete or Clean preserves the working folder. Read the confirmation carefully before accepting removal, and delete any remaining dedicated folders only after checking your separate copy.
For package and Project behavior, consult Synology's Container Manager Project help. For the image's settings and startup behavior, use LinuxServer's qBittorrent documentation.