

How to install Webtor on a Synology NAS for local browser access
Install a local Webtor instance with Synology Container Manager. Understand the browser URL, three named storage volumes, restart checks and safe updates.
Eugene Gavrilov
9 min read- NAS & storage
Install Webtor on your Synology NAS to open torrent content in a browser on your home network. This guide explains the address and storage settings, then walks you through opening the password-protected app and checking that it remains reachable after a restart. It covers your own self-hosted instance; visiting the public webtor.io service is a separate option.
The procedure combines Webtor's documented settings with Synology's Project interface. It has not been deployed or tested on a physical NAS for this article. It uses the release-documented image version 2.1.2; an image pull, playback and backup restore have not been verified here.
Check your NAS and prepare its address
A container is the running app; an image is the packaged application used to create it. Synology's Container Manager runs the container and uses a Project to read its configuration.
- In DSM, open Package Center > All Packages. Install and open Container Manager if it is offered for your model. You need its Project page. Synology identifies Container Manager for DSM 7.2 and later; this guide does not cover the older Docker package. If Container Manager or Project is unavailable, stop and check compatibility rather than sideloading a package.
- Open Control Panel > Info Center > General and note the model name and DSM version. Find that exact model in Synology's CPU reference or its official product page's Hardware Specs. Compare the CPU Model and CPU Architecture fields: the image supports amd64/x86-64 and arm64/64-bit ARM, not 32-bit armv7. A description that says only ‘64-bit’ is insufficient. If the processor family is unclear, ask Synology support to identify it before proceeding. Confirm Container Manager is offered for your model too; processor support alone does not establish package eligibility or playback performance.
- In Control Panel > Info Center > Network, note the IP address for your connected LAN without changing any settings. The example below uses
192.168.1.18; substitute your NAS's address. Use a browser device on the same local network. - Check free space in Storage Manager > Overview. Download cache and saved content consume disk space. Self-hosted Vault storage grows as you save content; leave room for other NAS work. The sources do not establish a universal RAM or free-space minimum.
Prepare the configuration folder and password
Use any suitable writable shared folder. docker is only an example name, not a required folder.
If you have no suitable shared folder, open Control Panel > Shared Folder > Create > Create Shared Folder. Enter a name such as containers and the basic information, then choose Next. Continue past the optional checksum/quota step with Next, review Confirm settings, and choose Next. At Configure user permissions, give the account you are using write access, then choose Apply. Extra screens can vary with your model and features.
In File Station, open that shared folder. Choose Create folder, name it webtor, and confirm with OK. This subfolder will hold the Project configuration, including docker-compose.yml.
The application's files will live in named volumes: storage areas managed by the container engine. They are separate from this File Station folder. Copying the webtor folder alone will save configuration, not a complete application backup.
Choose a long, unique administrator password and save it in your password manager. For this example, use letters, numbers and hyphens to avoid YAML quoting and Compose substitution problems. This is a convenience for entering the configuration, not a Webtor password restriction. The saved configuration contains your password, so treat it as sensitive.
Set the browser address and storage
Your local browser address will be http://YOUR-NAS-IP:8942. The IP identifies the NAS; 8942 is the chosen port through which the browser reaches Webtor. Inside the container, Webtor listens on port 8080. The mapping connects the two ports.
Despite its name, DOMAIN does not require buying a domain or setting up DNS. Here it supplies the exact local URL Webtor uses for stream/download links and sessions. Its scheme, address and port must match the URL you open. This configuration uses local HTTP, supported by v2.1.2.
Before using the following configuration:
- Replace both occurrences of
192.168.1.18with your NAS's actual LAN IPv4 address. - Replace
REPLACE-WITH-YOUR-UNIQUE-PASSWORDwith the password you chose. Do not leave that token in place. - Keep the indentation, quotes and three volume names. If you must use another available browser port, replace
8942in both places and leave8080unchanged.
This Compose configuration adapts upstream's documented container settings using Docker's service configuration and named-volume syntax.
services:
  webtor:
    image: ghcr.io/webtor-io/self-hosted:2.1.2
    environment:
      DOMAIN: "http://192.168.1.18:8942"
      ADMIN_PASSWORD: "REPLACE-WITH-YOUR-UNIQUE-PASSWORD"
    ports:
      - "192.168.1.18:8942:8080"
    volumes:
      - data:/data
      - pgdata:/pgdata
      - storage:/storage
    restart: unless-stopped

volumes:
  data:
    name: webtor_data
  pgdata:
    name: webtor_pgdata
  storage:
    name: webtor_storage
Keep this installation local: do not add router port forwarding or a public reverse proxy. Binding the port to your LAN address narrows where it listens; it does not establish that existing router or firewall rules isolate it from the internet. Remote access and HTTPS need a separate configuration.
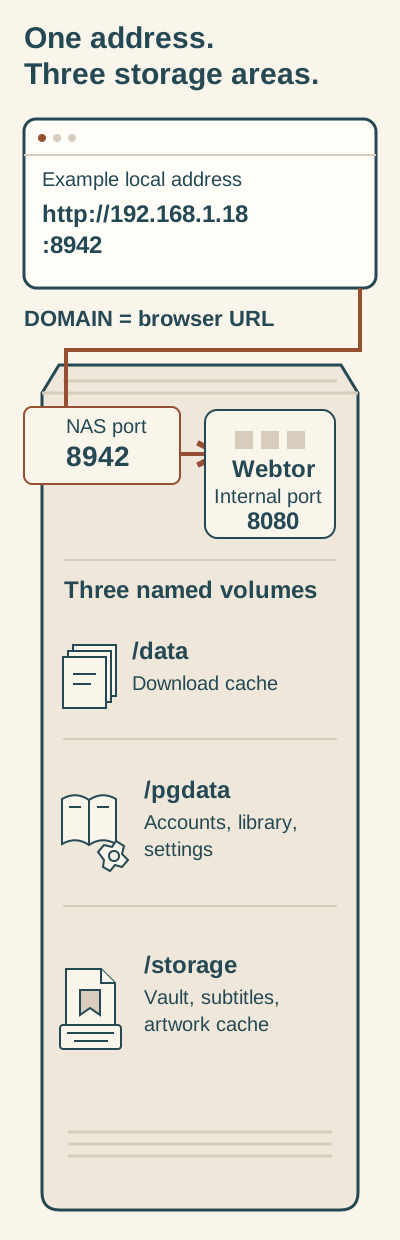
The browser address opens Webtor; three named volumes hold different kinds of application data.
In this example, the browser opens http://192.168.1.18:8942 and DOMAIN matches that address. NAS port 8942 maps to port 8080 inside Webtor. Its /data, /pgdata and /storage paths use separate named volumes. The File Station project folder holds configuration; copying it alone does not back up those volumes.
The three storage mappings have different jobs:
| Named volume | Inside Webtor | What it holds |
|---|---|---|
webtor_data | /data | Disposable torrent download cache; lost cache may need downloading again. |
webtor_pgdata | /pgdata | Accounts, library and settings. |
webtor_storage | /storage | Vault content, uploaded subtitles and disposable artwork cache. |
Keep /storage as a named volume: upstream requires extended attributes (extra file metadata), and specifies a named volume rather than an ordinary shared-folder mount. Do not point another running installation at these same volume names.
Create and open the Project
- Open Container Manager > Project > Create. Enter
webtoras the project name and select the folder you created as its Path. - Under Source, select the function that creates
docker-compose.ymlusing the editor, then paste your adjusted configuration there. You do not need to create the file separately in File Station. Synology documents this editor function, but the exact dropdown wording is not verified here; identify it by its create-with-editor description. If your wizard offers no such function, stop and consult the Project instructions rather than selecting an unrelated option. Leave the optional Web Station portal disabled for this direct-IP procedure. - Review the summary, choose Done, then choose to start the project. Allow the image download and initialization to finish. A completed creation step alone does not establish that the app is usable.
- Open your exact DOMAIN address in a browser: for the unchanged example,
http://192.168.1.18:8942. Authenticate with the Webtor administrator password you entered in the configuration, not your DSM password.
Keep that URL for future visits. If it does not open, use the checks below before changing network settings.
Check access after a restart
First confirm that the local URL opens Webtor and accepts the administrator password you configured. In Container Manager > Project, select webtor, then Action > Restart. Reload the same browser URL and authenticate if requested. Check that the application opens again. This checks access after an ordinary restart; it does not prove that library data persisted or that a backup can be restored.
An optional library check can give you a separate persistence marker if you already know how to add a torrent to your Webtor library. Use a small torrent containing material you are authorized to access, note its recognizable library entry, restart the project, then check that the entry remains. This article does not establish the exact library controls bundled in v2.1.2, so this exercise is optional rather than a required beginner step. These are checks for you to perform, not results observed on a NAS for this article.
A library entry is stored in /pgdata; it does not guarantee that all its content is permanently saved. Downloaded cache lives in /data. Webtor documents Save to Vault and My Vault for deliberately saving and managing content in /storage. If you attempt playback or downloading, reaching the application and successfully playing media remain separate checks: available peers, media compatibility and NAS capability can affect the result.
Stop safely, change settings and plan updates
To undo the running installation while retaining it, select the project and choose Action > Stop. Use Start to resume later. Avoid Clean and Delete as troubleshooting or update shortcuts: Synology documents destructive data/volume removal for these actions.
For a configuration correction, open Project Details > YAML Configurations, edit the settings and deploy them. Retain the volume names and saved administrator password. ADMIN_PASSWORD overrides a password changed through the profile, so keep the YAML value authoritative.
Before a future image upgrade, read that version's release notes and obtain an appropriate backup of persistent application data. Then change the pinned image tag in this same project's YAML and deploy the change. Stop/start alone does not select a different image. Preserve extended attributes when backing up /storage.
This guide does not supply a verified GUI-only backup and restore method for these named volumes. Copying the Project folder is insufficient. If you need a demonstrated restore process before upgrading, keep the current version until that process is arranged. Do not assume an arbitrary future release can safely be downgraded.
To stop using Webtor with data retained, leave the project stopped and keep its volumes. Before permanent removal, decide what data you want to preserve and back it up appropriately. Do not assume Delete will retain the named volumes.
If something fails
| Symptom | Check next |
|---|---|
| Container Manager or Project is absent | Check DSM, package availability and CPU support; do not force installation. |
| Image download or project startup fails | Read the project error and check disk space and registry connectivity. Synology's image-download troubleshooting also identifies DNS and clock/time-sync issues; use the reported error to guide diagnosis rather than weakening network settings blindly. |
Port 8942 is already in use | Choose an unused host port and change it in both DOMAIN and the port mapping; retain internal port 8080. |
| The page is unreachable | Compare the NAS's current LAN IP, running project state, published host port and browser URL. Check local connectivity and existing rules; do not open internet ports to solve local access. |
| Login/session failures or an error labeled CSRF appear | Make DOMAIN match the browser's scheme, host and port exactly. This procedure uses http://; an HTTPS DOMAIN with an HTTP browser address can cause failures. |
| A profile password change has no effect | Check ADMIN_PASSWORD in the saved YAML; it overrides the profile password. |
| Library entries disappear after recreation | Check that the same webtor_pgdata volume is still attached. Avoid reinitializing or deleting retained data while investigating. |
| A library item remains but content is unavailable | The cache may need downloading again from other people still sharing that torrent, provided you are authorized to access it. A library entry cannot make unavailable content return; distinguish cached content from saved Vault content. |
| S3/storage errors appear | Keep /storage on the required named volume; do not substitute an ordinary shared-folder mount. |