

Install Speedtest Tracker on a UGREEN NAS and Save Your First Result
Install Speedtest Tracker on a supported UGREEN NAS with Portainer, save your first result, and check persistent storage before scheduling hourly tests.
Eugene Gavrilov
9 min read- NAS & storage
One speed test cannot show whether your internet connection repeatedly slows down. Install Speedtest Tracker on your NAS to keep a history of measurements, then save your first result and check that it survives an app restart. This recipe also sets an explicit hourly schedule. Tests run from the NAS; they do not directly measure your laptop's Wi-Fi connection or NAS file-transfer speed.
This is a documentation-based procedure, not a report of testing on a physical UGREEN NAS. The Portainer deployment is covered below; installing Portainer and configuring NAS terminal access are prerequisites.
Check the prerequisites first
Use a UGREEN NAS running UGOS Pro with Docker available for your exact model. UGREEN documents Docker support for the DH4300 Plus and current DXP models; the DH2300 is not officially supported. Check your model and installed firmware, then confirm Docker is available in App Center. On supported systems install/open Docker before continuing. Do not install another model's package to bypass missing support. The image supports x86-64 and arm64.
You also need:
- A working Portainer instance connected to this NAS's Docker Standalone environment, with permission to create stacks. Select that environment before following the steps below. Swarm is outside this recipe.
- A computer on the same trusted home network and the NAS's local IPv4 address. Use the address shown by your NAS or router, not a remote-access link.
- An empty persistent folder on the NAS, its absolute filesystem path, and its owner's numeric user/group IDs. You must be able to confirm these through your NAS administration tools or with help from its administrator.
- An authorized terminal session on the NAS, or help from its administrator, to look up the account IDs. A terminal is a window for entering commands. The key-generation command also needs OpenSSL; it can run on a trusted Mac/Linux terminal with OpenSSL available. If a command is unavailable, stop and resolve that prerequisite rather than substituting random values.
A Docker image is the packaged application; a container is its running instance. A Portainer stack stores the recipe used to create it. The persistent folder keeps the database outside that replaceable container.
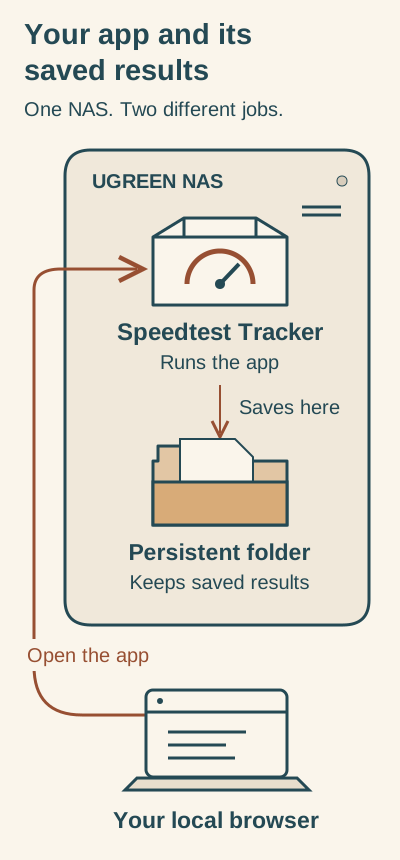
The app runs on your NAS; a separate persistent folder keeps its saved results.
The container runs Speedtest Tracker. A separate persistent folder on the NAS stores its settings and history. Your local browser accesses the app. Check that your own saved result survives a restart before relying on the setup.
Prepare the folder, account IDs and key
Create an empty folder named speedtest in your NAS's container-data location using your usual file-management tool. Record its full NAS filesystem path. For example, /volume1/docker/speedtest is illustrative: use it only if it actually exists on your NAS. A Windows drive letter, SMB share address or folder on your laptop is not the NAS filesystem path.
Make sure the NAS account you intend to use owns this folder and can read and write it. In the NAS terminal, replace YOUR_NAS_USERNAME with that account's actual name and run:
id YOUR_NAS_USERNAME
For example, output containing uid=1000(...) gid=100(...) means NAS_PUID will be 1000 and NAS_PGID will be 100. Those numbers are illustrative, not UGREEN defaults. Do not change broad shared-folder permissions or give everyone write access to solve a mismatch. Have the administrator correct ownership on this application's folder if necessary.
Generate your own encryption key in a trusted terminal with OpenSSL:
echo "base64:$(openssl rand -base64 32 2>/dev/null)"
Copy the entire output, including base64:. If you receive only that prefix or an error, key generation has failed. Keep the key in a password manager with the stack settings. Generate it once for this installation; do not replace it when restarting or updating an existing database. It protects encrypted application data.
Understand the address before deploying
For example, if your NAS has the local address 192.168.1.50, this recipe would open at http://192.168.1.50:8999. Replace the address with yours. The number 8999 is the NAS port, which directs the browser to this app. Docker passes that traffic to port 80 inside the container. APP_URL must match the browser address, including http:// and :8999. It is also used for application links.
You do not need a domain, DNS change, certificate or router port-forwarding rule for this local setup. HTTP is unencrypted: use a trusted LAN. Mapping a port makes it reachable through the NAS's network interfaces; it is not a firewall rule guaranteeing LAN-only access. Do not add public access or a tunnel during installation. HTTPS uses a certificate to encrypt the browser connection and is a separate setup task.
Create the Portainer stack
In your NAS's selected Portainer environment, choose Stacks → Add stack, name it speedtest, and select Web editor. Paste this Compose recipe. The ${...} entries take values from Portainer's environment-variable section; you will enter your own values below.
services:
  speedtest-tracker:
    image: lscr.io/linuxserver/speedtest-tracker:latest
    container_name: speedtest-tracker
    restart: unless-stopped
    ports:
      - "8999:80"
    environment:
      PUID: "${NAS_PUID}"
      PGID: "${NAS_PGID}"
      TZ: "Etc/UTC"
      APP_TIMEZONE: "UTC"
      DISPLAY_TIMEZONE: "Etc/UTC"
      APP_KEY: "${SPEEDTEST_APP_KEY}"
      APP_URL: "${SPEEDTEST_URL}"
      DB_CONNECTION: "sqlite"
      SPEEDTEST_SCHEDULE: "17 * * * *"
      ADMIN_EMAIL: "${SPEEDTEST_ADMIN_EMAIL}"
      ADMIN_PASSWORD: "${SPEEDTEST_ADMIN_PASSWORD}"
    volumes:
      - "${SPEEDTEST_DATA_PATH}:/config"
Add these variables using Portainer's environment-variable controls before deploying:
| Name | Value to enter |
|---|---|
NAS_PUID | Your numeric uid from the NAS |
NAS_PGID | Your numeric gid from the NAS |
SPEEDTEST_DATA_PATH | Your empty folder's absolute NAS path |
SPEEDTEST_APP_KEY | Entire newly generated key, starting base64: |
SPEEDTEST_URL | Your local app address, such as http://192.168.1.50:8999 with your NAS IP |
SPEEDTEST_ADMIN_EMAIL | Your chosen login email |
SPEEDTEST_ADMIN_PASSWORD | A unique strong password saved in your password manager |
These are app configuration values, called environment variables. Portainer administrators can access the configuration, so treat the stack and saved values as sensitive. The admin settings create your account only when initializing an empty database. They do not reset credentials in an existing installation.
DB_CONNECTION: sqlite stores the database with configuration in /config, mapped to your folder. No separate database container is needed. restart: unless-stopped is the upstream example's restart policy. The explicit schedule 17 * * * * means hourly at minute 17; it does not mean 17 minutes after deployment. This recipe keeps application time and displayed time in UTC. You can later set DISPLAY_TIMEZONE to your local IANA timezone if desired while leaving the application in UTC.
Click Deploy the stack. Open its container and check logs if startup fails. Deployment success alone does not prove the app initialized correctly.
Sign in and save your first result
Sign in
Open your SPEEDTEST_URL in a browser. If you need the sign-in route, append /admin/login. Sign in with the email and password you supplied. With an existing database use its existing credentials. The documented fallback defaults are [email protected] / password; if an installation unexpectedly uses them, change them immediately through the user menu's Profile page.
Run a test
Start a manual test using the app's Speedtest action and select a server if prompted. That action wording is supported by the supplied walkthrough; positions and wording may differ by release. Wait for a completed result, then note its timestamp and download/upload values. A result cannot be guaranteed: a failed internet check or unavailable test server can cause failure.
Restart and check the saved result
In Portainer, restart speedtest-tracker. Reopen the app, sign in and find the same result. Also confirm that files now exist in the NAS folder recorded earlier. These are checks for you to perform, not tests already performed for this guide. If the result disappears, check that the mount still points to the same folder before running further tests.
To start building the longer-term history, wait until the next UTC :17 boundary to verify the scheduled run separately.
Troubleshoot in the order you encounter problems
| Symptom | Check next |
|---|---|
| Stack cannot deploy | Confirm every variable has a value; check indentation and image-download errors. If port 8999 is already allocated, choose an unused host port and change both the left-hand port and SPEEDTEST_URL. Keep internal port 80. |
| Container starts then fails | Read its logs. Recheck complete APP_KEY, folder ownership, numeric IDs and actual mount path. Do not erase the folder as a first fix. |
| Browser cannot connect | Confirm container is running, computer is on the same LAN, address is the NAS IP, and you used the configured HTTP host port. Check NAS firewall rules. Do not expose it publicly to troubleshoot. |
| Login rejects the new password | An old database retains its existing account; initialization variables do not reset it. Use that account or the project's authentication help. |
| Manual test fails | Check the failure/log details and NAS internet access. A test server can fail even while the dashboard opens normally. |
| No scheduled result | Check the explicit cron value, UTC clock and container logs. A successful manual test does not prove the schedule ran. |
These checks narrow causes; they do not establish the cause of an unseen failure.
Back up, update or undo
Before updating, stop the container through Portainer. Copy the whole persistent folder to a separate backup location while it is stopped; keep the Compose recipe, environment values and original APP_KEY securely with it. Restart the container afterward. This is a conservative backup procedure, not a claim of a tested restore.
The recipe uses upstream's moving latest tag for initial installation. Record the image digest, which identifies the exact image you deployed, from the container/image details and preserve that image reference with each backup. For repeatable deployment, replace the image line with the exact lscr.io/linuxserver/speedtest-tracker@sha256:… reference recorded by your installation; the ellipsis here is explanatory, never something to paste. Read release notes before updates, then pull the new image and recreate through your Portainer stack workflow. Recheck login, saved history and a new test. Updating software inside the container is not the supported update method.
If an update fails, stop it. Restore the pre-update folder and original key together, then deploy the matching old image reference and recipe. Do not assume an old image can read a database migrated by a newer one. Have a verified backup before attempting recovery.
To pause testing, stop the container. To uninstall, remove this application's stack/container in Portainer while keeping the NAS data folder. Deleting that folder separately removes your saved history and configuration; do so only when you intend to discard them and have any backup you need.
For help, provide the image version/digest, NAS model, UGOS version and relevant log error to the Speedtest Tracker project documentation, LinuxServer image guide or Portainer documentation. Remove keys, passwords, email addresses and other personal data before sharing logs or a stack.