

How to install Tracearr on a Synology NAS and open it locally
Install Tracearr with Synology Container Manager, open it locally, connect your media server, and check persistence while keeping configuration and data separate.
Eugene Gavrilov
8 min read- NAS & storage
Install Tracearr as a Container Manager project, open it on your home network, and check that its server connection survives a restart. Use it to collect playback activity from a Plex, Jellyfin or Emby server you already run. The installation below translates the official three-container Compose deployment into Synology's Project interface. It follows primary documentation checked on November 4, 2026; it has not been tested on a physical NAS.
Check before starting
Have access to the media server before installing Tracearr. For Plex, use an account that owns the server or has shared administrator access. For Jellyfin or Emby, you need administrator access to generate an API key. These are the access prerequisites in the official first-server guide.
Use a NAS where Container Manager is officially available through Package Center, with its Project interface. Check Synology's current model list rather than assuming all Synology units work. Package availability does not establish that every image in this stack supports your CPU. If deployment reports “no matching manifest”, stop and ask upstream about the architecture; do not substitute an arbitrary database image.
The upstream FAQ lists 1GB minimum and 2GB recommended RAM. This is not a promise that a NAS with 2GB total can run DSM, your media server and the database comfortably. Leave capacity for those services.
This is a fresh installation. The recommended upstream docker-compose.pg18.yml still carries an Experimental header and explicitly forbids reuse of PostgreSQL 15/16 data volumes. Do not use this process to migrate an existing database.
Keep the first setup on your trusted home network. Do not create router port forwarding or enable the optional Web Station portal for this procedure. Your browser will use the NAS's local address and port. HTTP on your LAN does not encrypt the connection.
Prepare configuration and understand storage
A Docker image is the packaged software; a container is a running instance. A Compose file describes the app and its companion database/cache together. An environment variable supplies a named setting, such as a secret or timezone. A port is the numbered network endpoint used to reach a service.
In File Station, create a private project folder in an existing writable shared folder, for example docker/tracearr if you already have a docker share. This is an illustrative folder name, not a required /volume1 path. Restrict access because the configuration will contain secrets. Select this folder as the project's working directory later.
Keep upstream's named volumes: timescale_data holds the database, redis_data holds Redis data, tracearr_backups holds generated backup archives, and tracearr_images holds the poster cache. Docker manages these separately from your File Station project folder.
Copying the project folder alone does not back up the database. Do not create replacement bind mounts or grant Everyone write access to fix permissions.
Get the official Compose file and fill in secrets
Open the official pg18 Compose file and copy its complete contents into a private plain-text editor. Keep the database settings, health checks, mount paths, shared memory, limits and networking intact. The file is mutable; keep the exact copy you install.
Follow Tracearr's secret-generation instructions. Generate two different random strings, each 64 hexadecimal characters, for JWT_SECRET and COOKIE_SECRET. The documented nonterminal generator uses length 64 and characters 0–9, a–f; keep the values private. For the database password, use the same generator and settings to generate a third, different 64-character hexadecimal string. That database-password length is this guide’s suggested choice, not an upstream requirement. Store all three values in your password manager, labeled JWT_SECRET, COOKIE_SECRET, and database password.
Prepare your private Compose copy with these replacements. They adapt the upstream placeholders into values you can paste directly into the project:
- Replace
${JWT_SECRET}with the first generated value. - Replace
${COOKIE_SECRET}with the second value. - Replace both instances of
${DB_PASSWORD:-tracearr}with the same generated database password: once inDATABASE_URLand once inPOSTGRES_PASSWORD. - Replace
${PORT:-3000}with3000so the port line reads"3000:3000".
Do not paste sample secrets from a website. Keep the other default expressions unchanged. BETTER_AUTH_SECRET is optional; when absent Tracearr derives it from JWT_SECRET, so this minimal procedure leaves it absent. Hexadecimal database passwords avoid URL punctuation in DATABASE_URL.
Create the project
Following Synology’s Project workflow, open Container Manager, select Project, then Create. Fill in:
- Project Name:
tracearr. - Path: select the private working folder you created.
- Source: choose the editor route and paste your complete prepared Compose file, or upload it as
docker-compose.yml.
Leave the optional Web Station portal disabled. Review the summary, click Done, and choose to start the project. Wait for image downloads and database startup rather than repeatedly recreating the project.
Open Tracearr and connect a server
From a computer on the same home network, open http://NAS-LAN-IP:3000, substituting the NAS address you use locally. For example, only if your NAS address were 192.168.1.50, the URL would be http://192.168.1.50:3000. localhost on your computer refers to that computer, not the NAS.
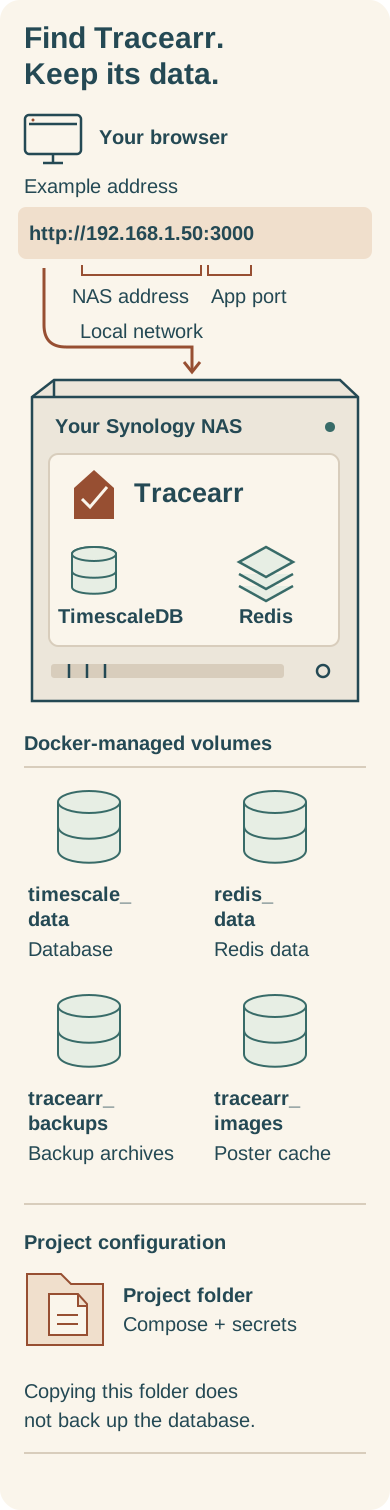
Illustration: an example local address opens Tracearr on the NAS; four Docker-managed volumes store data separately from the project’s Compose configuration and secrets.
Text alternative: in the illustrative address http://192.168.1.50:3000, 192.168.1.50 is the NAS’s local network address and 3000 is the published app port. Substitute your own NAS address. The project runs Tracearr, TimescaleDB and Redis. Its Docker-managed volumes are timescale_data for the database, redis_data for Redis data, tracearr_backups for backup archives, and tracearr_images for the poster cache. The project working folder contains Compose configuration and secrets; copying that folder does not create a database backup.
In the documented first-run setup, the first account becomes the sole owner. Set it up as yourself and save your login details. Plex users can choose Sign up with Plex, authenticate and select a discovered server.
For Jellyfin or Emby, choose Create Account. Then open Settings → Servers → Connections → Add Server and select the server type. Enter its reachable Server URL, a friendly Server Name, and an API Key generated in that media server's Dashboard → API Keys. Choose Connect Server. The optional Public address may remain blank for this local setup. Do not enter the Tracearr URL as the media-server URL.
Check a real playback and persistence
Play something through the connected media server, then look for the session in Tracearr. Plex pushes session information; Jellyfin and Emby may require a polling cycle. A newly connected server without playback is not enough to prove tracking works.
Once you have a connected server and recorded activity, select the project in Container Manager and use Action → Restart. Reopen the same local URL, sign in if needed, and confirm that the server connection and recorded activity remain. These are checks for you to perform; no restart result is claimed here. If setup starts over unexpectedly, stop and inspect the retained volume configuration before entering more data.
Back up before updating
Use the documented backup workflow: in Tracearr, open Settings → Backup → Create Backup. Wait for completion in the history table, then download the archive and keep a protected copy away from the NAS. Save the installed Compose file and secrets securely too. Named volumes protect against container replacement, not disk loss. The backup/restore feature is beta; no restore test is claimed here.
Tracearr's documented recovery route is Upload in Settings → Backup followed by Restore for an appropriate archive. Restore replaces the entire current database; it is not a merge. Preserve the encryption/JWT secret used by the old installation or encrypted destination credentials may need re-entry. Treat a restore as deliberate recovery, not a routine installation check.
Prepare for updates or stop the project
The supplied app image uses latest, which can change. Record the installed image identifier before changing it, review upstream release/upgrade notes, create and download a backup, and retain your Compose copy. An update requires pulling the new app image and recreating the app while retaining its volumes. A restart alone does not download an update.
This guide covers update preparation, but does not provide a Synology redeployment procedure: the exact image-pull and redeploy controls have not been established in this research. Synology documents editing under project Details → YAML Configurations; editing the YAML alone is not the complete update process. Read the official upgrade instructions before planning an update, and pause if you cannot identify how to pull the image and recreate the app with its volumes retained. Do not use Clean as a shortcut. An older app image is not a guaranteed database rollback after migrations.
To undo the running installation reversibly, select the project and use Action → Stop. Keep the folder and volumes until your downloaded backup and saved secrets are secure. Clean and Delete are not routine restart buttons: Synology describes them as removing project resources/data. Inspect every deletion confirmation before agreeing.
If something fails
If the editor rejects the file, compare indentation and structure with your retained upstream copy; do not replace the file with a smaller single-container recipe. If the app cannot start, check that both required secrets were replaced and inspect the app/database/cache status and logs.
If the browser cannot open Tracearr, confirm the project is running and that you used the NAS LAN IP and published host port. If port 3000 is already occupied, choose an unused host port by changing only the left side, for example "3001:3000", and then use :3001 in the browser. This example is an adaptation of the documented host/container mapping.
If the page opens but the server connection fails, check the media-server URL, API key and firewall rules, then read Tracearr's logs. Avoid disabling the firewall globally. For upstream help, use the official troubleshooting documentation and repository linked there; include the error and image/version details but remove API keys, tokens and Compose secrets first.