

How to Install Trilium on Your Synology NAS
Install Trilium on a Synology NAS with Container Manager, open your notebook locally, and check that a sample note remains after restarting.
Eugene Gavrilov
12 min read- NAS & storage
Keep your notes on your NAS and open them in a browser on your home network. You will create a persistent data folder, install Trilium through Container Manager, and check that a note remains after restarting the application. The restart check is something you will perform; it is not a test already carried out for this guide.
This guide uses the maintained TriliumNext image, pinned to v0.106.1, researched on November 4, 2026. It applies to Synology NAS devices with Container Manager and its Project controls. The configuration follows documented settings, but has not been run on a physical NAS for this article.
- Check the installation requirements
- Prepare the folder and understand the address
- Create the Trilium project
- Open Trilium and save your first note
- Restart, check and back up your notes
- Troubleshoot or stop the installation
Check the installation requirements
DSM is your Synology NAS management interface. Open Package Center there and look for Container Manager. Install it if it is available, then open it and check for Project. If the package or those controls are missing, stop here: this procedure does not establish support for your NAS. The older Docker package should not be assumed to have the same project wizard.
Three terms explain what you are about to create. An image is the packaged application; a container is a running instance of it. A project holds the container and its settings, described in a Compose file. You will enter that file in Container Manager's editor, without using a terminal.
The notes need a place to live outside the container. A bind mount connects a folder on the NAS to the folder Trilium uses inside the container. The NAS folder must be writable by the application. Setting up this connection is the reason for creating the data folder before starting Trilium. If startup reports a permission error, use the log-and-support route below before changing permissions.
Prepare the folder and understand the address
In File Station, open the docker shared folder if it is available. Create a folder named trilium, then create a folder named data inside it. If you use another available shared folder, keep the same trilium/data arrangement and select that actual project folder later. Do not enter an assumed /volume1 path: your NAS may store the shared folder elsewhere.
The configuration below connects these two locations:
- On your NAS: the
datasubfolder inside your chosentriliumproject folder. - Inside the container:
/home/node/trilium-data, where this image will store its application data.
There is a separate connection for your browser. Your NAS has a network address; a port selects the service to reach at that address. This guide uses NAS port 4292 and forwards it to port 8080 inside the container. The browser uses the NAS port. It does not use the container's internal data path.
Local access here means connecting from a device on the home network that can reach the NAS's LAN address. A remote-access address, such as a QuickConnect address, is not the local IP to use in this recipe. A hostname or domain name is a readable network name; DNS looks up the IP address associated with such a name. You do not need to configure a name for this numeric-IP connection.
To find the NAS's local address, open DSM → Control Panel → Info Center → Network and look for the IP address of the connected local LAN interface. Do not copy the DNS server address or a QuickConnect URL. If several interfaces are listed, use the LAN reachable from your computer. You are reading the settings, not changing them.
For example, if that local address were 192.168.1.50, the Trilium address would be http://192.168.1.50:4292. That IP is illustrative: substitute your own NAS's LAN IP and the NAS-side port from the configuration. If you already open DSM directly by that local IP, reuse the IP with http:// and Trilium's port; do not append a second port to the DSM address.
HTTP does not provide TLS encryption. HTTPS adds TLS, and its certificate helps the browser check the server's identity. This walkthrough configures neither HTTPS nor a certificate. Use it for an initial trusted-network check, without adding router port forwarding or a public reverse proxy. A published container port is not inherently restricted to your LAN: actual access also depends on routing and firewalls.
One route to open Trilium, one folder for its data
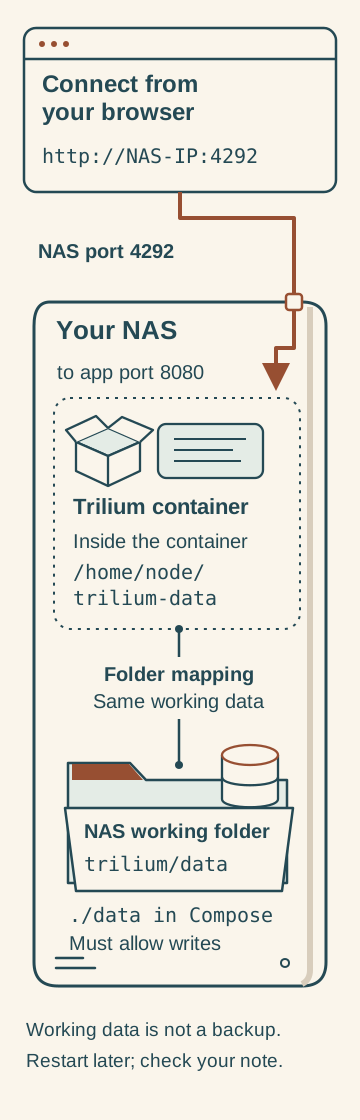
The browser connects through NAS port 4292 to Trilium port 8080. Inside the NAS, the app's data directory maps to the project's data folder. That working folder is not an independent backup.
In text: open http://NAS-IP:4292, replacing NAS-IP with your NAS's local IP address. In 4292:8080, the first number is the NAS port and the second is Trilium's port inside the container. The ./data:/home/node/trilium-data mapping makes the data subfolder of your selected trilium project folder available at /home/node/trilium-data inside Trilium. That NAS folder must allow writes. This is the app's working data folder, not an independent backup. Later, restart the project and check your sample note yourself.
Keep a short record of your project folder, NAS address and chosen NAS port. Those values will help you reconnect and check the storage mapping later.
Create the Trilium project
The following is one Project-based route, based on Synology’s Project documentation and Trilium’s Docker installation documentation. Synology's documentation describes the wizard controls, but their wording may vary; this article does not contain an observed DSM screen recording.
Step 1: Name the project
Open Container Manager → Project → Create. Enter trilium as the project name.
Step 2: Select the project folder
For Path, select the trilium folder you created in File Station. Select the project folder itself, not its data subfolder.
Step 3: Enter the Compose settings
Under Source, choose the option to create a Compose file in the editor. Paste the complete configuration below. The wizard also supports uploading a Compose file, but the editor is sufficient for this route.
services:
  trilium:
    image: triliumnext/trilium:v0.106.1
    restart: unless-stopped
    environment:
      TRILIUM_DATA_DIR: /home/node/trilium-data
    ports:
      - "4292:8080"
    volumes:
      - ./data:/home/node/trilium-data
Read the settings once before continuing:
servicesandtrilium: define the application's service within this project.image: selects the TriliumNext image and fixes the installation tov0.106.1.restart: unless-stopped: lets the container come back automatically, while respecting an intentional stop.environment: supplies application settings.TRILIUM_DATA_DIRtells Trilium which internal folder to use.ports: maps NAS port4292to application port8080.volumes: maps./data, relative to the selected project folder, to/home/node/trilium-datainside the container.
These values are an adaptation of documented settings, not a configuration executed for this article. Keep the YAML indentation as shown.
If another service already uses 4292, change only the first number in "4292:8080" to an available NAS port, and use that number in your browser address. Leave 8080 unchanged for this configuration.
The example leaves the image's user and group IDs at their default, 1000. It does not add USER_UID or USER_GID. Those variables are supported, but a numeric identity copied from someone else's NAS is not a universal permission fix. The selected data folder still needs to be writable.
Step 4: Skip the optional portal
Continue through the wizard. Leave the optional Web Station portal disabled; direct access through the mapped port does not require it.
Step 5: Start the project
Check the summary, confirm with Done, and choose to start the project. If creation or startup fails, keep the folder and configuration and use the troubleshooting steps below.
Open Trilium and save your first note
From a device that can reach your NAS, open http://YOUR-NAS-IP:4292, substituting the NAS's real address. If you changed the first port number in the configuration, substitute that number too. For the illustrative address used earlier, this would be http://192.168.1.50:4292.
For a new, empty installation, follow this sequence. The setup labels come from the pinned v0.106.1 implementation; the note controls come from official documentation. They have not been exercised on a physical NAS for this article.
- If a language screen appears, choose your language and select Continue.
- Choose New knowledge base. This creates your notebook's database.
- Choose Empty for a blank starting notebook. With demo content is the alternative, but this guide uses the empty starting point.
- Wait for creation and the page reload. When the password form appears, enter the same chosen password in Password and Password confirmation, then select Set password. Follow any displayed validation and sign in when prompted.
If you see unexpected existing-data or recovery prompts, stop and preserve the project data before creating a replacement database. The sequence above is for a new installation.
Now make the note you will check after restart:
- In the note tree, right-click an existing note. Choose Insert child note, then select the text-note type.
- Click the new note's title field above its content and name it NAS persistence check. The title saves as you type.
- Enter a recognizable sentence in the content, such as “This is the note I will check after restarting Trilium.”
- Select another note, then return to NAS persistence check and confirm that your sentence is present.
This is your first checkpoint: you can reach the notebook and find something you entered. Next, check the same note after restarting the application.
Restart, check and back up your notes
- Return to Container Manager → Project and select the Trilium project.
- Choose Action → Restart.
- After the project has restarted, reopen the same Trilium address in your browser and find NAS persistence check. Check its contents.
In File Station, also inspect your project's data folder. The database and configuration files belong in that location through the bind mount. If the note is missing, preserve the folder and check the mapping before trying another installation.
Finding the same note after restart checks this installation's persistence. It does not show that a backup can be restored or protect the notebook from losing the NAS.
Keep a separate backup
For a whole-installation copy, select the project and choose Action → Stop. Copy the entire trilium project folder, including its Compose file and complete data subfolder, to separate storage. Once the copy is complete, choose Action → Start. Keep the backup independent of the working NAS folder. This stopped-copy procedure is a documented-settings recommendation; no successful restore is claimed here.
You can also download a database backup using Trilium’s official backup instructions. Open Settings → Backup → Backup Now, then go to Existing backups → Download. Keep the downloaded file off the NAS. Automatic backup copies in the application's data directory do not cover losing that NAS.
Know how restoration starts
A new Trilium installation offers Restore from backup during setup. For an existing web installation, the documented route is Settings → Database → Start over, followed by restoration. Restoration replaces the current database: preserve the current data separately before beginning. An encrypted backup requires its original password.
These are documented restoration entry points, not a report that this installation has passed a restore test.
Prepare before considering an update
An update is a separate maintenance task. First keep an independent backup and record the working image tag and Compose configuration. Before changing anything, read the official Trilium upgrade instructions, including their Docker procedure, release-note guidance and migration warnings. Use those instructions for the actual upgrade; this installation guide does not supply an additional GUI update sequence. Restart alone does not deploy another image.
A database migration can prevent an older image from reading upgraded data. Returning to the previous release requires that release's image together with matching pre-update data or backup; changing the tag back alone is not a reliable rollback. If you use synchronization, also check the release's sync compatibility before updating.
Troubleshoot or stop the installation
Work from the symptom you have reached, keeping the project folder and data intact during diagnosis.
Container Manager or Project is missing
Check Container Manager package availability for your NAS. This guide does not establish a replacement workflow or compatibility for a device without the required Project controls.
The project cannot be created or started
First compare the YAML indentation and values with the complete example. Then check any image-download or network error reported during creation: if the image cannot be obtained, the project cannot reach the normal application startup stage. Next check whether the chosen NAS port is already in use. Change the first port number if necessary and keep your browser address consistent with it.
Trilium reports a data-folder permission error
If startup reports that it cannot access or write the mapped folder, retain the folder and collect the specific error before attempting a fix:
- Open Container Manager → Container, select the Trilium container, then open Details → Log. Save the exact error privately.
- Keep the image tag and complete Compose file with that error. Record your DSM version from Control Panel → Info Center → General.
- Compare the project path and mapping with this guide: Path selects the project folder,
dataexists beneath it, and the mount is./data:/home/node/trilium-data. - Read Synology's mapped-folder permissions guidance. The image's user identity and the NAS folder's permissions must match; this guide does not establish a universal permission change.
If the required identity or folder-access change is unclear, stop the project with Action → Stop and leave its data intact. Open DSM → Support Center → Contact Support, sign in to your Synology Account when required, and request help with the mapped-folder permission error. Retain the error, DSM version, image tag and Compose settings for support. Do not reset permissions for the entire share or substitute an arbitrary user ID.
For an application or image problem, use the Trilium issue tracker. Public reports should contain only a redacted error and configuration excerpt; do not attach your notes database, password or complete private log bundle.
The browser cannot open the notebook
Check the NAS's current address, the NAS-side port in your configuration, and whether your device can reach the NAS. Use the mapped host port, such as 4292, rather than internal port 8080. If the project has not started successfully, resolve that first.
The check note is missing after restart
Inspect the selected project path and its data folder before creating a replacement notebook. Compare the folder mapping with your saved configuration. Do not use Delete or Clean as a troubleshooting step: preserving the existing files comes first.
Stop using the installation safely
Choose the project's Action → Stop to halt Trilium without removing it. You can resume with Action → Start.
Before removing the project, make a separate complete backup and keep a record of the pinned image and folder mapping. Synology describes project Delete as deleting containers and project data. Do not treat it as a way to remove only the application while guaranteeing the notes remain. If your immediate goal is simply to stop running Trilium, leave the project stopped and retain the data folder.