

Install Dozzle on Synology and View Your Container Logs
Install Dozzle on Synology with DSM Task Scheduler, create a login, view container logs locally, and check saved settings after a restart.
Eugene Gavrilov
12 min read- NAS & storage
When an application on your Synology NAS is behaving unexpectedly, its logs can help you see what it is reporting. Dozzle puts container logs in a browser. This guide uses DSM Task Scheduler to install Dozzle, create a login, and open an existing container's logs. You will paste commands into DSM, without opening a terminal or enabling SSH, the service used for remote command-line access.
The procedure combines Dozzle's installation documentation with Synology's Task Scheduler instructions; it has not been tested on a physical NAS. Download time and setup checks vary, so allow time to complete the checks as well as the installation.
Check your starting point
DSM is Synology's NAS operating system. In its Package Center, make sure Container Manager is available for your exact NAS model and DSM version, then install and start it. Check the official model list and package release requirements. An older guide mentioning the Docker package does not establish compatibility with your NAS. Dozzle documents a minimum Docker Engine version of 19.03, with API 1.40.
Docker Engine is the software that runs containers. A container is a running application instance, created from an image, its downloadable application template. You will create one container for Dozzle. Have an existing container available so you can check its logs afterward. Both scripts below use the explicitly selected image version amir20/dozzle:v11.4.0, the release retrieved for this guide.
Before proceeding, understand the access you are granting. The Docker socket is Docker's local control connection. Giving Dozzle access to it is effectively granting root-level control of the NAS. Root is the highly privileged system account. Even the :ro socket setting in the command below does not prevent writes through Docker's API. A Dozzle login controls entry to the application; it does not reduce that underlying access. Optional shell and container actions remain disabled in this setup.
Use a trusted home network for the first connection. The guide uses HTTP, a browser connection that does not encrypt the password or log contents in transit. Use a unique Dozzle password, and do not add router port forwarding or public access for it. If the network is shared or untrusted, arrange a trusted VPN connection or HTTPS before entering credentials. Remote access and HTTPS setup are outside this procedure.
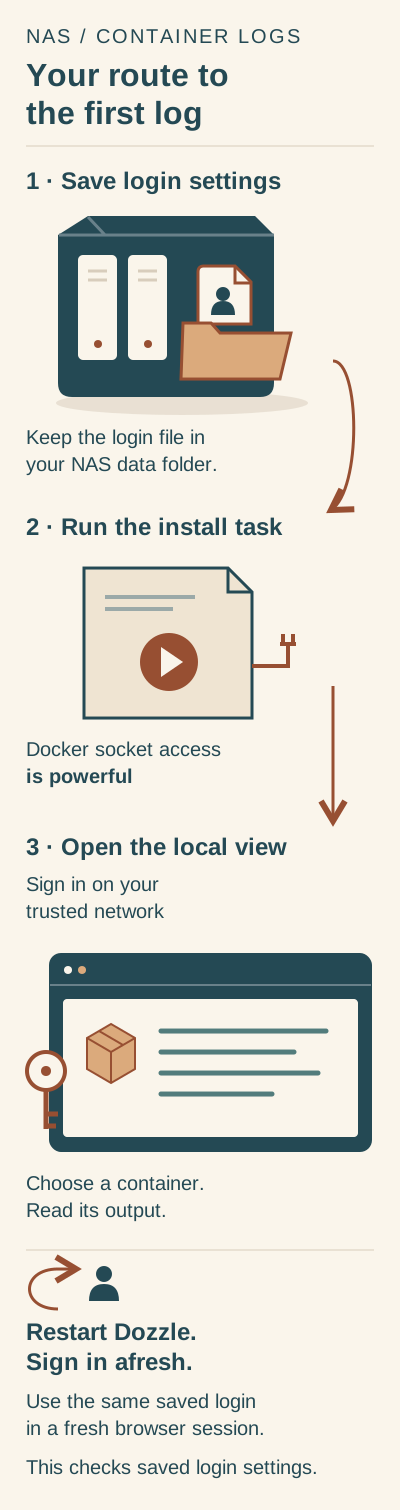
Prepare a saved login, install Dozzle, then open a container’s logs locally. After restarting Dozzle, sign in with the same credentials in a fresh browser session.
Diagram text alternative: Save the authentication configuration in the NAS data folder. Install Dozzle using the documented task. Open its local address on a trusted network, sign in and choose a container. Restart Dozzle, open a fresh browser session and sign in with the same credentials. This checks saved login settings.
1. Prepare a folder and your NAS address
A shared folder is a top-level NAS storage location. Open Control Panel → Shared Folder. If docker exists, select it and choose Edit to check its Location, then cancel without changes. If it is absent, choose Create → Create Shared Folder, name it docker, select the intended volume under Location, and finish the wizard. Grant access only to trusted administrators. Do not move an existing share to match this example.
In File Station, DSM's file browser, open docker and create a dozzle subfolder. On Volume 1, its path is:
/volume1/docker/dozzle
On Volume 2, use /volume2/docker/dozzle instead. Replace the path in every DATA assignment if your volume differs. The installation connects this folder to /data, a location inside the Dozzle container, so settings survive replacing the container. Keep access to the folder limited to trusted administrators.
Open Control Panel → Info Center → Network and copy the NAS's home-network IPv4 address, four numbers separated by dots. Choose the LAN connection through which your computer reaches the NAS; do not copy the DNS server, gateway or an IPv6 address. Leave network settings unchanged. 192.168.1.50 below is illustrative. Put your actual address in both NAS_IP and the browser URL. No domain name is needed.
A port is a numbered connection endpoint at an address. Here, browser connections use NAS port 8892; Docker passes them to port 8080 inside Dozzle. Choose another unused NAS port if 8892 is already occupied, and use that same number in the browser address later.
2. Generate your login file
Dozzle can generate its own authentication file; there is no paid file to obtain. The file is named users.yaml. YAML is the text format Dozzle reads for account settings. As explained in the simple authentication documentation, Dozzle also accepts users.yml, but that name takes precedence if both exist. The script below deliberately stops if either file already exists.
In DSM, open Control Panel → Task Scheduler → Create → Scheduled Task → User-defined script. Create a task named Generate Dozzle user. Choose root as its user, clear Enabled, and select a one-time date in the schedule. Keeping the task disabled lets you run it manually without setting up repeated execution. Under Task Settings, paste the following into Run command.
First replace CHANGE_ME_TO_A_UNIQUE_PASSWORD with a new password and save it in your password manager. For this command, use 20–64 ASCII letters and digits only, keeping the surrounding single quotes. This avoids needing to escape shell punctuation. Use a different password from your DSM account.
set -eu
umask 077
DOCKER=$(command -v docker)
DATA='/volume1/docker/dozzle'
test -d "$DATA"
test ! -e "$DATA/users.yml"
test ! -e "$DATA/users.yaml"
"$DOCKER" run --rm amir20/dozzle:v11.4.0 generate nasadmin \
  --password 'CHANGE_ME_TO_A_UNIQUE_PASSWORD' \
  --name 'NAS logs' --user-roles none > "$DATA/users.yaml.tmp"
test -s "$DATA/users.yaml.tmp"
mv "$DATA/users.yaml.tmp" "$DATA/users.yaml"
Your Dozzle username will be nasadmin. The none role allows log viewing without optional privileged user capabilities. The generator runs in a temporary container, with no Docker socket connection or browser port. It produces a password hash, a derived value used to check your password without storing the original password in the account file. --rm removes the temporary container afterward.
The script locates Docker, checks the destination, and writes a temporary file before renaming it to users.yaml. It stops on a failed command, so a failed generator does not replace an existing account file. umask 077 restricts access to newly created files. These shell steps are part of the source-grounded procedure, rather than a recorded NAS test.
Review the path and command, save the task, select it and choose Run. In File Station, check that users.yaml exists and is not empty. Its password value is a hash; leave it as generated and keep the file private. If the task fails, Task Scheduler can save its output: use Settings → Save output results, choose a private folder, then inspect Action → View Result.
After successful generation, delete this task through Action → Delete. The task contains the original password in plaintext. Administrators can read it while it exists, and command arguments may be visible during execution. Deleting it removes that saved task, without guaranteeing removal from backups or audit records. Keep any diagnostic exports containing the script private too.
3. Install Dozzle once
Create another disabled user-defined scheduled task, again running as root, named Install Dozzle. Adjust DATA if necessary and replace the example NAS_IP with your NAS's actual private address. Paste this command:
set -eu
DOCKER=$(command -v docker)
DATA='/volume1/docker/dozzle'
NAS_IP='192.168.1.50'
test -s "$DATA/users.yaml"
test ! -e "$DATA/users.yml"
"$DOCKER" run -d --name dozzle --restart unless-stopped \
  -p "$NAS_IP:8892:8080" \
  -v /var/run/docker.sock:/var/run/docker.sock:ro \
  -v "$DATA:/data" \
  amir20/dozzle:v11.4.0 --auth-provider simple
The command creates a container named dozzle. -d keeps it running after the task finishes. The restart policy, unless-stopped, lets Docker restart it automatically except when you deliberately stop it. --auth-provider simple enables the account-file login you prepared.
Each -v connects a NAS location to a location inside the container. One connects the powerful Docker socket; the other connects your saved settings folder to /data. The settings folder remains writable. Remember that :ro on the socket does not make Docker API access read-only.
The -p setting publishes the browser connection at your chosen NAS address and port. Binding that address is not a firewall and does not guarantee that only home-network devices can reach it; keep your network access rules private.
Save and Run this task once. Leave it disabled. Running it again tries to create another container with the same name and will conflict; normal startup is handled by the restart policy.
4. Sign in and find a container's output
On a computer connected to your trusted network, open:
http://192.168.1.50:8892
Substitute your NAS address and the NAS port you selected. Sign in with nasadmin and the original password from your password manager. Do not enter the hash from users.yaml. If you reach the logs without a login, stop and check that the container was created with --auth-provider simple.
Choose an existing container and look for an entry in its output. A quiet application may have no new lines to show. You do not need to create a fault to complete this check. Treat log contents as private, because applications can print sensitive information. This setup leaves optional shell and container actions disabled.
5. Check that the saved login survives a restart
Edit the disabled Install Dozzle task. Replace its installation script with this restart script:
set -eu
DOCKER=$(command -v docker)
"$DOCKER" restart dozzle
Run it, then deliberately open a fresh browser session. For example, in Firefox close all private windows, open a new Private Window, and visit your Dozzle address. Check that the login screen appears, enter nasadmin and your saved original password, then confirm access to logs. This avoids reusing your normal-window login or an earlier private session. Private browsing does not encrypt HTTP. Also check that users.yaml remains in your NAS folder. This is a check for you to perform; it is not a result observed for this guide. It checks saved configuration, and does not establish that logs are archived in the Dozzle folder.
Once satisfied, delete the installation task. Deleting that task leaves the container and its restart policy in place.
Resolve a failed step
To inspect Dozzle itself, open Container Manager → Container, select dozzle, then Action → Details → Log. Use that selected container's log, rather than the package's overall Log page. Its Action menu also offers Stop, Start and Restart for this existing container.
Use the first symptom that matches what you see:
| Symptom | What to check |
|---|---|
| Container Manager is unavailable | Check Synology's package requirements for your model and DSM version before continuing. |
| The task stops before downloading | Check that Container Manager is running, the task uses root, and DATA names an existing shared-folder path. |
| Credential generation stops at an existing file | Preserve that account file privately before deciding whether to replace it. Keep only one supported users filename in the folder. |
The name dozzle is already in use | Inspect the existing container in Container Manager before trying another installation. |
| The port is already allocated | Use the named removal procedure below for the failed Dozzle container, then select another unused NAS port. Change the browser port too; leave Dozzle's internal 8080 unchanged. |
| Docker cannot assign the requested address | Verify NAS_IP belongs to this NAS. An address change requires recreating the container with the new mapping; restarting keeps the old mapping. |
| The browser cannot connect | Recheck the NAS address, the selected NAS port and whether the dozzle container is running. |
| Login fails or Dozzle exits | Use the selected-container Log route above. Check the data-folder mapping and account filename, and keep credential files private. |
| A selected container has no new output | Check whether that application has produced output; Dozzle does not generate logs on its behalf. |
Manage the existing Dozzle container
You can use the Action menu above, or create a disabled root task named Manage Dozzle using the same Task Scheduler route as the installation. Paste one required script into Task Settings → Run command, save and Run. Check the task result or the container's status afterward. Delete the helper task when finished.
To stop Dozzle before changing its credentials:
set -eu
DOCKER=$(command -v docker)
"$DOCKER" stop dozzle
To start that same container afterward:
set -eu
DOCKER=$(command -v docker)
"$DOCKER" start dozzle
Use the restart script in step 5 when a restart is required. Use Start after password recovery; running the installation script again would try to create a new container.
Update or remove the installation
For an update, read the new release's notes first; this guide's selected version is v11.4.0. Privately back up the Dozzle folder and record the current image version and installation command. Use the controls above and removal script below to stop and remove only dozzle, then rerun the installation script with only the image tag changed to the chosen release. Keep its folder, address, port and authentication argument. Repeat the login and persistence checks. Restarting alone does not change the image version. Keep the earlier folder backup and image reference for recovery; do not assume an older release can read settings modified by a newer one.
To remove a running Dozzle installation, create a disabled root task and run this once:
set -eu
DOCKER=$(command -v docker)
"$DOCKER" stop dozzle
"$DOCKER" rm dozzle
If dozzle is already stopped, use the following script instead; it skips the stop command so an unsuccessful stop does not prevent removal:
set -eu
DOCKER=$(command -v docker)
"$DOCKER" rm dozzle
If a download failed before creating a container, there is nothing to remove: inspect the task output and resolve the download error first. Avoid Container Manager's Reset action for these procedures.
The removal commands target the container named dozzle. Keep /volume1/docker/dozzle if you want its saved settings for another installation. Delete that folder in File Station only when you no longer need its credentials or settings, and delete any helper tasks. Avoid commands that remove every container or perform a system-wide cleanup.
Recover this user's password
Stop dozzle with Action → Stop or the Stop helper above, then privately back up its NAS data folder. In File Station, move the old users.yaml into that private backup location, outside the active dozzle folder. Ensure no users.yml remains in the active folder, because it takes precedence.
Recreate the Generate Dozzle user task from step 2 with a new unique password, the same username and correct DATA path. Run it, check that a nonempty users.yaml appears, then delete the task containing the password. Use Action → Start or the Start helper above to resume the existing container. Repeat step 5's fresh-session login check. This replaces this guide's single-user file; preserve and review a multi-user file before changing it.