

Install Nextcloud on a Synology NAS with Docker
Set up Nextcloud with Synology Container Manager, keep app and database files persistent, check a local upload after restart, and back up the complete project.
Eugene Gavrilov
11 min read- NAS & storage
Set up Nextcloud in a browser on your home network, upload a small file, and check that it remains after a restart. This guide uses one Container Manager project with the web app, a MariaDB database and a worker for background jobs.
Start with a non-sensitive test file. The local HTTP connection below is unencrypted; it is a first installation check before you add HTTPS or important data. The procedure follows current documentation and has not been tested on a physical NAS for this article.
Check your NAS before creating anything
You need an administrator account on a supported Synology NAS with Container Manager available in Package Center. Open Container Manager and confirm that it has a Project page. If the package or page is missing, check your model and DSM compatibility first; do not install a package meant for another model. This exact recipe requires a compatible 64-bit NAS, typically x86-64 or ARM64: the selected MariaDB image has no 32-bit build. Memory requirements depend on workload, so this guide does not promise a total-RAM minimum.
In Control Panel > Info Center > General, note the model and DSM version. Under Network, find the NAS's private IPv4 address. You will use that address twice in the configuration and once in your browser. Keep it stable with a router address reservation if available.
This is the community-maintained manual Nextcloud image, which upstream describes as intended for expert use. The fixed recipe explains its settings, but still needs ongoing administration. Nextcloud All-in-One is a separate installation method.
Know the address and the saved folders
An image is a package of software. A container runs that package. The project keeps the related containers and their settings together.
For the example NAS address 192.168.1.18, you will open:
http://192.168.1.18:8082
Replace the address with your NAS's actual private IPv4. The number 8082 is the NAS-side port for this app; the container's web server uses port 80. On a laptop, localhost would mean the laptop, not the NAS.
Keep access inside your trusted home network. Do not add features that make it reachable from outside (router forwarding, UPnP mapping, a public tunnel or a public reverse proxy). Check that existing network settings do not already expose the service. Binding to a private IP does not itself make a firewall.
In File Station, open the docker shared folder and create a folder named nextcloud. Inside it, create two empty folders: html and db. If docker does not exist, create a private project shared folder with the same empty html and db children. Whichever location you choose is your project folder throughout this guide. Restrict access to the intended administrator; do not grant Everyone write access or copy another person's UID/GID settings.
| NAS project folder | What it holds |
|---|---|
html | Nextcloud installation, configuration, uploaded data, custom apps and themes |
db | MariaDB's database files |
| Project YAML | Container settings, image versions and the credentials you enter |
The first two folders are bind mounts: they connect NAS folders to storage paths inside the containers. Keep all three parts together for backup.
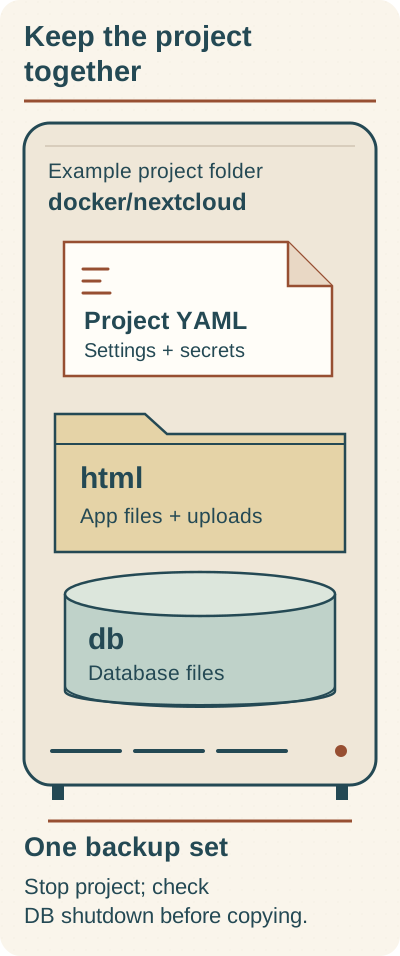
The project YAML, html folder and database folder form one backup set. Stop the project and confirm normal MariaDB shutdown before copying it; preserve ownership and permissions.
Text alternative: In the example docker/nextcloud project folder, keep the project YAML with html and db. The html folder maps to /var/www/html and includes configuration, uploaded data, custom apps and themes. The db folder maps to /var/lib/mysql. The app and cron containers share html. Stop the entire project and confirm normal MariaDB shutdown before copying the complete set, with ownership and permissions intact, to a destination outside the project.
Create the project
First make three different passwords in your password manager: one for database root, one for the application's database account, and one for the Nextcloud administrator. For the pasted configuration below, use generated passwords of at least 32 letters/digits. This chosen format avoids special-character handling in YAML; it is not Nextcloud's password-format limit. Save the three secrets and the administrator name securely. The project file will contain credentials, so restrict access and never share it unredacted.
In Container Manager > Project, click Create. Set the name to nextcloud and select the project folder you created: docker/nextcloud in this example, or your chosen private project folder. For Source, choose the option to create YAML—the text configuration that defines the project—in the editor.
An environment variable is a named setting supplied to a container when it starts. The entries under environment provide credentials and application settings.
Paste the configuration below, then make these edits before starting:
| Value to replace | What to enter |
|---|---|
Both 192.168.1.18 entries | Your NAS's private IPv4 address, without http://, a port or a path |
REPLACE_ROOT_PASSWORD | Your database-root secret |
Both REPLACE_DATABASE_PASSWORD entries | The same application-database secret in both places |
REPLACE_ADMIN_PASSWORD | Your Nextcloud-administrator secret |
ncadmin, if desired | Your chosen administrator name, set before the first start |
Keep the single quotes around passwords and the port mapping. Preserve indentation: YAML uses spaces to group settings.
services:
  db:
    image: mariadb:11.8.9-noble
    restart: unless-stopped
    stop_grace_period: 1m
    command: --transaction-isolation=READ-COMMITTED --binlog-format=ROW
    volumes:
      - ./db:/var/lib/mysql
    environment:
      MARIADB_ROOT_PASSWORD: 'REPLACE_ROOT_PASSWORD'
      MARIADB_DATABASE: nextcloud
      MARIADB_USER: nextcloud
      MARIADB_PASSWORD: 'REPLACE_DATABASE_PASSWORD'
    healthcheck:
      test: ["CMD", "healthcheck.sh", "--connect", "--innodb_initialized"]
      start_period: 60s
      interval: 10s
      timeout: 5s
      retries: 10

  app:
    image: nextcloud:35.0.2-apache
    restart: unless-stopped
    ports:
      - '192.168.1.18:8082:80'
    volumes:
      - ./html:/var/www/html
    environment:
      MYSQL_HOST: db
      MYSQL_DATABASE: nextcloud
      MYSQL_USER: nextcloud
      MYSQL_PASSWORD: 'REPLACE_DATABASE_PASSWORD'
      NEXTCLOUD_ADMIN_USER: ncadmin
      NEXTCLOUD_ADMIN_PASSWORD: 'REPLACE_ADMIN_PASSWORD'
      NEXTCLOUD_TRUSTED_DOMAINS: '192.168.1.18'
    depends_on:
      db:
        condition: service_healthy

  cron:
    image: nextcloud:35.0.2-apache
    restart: unless-stopped
    entrypoint: /cron.sh
    volumes:
      - ./html:/var/www/html
    depends_on:
      app:
        condition: service_started
The explicit image tags were listed in the official image documentation on November 4, 2026. Keep the Nextcloud app and cron image versions identical. These version tags avoid following latest automatically; they are not immutable image digests. MariaDB 11.8 is supported by this Nextcloud version.
Here is what the fixed settings do:
| Setting | Meaning |
|---|---|
./html and ./db | Folders relative to the project path selected in the wizard |
/var/www/html and /var/lib/mysql | The app's and database's storage paths inside their containers |
MYSQL_HOST: db | Connect to the database service named db within the project |
Database/user nextcloud | Matching application database and account names; these are separate from your browser login |
READ-COMMITTED and ROW | Database settings matching Nextcloud's documented requirements |
| Database healthcheck | Wait for MariaDB connectivity and InnoDB initialization before starting the app |
60s, 10s, 5s, 10 | Initial healthcheck allowance, check interval, check timeout and retry count; these are configuration choices, not measured install times |
restart: unless-stopped | Restart services automatically unless deliberately stopped |
stop_grace_period: 1m | Allow MariaDB up to a minute to shut down before termination; still check that shutdown completed normally |
/cron.sh | Run scheduled background jobs using the same Nextcloud files |
This starter project keeps Nextcloud's default database-backed file locking. It does not include Redis and is not tuned for heavy workloads.
Leave the optional Web Station portal disabled, confirm the summary, and choose to start the project. Follow its status and logs while images download and initialization runs. The database should become healthy; the app can show as running while installation is still in progress. Do not rely on a fixed wait time.
Sign in, upload a file and restart
When the database is healthy and the app is running, try the local HTTP address with your actual NAS IP. The sign-in page is your next checkpoint. If it is not ready, return to the project status and logs; initialization may still be in progress.
Use ncadmin—or the name you chose—and your saved Nextcloud-admin password. With all database/admin settings supplied, a fresh installation should skip the setup wizard. If a wizard unexpectedly appears, inspect the configuration and logs instead of choosing another database.
- On your computer, create a small non-sensitive text file called
nextcloud-check.txt. - Upload it through Nextcloud's file interface. Reopen or download it to check the contents.
- In Container Manager, select the
nextcloudproject and choose Restart. - After startup, sign in again and reopen or download the same file.
This check tells you whether your upload remains after a restart. It does not prove you have a working backup. In File Station, open html/data and db inside your selected project folder, but manage uploaded files through Nextcloud rather than moving files inside these folders yourself.
For background jobs, open Administration settings > Basic settings from the Nextcloud profile menu and select Cron. After a scheduling interval, check for a recent successful execution. The menu route comes from the source article; it was not checked against a live NAS interface.
Back up the complete project
A copy of uploaded files alone is insufficient. Keep the YAML, html and db from the same stopped installation, including hidden files, ownership and permissions.
- Select the
nextcloudproject and choose Stop. Confirm all three containers are stopped and MariaDB reports a normal shutdown. If shutdown failed or was forced, investigate before treating a raw-file copy as a clean backup. - While it remains stopped, back up the entire project folder with a method that preserves ownership, file permissions and access-control lists (ACLs). An existing Hyper Backup folder task can include this folder and use an external or remote destination.
- Confirm backup completion and check that it contains the YAML,
html/config,html/dataanddb. Keep the copy outside this project, preferably on another device. - Choose Start and repeat the file check. Do not automate this raw-folder backup against a running database.
Recovery outline: disconnect clients and stop the project. Preserve its failed state separately, then restore all the folders and configuration from that one backup, including their permissions to the original location. Redeploy using the restored YAML and its saved image versions, then start the project and check login, file download and cron. Restoring a YAML file alone does not replace existing containers. If you already use sync clients and the restored backup is older than their data, follow the official client-resynchronization guidance before reconnecting them. Its maintenance:data-fingerprint step applies to that recovery condition; do not run it indiscriminately. Do not mix database files from different dates or simply run an older image against a migrated database. This restore procedure is documentation-grounded; no hardware restore was performed for this article.
Update or stop using Nextcloud
Before updating, take a complete backup and read the image release notes. Set both app and cron to the same new explicit Nextcloud tag in Details > YAML Configurations, then redeploy with the same mounts and credentials. Confirm that the new image was downloaded and applied; repeat the file and background-job checks. Restart alone does not fetch a new image. Plan database upgrades separately.
Reach the latest maintenance release of the current Nextcloud major version before advancing to the next major. Do not skip major releases.
To undo the trial, Stop the project and keep the saved folders. For permanent removal, verify an independent backup first and read the deletion confirmation. Synology describes project Delete as deleting project data; do not treat Delete or Clean as a backup-preserving shortcut. Deleting the saved project folders removes the retained app files and database.
If a checkpoint fails
| What you see | What to check next |
|---|---|
| Container Manager or Project missing | Check the NAS model, DSM and package compatibility before making changes. |
| Images fail to download | Read project errors and check the NAS's Internet/DNS access. Broadening folder permissions will not fix a registry download. |
| Address cannot be bound or port is occupied | Use the NAS's actual private IP. For a port conflict, change host port 8082 to an unused port such as 8083 and use that in the browser; keep container port 80. |
| Database is unhealthy or rejects login | Read the DB error and compare initial names/passwords. Changing initialization variables does not reset an existing database password. Keep the db folder. |
| Untrusted-domain message | Open the configured address and follow upstream trusted-domain instructions to repair the setting. |
| Data-directory or permission error | Stop and inspect mounts, ownership and ACLs. Do not grant Everyone write access or apply an unrelated UID/GID. |
| File missing after restart | Confirm that the project still mounts the same html and db folders. Preserve them and the logs before attempting a restore. |
| Maintenance mode after update | Preserve logs/backup and follow the image's upgrade instructions; do not blindly clear maintenance mode. |
For help, record model, DSM, Container Manager version, image tags and redacted errors. Use Synology support for package issues and the Nextcloud community forum for application/image questions. Remove passwords before sharing logs or configuration. Email notifications and password recovery require later SMTP configuration; Gmail is not a prerequisite for this local file check.
Leave remote access for a separate task
A domain gives an address a name; HTTPS uses a certificate to protect browser traffic. Before adding important files or connecting from outside your home, plan that secure access separately. Do not carry the original article's public-domain, trusted-proxy or forced-HTTPS settings into this direct-IP project.
You can finish the local trial when you can open Nextcloud, retrieve the same test file after a project restart, locate both persistent folders, and find your saved credentials and configuration. Establish and verify your backup before depending on the installation. These are checks for you to perform, not claims of a completed NAS test.
Sources: Synology project controls, Nextcloud image and settings, Nextcloud image tags, MariaDB image tags, Nextcloud system requirements, background jobs, backup requirements, MariaDB cold backups, restore, upgrade policy. Documentation checked November 4, 2026; registry records exact scopes and access limitations.