

Install Radarr on a Synology NAS with Portainer
Install Radarr on a Synology NAS with Portainer, map persistent folders, open its local web interface and check saved settings after a restart.
Eugene Gavrilov
12 min read- NAS & storage
Get Radarr running in your browser, give it a movie-library folder, and check that its settings survive a restart. This guide uses an existing Portainer installation connected to the Docker environment on your Synology NAS. Keep the first installation on your home network. [F01, F05, F09]
Radarr manages a movie collection and works with separately configured indexers and download clients. Installing this container alone does not set up a downloader. Start with an empty library folder so you can check the setup before connecting valuable files. [F01, F08]
The route is: check support, prepare folders and permissions, deploy the stack, configure Radarr, then restart and check its saved settings.
Gather these details first
You need administrator access to DSM, a functioning container package on your NAS, and Portainer already managing that NAS. If Portainer shows another computer's Docker environment, stop: the folder paths below must belong to the machine actually running Radarr. This is a Portainer deployment guide, not a Portainer installation guide. [F02, F06]
Check your model and DSM release before installing anything. Use Synology's Container Manager package listing for your exact model to confirm container-package availability; an image supporting your processor does not establish that DSM supports the required package. LinuxServer currently lists x86-64 and arm64 for this image, without making every Synology model compatible. [F02]
Write down your NAS's local IP address, the actual storage paths, and the user and group IDs you will obtain below. In examples, 192.168.1.50 is an illustrative NAS address. Use the address you use to reach this NAS over your home network, not a public domain or a remote-access link. [F05]
An image is the packaged application; a container runs it. Portainer's stack is the saved Compose configuration used to create that container. The NAS container package runs the application; Portainer gives you a management interface for it. A bind mount connects a NAS folder to a folder inside the container so files can live outside the container. [F06, F12]
Create folders and choose the account
Choose a shared folder for container data. If none exists, in DSM 7 open Control Panel → Shared Folder → Create → Create Shared Folder, name it docker, select its storage volume and complete the wizard. An existing suitable share is also fine; Portainer does not need to create it for you. In File Station, open that share, create radarr, then create config, movies, and downloads inside it. For an illustrative NAS using volume 1, their full paths are: [F03]
/volume1/docker/radarr/config
/volume1/docker/radarr/movies
/volume1/docker/radarr/downloads
In File Station, right-click the newly created config folder, select Properties → General, and copy its Location path. Record the full paths for movies and downloads the same way. These recorded paths replace the complete NAS-side paths in Compose; if your share is /volume2/containers, replace every example /volume1/docker prefix with /volume2/containers. Do not guess the volume number. [F16] The config folder holds Radarr's database and settings; movies is the final library, and downloads is the download client's output location. Downloads and the final library must be different folders. [F03, F08]
Choose the DSM account whose identity Radarr will use. For a newly created, dedicated container-data share, open Control Panel → Shared Folder, select the share, then Edit → Permissions. Select local users, grant your chosen account Read/Write, and save. If you use an existing share, avoid widening access to unrelated data; inspect its current permissions before changing them. [F04, F17]
In File Station, right-click radarr and open Properties → Permission. Inspect the selected account's entries and the Inherit from information. If the new empty folder needs an explicit rule, choose Create, select that account, choose Allow, and grant Read and Write; apply the rule to this new folder and its child folders/files, then save. Check config, movies and downloads under the same Permission tab. Advanced options → Permission Inspector lets you select the account and inspect its effective access. [F17]
If /movies is still unwritable, stop setup. Compare the deployed IDs and bind path with your recorded values, then inspect this folder and its parent share. Do not recursively change an existing library or grant access to everyone. DSM ACL settings do not eliminate the need to check actual container access. [F04, F17]
Get the real PUID and PGID
PUID means the numeric user ID; PGID means the numeric group ID. They are not your password, and numbers copied from someone else's NAS may identify a different account on yours. Obtain the IDs from the NAS, not from your laptop. [F04]
If your NAS administrator can supply the results of id for the selected DSM account, you can skip using a terminal yourself. Otherwise, SSH provides a brief command-line connection to the NAS. You do not need to become root to read account IDs. [F04, F13]
- In DSM, open Control Panel → Terminal & SNMP → Terminal, enable SSH and note the configured SSH port. Enable it only when needed. [F13]
- Open Terminal on macOS/Linux or a terminal with an SSH client on Windows. Connect using your NAS administrator account. This illustrative command uses SSH port 22; replace the username, address and port with your actual values: [F13]
ssh [email protected] -p 22
Before accepting a first-connection host-key prompt, verify that the address and fingerprint belong to your NAS, using a trusted record or your NAS administrator. If you cannot verify it, stop. An unexpected changed-host-key warning also means stop and investigate; do not bypass it. At the terminal password prompt, characters normally remain invisible while you type; enter the password and press Enter. [F18]
- After connecting, run
idfor the account chosen for Radarr. Replaceradarruserwith its actual DSM username: [F04]
id radarruser
For an illustrative result of uid=1030(radarruser) gid=100(users), record 1030 for PUID and 100 for PGID. Use your result, not these examples. If the account is not found, correct its name before continuing. Type exit to disconnect; turn off SSH if you enabled it solely for this step and no other task needs it. [F04, F13]
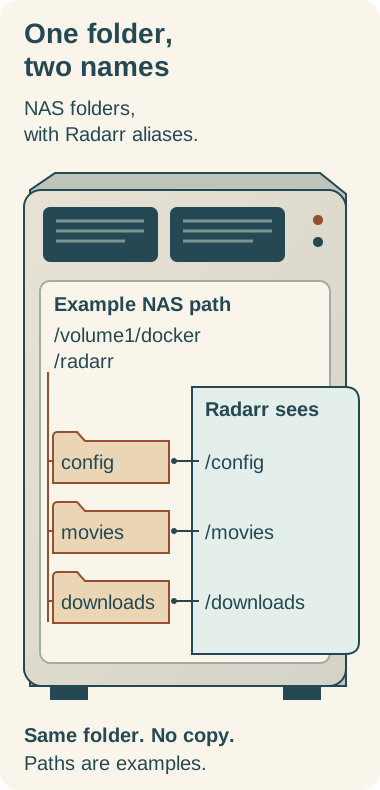
A folder mapping gives Radarr a shorter name for a folder stored on your NAS. It does not copy the files. [F03, F07, F12]
The example mappings are:
/volume1/docker/radarr/config→/config: application settings and database./volume1/docker/radarr/movies→/movies: finished movie library./volume1/docker/radarr/downloads→/downloads: download-client output.
Each pair names the same folder from two environments; it does not copy files. Use the left-hand path in File Station and the right-hand path inside Radarr. If you later connect an existing library, change only the NAS-side movie path to that library's actual location after backing it up and checking permissions. [F03, F07, F12]
Deploy the Compose stack
In Portainer, select the NAS environment. Open Stacks → Add stack, name it radarr, and choose Web editor. Paste the following configuration. Before deployment replace all five marked example values: the PUID, PGID, and three NAS folder paths. TZ sets the timezone used inside the container. Keep the documented example value Etc/UTC, or choose a timezone identifier in the same region/city format from the list linked in the image documentation’s environment-variable section. [F06, F07]
services:
  radarr:
    image: lscr.io/linuxserver/radarr:latest
    environment:
      PUID: "1030"  # replace with your NAS user's uid
      PGID: "100"   # replace with that user's gid
      TZ: Etc/UTC
    volumes:
      - /volume1/docker/radarr/config:/config
      - /volume1/docker/radarr/movies:/movies
      - /volume1/docker/radarr/downloads:/downloads
    ports:
      - "7878:7878"
    restart: unless-stopped
The left side of each folder mapping is on the NAS; the right side is what Radarr sees. For example, the NAS movie folder appears as /movies inside Radarr. These are writable mappings: Radarr can modify files in the mounted folders. [F07, F12]
7878:7878 connects NAS port 7878 to Radarr's web interface. The latest image tag follows stable releases; it is not a fixed version. Save the Compose text outside Portainer too. The unless-stopped restart policy restarts the container unless you stop or remove it. [F05, F07]
This simple layout uses separate /movies and /downloads mounts. LinuxServer documents a tradeoff: this layout prevents hardlinks and atomic moves between those mounts. In practice, importing may copy the movie and use extra space rather than share its existing file data or move it instantly. If those features matter for your downloader workflow, plan a shared data mount with the Servarr Docker guide before connecting an existing library. [F07]
Choose Deploy the stack. If Portainer rejects the stack before creating a container, read the deployment error and check the YAML and edited values. If a Radarr container was created but stops or keeps restarting, open Containers in the selected NAS environment, select the Radarr container, then select Logs. Read the startup error before changing the configuration. Check that the container is running. A deployment message does not replace checking the application in a browser. [F06, F10]
Open Radarr locally and save its first configuration
On a computer on the same home network, open http://192.168.1.50:7878, replacing the address. The number after the colon is the port, which selects this application on the NAS. If 7878 is occupied, use an available host port: for example, change the mapping to "17878:7878" and open http://192.168.1.50:17878. Keep the container-side 7878 unchanged. localhost on your laptop refers to the laptop, so use the NAS address. [F05]
No domain name, DNS change or HTTPS certificate is needed for this local-IP check. HTTP does not encrypt the connection; use a trusted local network. Do not add a router port-forward or publish a reverse proxy for this first setup. A published Docker port can be reachable on the host's network interfaces; home-network use is a setup choice, not a guarantee supplied by the Compose file. [F05]
At the authentication setup, choose Forms (Login Page), keep authentication required Enabled, and save your own username and unique password. Record them in your password manager. If the authentication screen differs, pause setup and compare your installed release with the official Radarr authentication guidance. Keep authentication enabled; do not use a bypass to force the tutorial’s screen sequence. [F09]
Open Settings → Media Management, add /movies as the root folder and save. Choose the container path, not /volume1/docker/radarr/movies. A root folder is the final location of the organized library. If it is missing or unwritable, fix the mount or account permissions before importing anything. [F03, F08]
Do not configure indexers or download clients yet. For the first check, the saved login and root-folder setting are enough; you do not need to trigger a download. [F08, F14]
Restart and check persistence
Record the /movies root-folder setting. In Portainer, open the Radarr container and restart it using the container controls. Wait for it to run, reopen the same local URL, sign in and confirm that /movies remains configured. In File Station, confirm the NAS config folder now contains application files; leave those files in place. [F07, F10, F14]
If the first-run screen returns or the root folder disappears, stop here and compare the deployed /config mapping with the NAS folder you created. The restart check verifies saved configuration on your installation; it does not verify downloader integration or backup restoration. [F12, F14]
When you later add a download client, it must report paths Radarr can actually access. Check its host-folder mapping against Radarr's /downloads mapping before enabling automation. [F08]
Back up, update and recover
Open System → Backup in Radarr, create a backup and download the ZIP somewhere outside this NAS. Save the stack text too. Back up movie files separately; a settings backup is not a copy of the library. [F11, F12]
For a file-level configuration backup, stop Radarr first, copy the complete NAS config folder to your backup destination, then start it again. Keep the folder paths and permissions recorded with the copy. Do not treat copying a live database as an equivalent procedure. [F11]
An image update recreates the container; a restart alone does not fetch one. Use the container-image update process, rather than Radarr's in-app updater. Before updating, read LinuxServer's complete image-update procedure and the Portainer web-editor stack instructions. Those documents explain replacing the image and applying stack changes. [F10, F15]
This installation guide does not provide a complete downgrade procedure. Before attempting an update, arrange a recovery procedure with your NAS administrator that includes obtaining a usable record of the current image and a matching backup. Saving a stack that says latest does not preserve that running image version. A local image ID is not necessarily a pullable registry digest, and an older Radarr image must not be started against a database upgraded by a newer release. The Servarr backup/restore instructions explain stopped file-level restoration and restoring a ZIP in a compatible installation; use those instructions when planning recovery. Do not treat changing the image tag or merging backup files into a failed configuration folder as rollback. [F11, F15]
If an update has already failed, stop the container and preserve the configuration, stack and backup before seeking recovery help. Leave movies and downloads untouched. After any supported update or restore, repeat the local login, /movies and persistence checks before enabling automation. [F11, F14, F15]
Fix common problems, or remove the installation
| What you see | What to check first |
|---|---|
| Stack fails to deploy | Read the error. Check YAML spacing, the selected NAS environment, folder paths, and whether host port 7878 is already occupied. [F05, F06] |
| Container runs but page will not open | Check the NAS address and http:// URL, port mapping, local network connection and applicable firewall rules. Use Containers → your Radarr container → Logs as described above. Do not solve this by exposing the port to the internet. [F05, F10] |
/movies is missing or unwritable | Confirm its mapping and the chosen account's read/write access. Recheck PUID/PGID instead of copying another NAS's numbers. [F04, F08] |
| Settings disappear | Compare /config with the intended persistent NAS folder before saving new settings. [F07, F12] |
| Download imports fail later | Compare the download client's reported path with Radarr's mounts; keep downloads separate from the final library. [F08] |
To undo the installation, stop and delete its stack in Portainer. Keep the NAS folders until you have a backup and are sure you want to discard them. Removing the container is separate from deliberately deleting the bind-mounted folders in File Station. Never remove an existing movie library merely to uninstall Radarr. [F10, F12]
If the local login works, /movies is configured, and the setting remains after restart, you have completed this local installation check. Connecting an indexer and download client is a separate next task. [F08, F14]
For help, use the LinuxServer Radarr image documentation, Servarr quick-start guide, Servarr backup and recovery FAQ, and Portainer stack documentation. Before sharing logs or your stack, remove passwords, API keys and private addresses you do not want to disclose.
Documentation checked on 4 November 2026. This is a source-grounded procedure; it does not claim a physical Synology installation or restore test.