

How to Install Deemix on Synology: Folders, Ports and First Checks
Set up the documented Deemix container with Synology Container Manager, map settings and downloads, check local access, and test saved settings.
Eugene Gavrilov
9 min read- NAS & storage
The original guide describes Deemix as a Deezer music downloader. This walkthrough installs its documented web interface on your home network, with separate NAS folders for its settings and downloads. A Container Manager project keeps the application configuration in one Compose file.
Source and scope: The recipe below follows the Bockiii container repository and Synology’s Project help. The retrieved repository master dates to June 2, 2023; this guide has not been run on a physical NAS and does not establish present image availability, login compatibility or download success. Use Deemix only for material you are entitled to download.
Check your NAS before starting
Open Package Center and look for Container Manager. Install and open it if it is offered. These steps use that package’s Project screen; they do not establish support for every Synology model or cover the older Docker package’s screens.
An image is the packaged application, and a container is the instance you run from it. The repository documents amd64, arm32v7 and arm64v8 image builds. If Container Manager cannot retrieve a matching image, stop and check the repository error before proceeding. Do not substitute a similarly named image.
Keep this installation on a trusted home network. Do not configure router port forwarding, a public tunnel or a web portal. Publishing the app’s port does not itself restrict access to your home network; use NAS and network access rules that allow only the devices you intend.
Give settings and downloads their own folders
A folder mapping connects a folder on your NAS to a path inside the container. The documented container uses /config for configuration and /downloads for downloaded music. Separate NAS folders make both locations easy to identify.
If File Station has no docker shared folder, create one through Control Panel > Shared Folder > Create > Create Shared Folder. Name it docker, choose the storage volume in Location, and complete the wizard with access limited to the people who need it. This is the new-share creation route in Synology’s DSM 7.0+ tutorial; you do not need to move an existing share.
In File Station, open docker, create deemix, then create config and downloads inside it. Right-click each new folder and open Properties. If it displays a full Location path, record it, including the final config or downloads folder name. Synology’s older File Station materials document Properties and a full Location path; the exact current field placement has not been observed for this guide.
If the full path is missing or ambiguous, stop and consult File Station Help or obtain help identifying it before filling in Compose. Do not guess /volume1. The examples below apply only when the shared folder is on volume 1.
Settings
- Example NAS folder:
/volume1/docker/deemix/config - Container path:
/config
Downloads
- Example NAS folder:
/volume1/docker/deemix/downloads - Container path:
/downloads
These are replaceable NAS paths. Use your actual volume and folder locations on the left side of each mapping below; keep the container paths on the right unchanged. Use the parent deemix folder as the project’s working directory.
The configuration folder can contain saved login information. Restrict who can read it and protect any backup of it as account data.
Find your NAS’s local address
An IP address identifies the NAS on your network. Local access here means connecting from a device on that same trusted network; remote access from outside it is outside this setup. A hostname or domain name is a name used to reach a machine instead of typing its IP address.
If you do not know the local IP, follow Synology’s device-discovery instructions. Use Web Assistant or the Synology Assistant desktop utility, available through Download Center > Desktop Utilities, on a computer on the same local network as the NAS. Follow the linked instructions for the full network requirements. Identify your own NAS in the results and record its local IP. Use that address, not your internet connection’s public address. Do not reset the NAS for this step.
Create a Container Manager project
Compose is the configuration format accepted by Container Manager’s Project wizard. Its file describes the image, folder mappings and port the project will use. A port is the numbered connection point used to reach the application: this recipe maps NAS port 6595 to container port 6595.
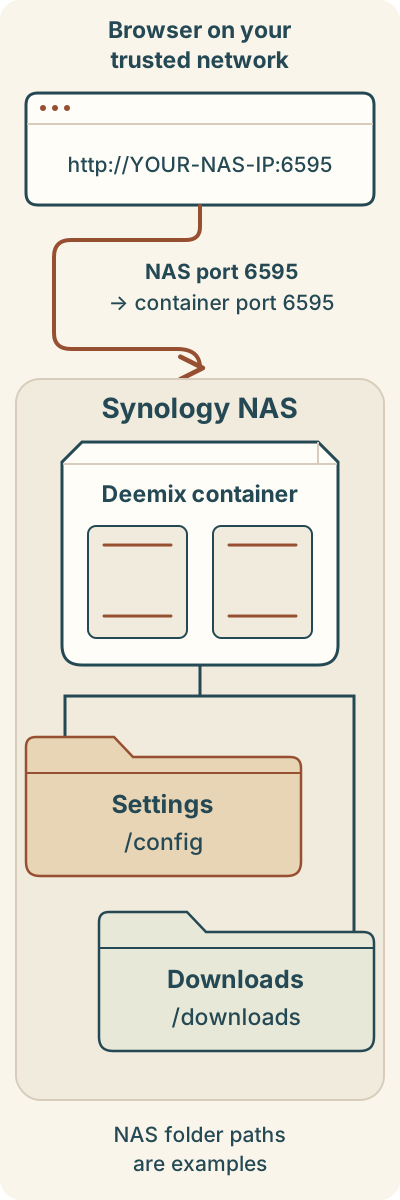
A local browser connects through NAS port 6595 to container port 6595. The Settings and Downloads folders represent the mappings listed above; NAS folder paths are examples. Check access restrictions separately before starting.
Text alternative: Inside the NAS, /config maps to the example settings folder /volume1/docker/deemix/config, and /downloads maps to /volume1/docker/deemix/downloads. Use your recorded NAS folder paths. Browser access uses the NAS’s local IP address and port 6595; access restrictions must be checked separately before starting.
Before pasting the configuration: confirm that both NAS folders exist, you have recorded both full paths, and you have the NAS’s local IP. If any value is uncertain, resolve it before continuing.
- In Container Manager, select Project > Create and name the project
deemix. - Set Path to the parent
deemixfolder you prepared. Under Source, choose the option to createdocker-compose.ymlin the editor. - Paste this configuration. Before continuing, replace both
/volume1/docker/deemix/…paths if they differ from your NAS paths.
version: '3.3'
services:
  deemix:
    image: registry.gitlab.com/bockiii/deemix-docker:latest
    volumes:
      - /volume1/docker/deemix/config:/config
      - /volume1/docker/deemix/downloads:/downloads
    environment:
      - DEEMIX_SINGLE_USER=true
    ports:
      - "6595:6595"
This is a minimal adaptation of the repository’s Compose example. latest is a changing image tag, not a promise of a recent release. The optional user/group identity and file-mask overrides are omitted, so this file does not select a NAS user or group for the container. Folder permissions may still need attention if the application cannot write. Do not add someone else’s PUID=1026 or PGID=100 as if they were your NAS identity.
DEEMIX_SINGLE_USER=true makes browser sessions share one login. The repository says to log in through the web interface; it says legacy ARL environment content is ignored, so do not add a token to this file.
The mapping 6595:6595 makes the app available through the NAS’s network connections; it does not limit access to your home network by itself. Complete the access check below before starting.
- Leave the optional Web Station portal disabled. Review the configuration and finish creating the project without starting it until the access check below is complete.
Before starting — required access check: review Control Panel > Security > Firewall using Synology’s firewall guidance. It explains source-IP and port rules, rule order, network interfaces and default actions. Confirm which devices the effective NAS/network rules permit to reach port 6595; only your intended trusted devices should be allowed. Merely enabling the firewall or seeing an allow rule does not establish that restriction, and this guide does not verify container-port filtering on your setup. Do not add router forwarding or a public portal. If you cannot confirm the permitted devices, leave the project stopped and obtain setup help before continuing.
- Only after that check, select the created project and use Action > Build if it has not already been built. Wait for the build to complete without errors, then use Action > Start. If the project is already built, use Action > Start.
- In Container Manager > Project, select
deemixand open Details > Containers to identify its container. Inspect Overview for project/container status and running-resource usage. If the desired container is stopped or reports an error, resolve that before opening the browser. An overall Healthy status does not establish successful login or downloads.
Open the interface and check that settings survive a restart
From a device on the same network, open http://YOUR-NAS-IP:6595. Replace YOUR-NAS-IP with the NAS’s actual local IP address. For example, only if your NAS address is 192.168.1.50, use http://192.168.1.50:6595. That example address is not a value to copy unchanged. No domain name or certificate is needed for this first local HTTP check.
Work through these checks yourself:
- Open the page. A reachable interface establishes that you can connect to the app. It does not establish that Deezer login or downloading works. The documented login route is through the web interface; keep account and session details private.
- Save a harmless setting. Choose one the interface lets you save. Record its original value, change it, and save.
- Restart and check again. Use Project > Action > Restart, reopen the interface, and check whether the saved value remains. Restore the original value afterward.
- Inspect storage. Look in your mapped
configfolder for application-created content. A file you manually place there does not demonstrate that the app saved its own settings.
You do not need to download music to perform the settings check. If you later download an authorized sample, check the mapped downloads folder for its output. An empty folder is not evidence of successful downloading.
If something fails
Container Manager is unavailable
Check package availability for your NAS. This route requires Container Manager.
The image cannot be pulled
Keep the exact error and consult the repository, including whether a matching architecture is available.
The container does not start
Check Container Manager’s activity Log for management warnings or errors. Record the message before changing the configuration.
The browser cannot connect
Check the container state, actual NAS IP, port mapping and local access rules. Check whether NAS port 6595 is occupied. If you change the host port, change the first number in the mapping and use it in the browser URL.
Settings or downloads cannot be written
Recheck the mapped NAS paths and folder permissions. If an identity override is needed, obtain the correct NAS user/group IDs before adding it; do not grant everyone write access as a blanket fix.
The page opens but login or downloads fail
Inspect the application’s reported error separately from the container connection checks. Opening the interface does not prove current upstream compatibility.
Stop safely and keep your files
For an immediate undo, select the project and use Action > Stop. Leave the NAS folders in place while you inspect the installation.
Before updating or removing anything, stop the project and copy config, downloads and docker-compose.yml to a separate backup location outside the project folder. Check that the copies are present and protect the configuration backup. A settings backup alone does not preserve the application image.
This guide’s recovery steps stop at stopping the project and backing up its files. Before replacing the application image, consult the container repository and Synology’s Project help for an update procedure appropriate to your installed package. The latest tag does not guarantee a newer release. Repeat the page, saved-setting and folder checks after a change.
For permanent removal, verify the separate backup before using Delete. Synology describes that action as deleting containers and project data: do not assume it preserves your files. Delete the original NAS folders only after deciding their contents are no longer needed.
Your initial setup is ready to assess when the container runs, the local interface opens, a saved setting survives a restart, and you can identify both mapped NAS folders. Treat login and download results as separate checks.