

Install File Browser on Synology for a Local Test
Install the archived File Browser app in Synology Container Manager for a local disposable-file trial, with folder mappings, login and removal checks.
Eugene Gavrilov
10 min read- NAS & storage
File Browser gives you a web page for uploading and managing files in a folder on your NAS. This guide installs the original filebrowser/filebrowser application in Container Manager, with a separate test folder you can inspect in File Station. It is a file manager, not a web browser for visiting websites.
Read this before installing: the original project has ended maintenance. Its final planned release, v2.63.23, is dated July 27, 2026. The maintainer says there will be no more bug or security fixes, and GitHub records the repository as archived on August 31, 2026. Use this procedure only for a trial on an isolated home network, with disposable files and an understanding of these limits. For everyday access to valuable files, keep using DSM File Station rather than making this abandoned application part of your storage workflow. A local address reduces exposure but does not make unsupported software secure.
A second limit is permissions: this recipe runs the app as root to avoid guessing Synology user IDs or changing permissions across a shared folder. Root has broad privileges over the attached folders; this is why the recipe attaches only empty trial folders. It is not a safe sandbox. Read the permission explanation beside the configuration before starting.
This is a documentation-based procedure, not a report of a physical Synology test. Some File Station and container-log labels are supported by source instructions with version limits rather than independently verified on a current NAS; your package may show slightly different wording.
What you need
Use a NAS on which Package Center offers Container Manager, an administrator DSM account, and a computer connected to the same trusted home network. Install the compatible package offered for your model and DSM version. Container Manager first required DSM 7.2; newer package builds have higher requirements, so do not assume every DSM 7 NAS can run the same build. If the package is unavailable, stop here rather than installing a package intended for another model.
A Docker image is the packaged application; a container is a running instance made from it. Removing a container is different from deleting the folders that hold its files. We will place those folders on the NAS and attach them to the container, a mechanism called a bind mount.
Keep the trial private: do not add a router port-forward, reverse proxy, public share link, DDNS address, or Web Station portal for it. Use only nonsensitive samples: the example uses ordinary unencrypted HTTP. A domain name is a readable address resolved by DNS; neither is needed to open a private numeric NAS address. HTTPS uses a certificate to protect the connection, but adding HTTPS would not restore this project's maintenance.
1. Find your NAS address and prepare its folders
A LAN, or local area network, is your home network. An IP address identifies a device on that network; a port selects a service on that device. You will use the NAS address and a new app port to reach File Browser from your computer.
Look at the address you use for DSM. For an illustrative DSM address of https://192.168.1.50:5001, the NAS address is 192.168.1.50. If you normally use QuickConnect or a domain, find the NAS's private LAN address in DSM's network settings before continuing. The example below assumes 192.168.1.50; replace it with your own address. This is not your computer's address or the container's internal address.
The storage arrangement will be: your home browser → NAS address and app port → File Browser → your chosen test folder. The app also attaches separate database and configuration folders. Those NAS folders sit outside the replaceable container. Persistent storage is not a backup.
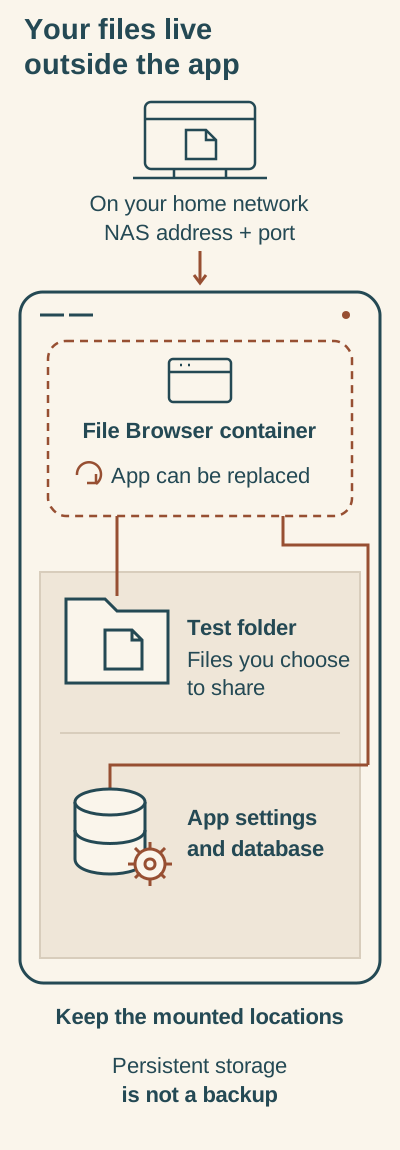
File Browser accesses test files and app settings and database in mounted NAS locations outside the container itself. Keep those locations when replacing the app.
The File Browser container uses mounted NAS storage for the test folder and app settings and database. The latter are separate mounted folders, grouped together in the diagram. Keep these NAS locations when replacing the container. Persistent storage does not replace a backup. Back up these locations before deleting a Container Manager project; project deletion may also delete data.
In File Station, open an existing shared folder intended for container trials, such as docker. Create filebrowser-trial, then these three empty folders inside it:
filebrowser-trial/
  files/
  database/
  config/
Right-click filebrowser-trial, open Properties, and find its full location. For example, it may be /volume1/docker/filebrowser-trial; another NAS may use a different volume. Use your actual location in all three mount lines below. Do not assume /volume1 is correct. Do not download a prepared database or create an empty filebrowser.db file: the application initializes its own database.
Only disposable uploads belong in files. Keep config and database out of the folder that the web interface can browse. Before continuing, confirm that all three folders exist, are empty, and sit inside the filebrowser-trial folder whose full location you recorded.
2. Create a Container Manager project
Open Container Manager → Project → Create. Set Project Name to filebrowser-trial, select the filebrowser-trial folder for Path, and choose the Source option that creates docker-compose.yml with the editor. A Compose file is a short set of instructions for starting the container.
Paste this configuration. First replace 192.168.1.50 with your NAS address. In each of the three lines under volumes, replace /volume1/docker/filebrowser-trial with the full folder location you recorded. Leave the ending folder names (files, database, and config) and the paths after the colon unchanged. Preserve the spaces and quotation marks.
services:
  filebrowser:
    image: filebrowser/filebrowser:v2.63.23
    container_name: filebrowser-trial
    user: "0:0"
    restart: unless-stopped
    ports:
      - "192.168.1.50:8147:80"
    volumes:
      - /volume1/docker/filebrowser-trial/files:/srv
      - /volume1/docker/filebrowser-trial/database:/database
      - /volume1/docker/filebrowser-trial/config:/config
Permission tradeoff: user: "0:0" runs this container as root, which has broad privileges over the directories you attach. This is an explicit convenience for this disposable trial, avoiding guessed Synology user IDs and blanket permission changes. Mount only these three trial folders: never substitute an entire volume, your home folder, or your photo library. Root in a container is not the same as a safe sandbox. The image normally uses numeric user and group 1000:1000; a long-term deployment would require a deliberately configured non-root identity and folder permissions, alongside maintained software.
The important fields mean:
| Setting | Meaning |
|---|---|
image | Selects the original app and its specific final version, rather than a moving latest tag. |
container_name | Gives this instance a recognizable name in the container list. |
restart | Allows automatic restarts while respecting a deliberate stop. |
192.168.1.50:8147:80 | Publishes container port 80 as NAS port 8147, on that NAS interface address. |
files:/srv | Makes the trial files available inside the web interface. |
database:/database | Keeps the account database outside the container. |
config:/config | Keeps the configuration outside the container. |
Each line under volumes contains two paths separated by a colon. The left path is the real folder location on your NAS; the right path is where the app sees that folder inside its container. These are writable mounts: deleting a file through the app deletes that file from the mounted folder. No environment variables are needed in this recipe. You may see other instructions that set user and group IDs with PUID and PGID. Those instructions are for the separate s6 image; they do not apply to the image used here.
Leave the optional Web Station web portal disabled. Review the summary, finish the wizard, and choose to start the project. If it fails, read its error before changing permissions or ports.
3. Retrieve the first password and log in
Once the project starts, check that filebrowser-trial appears as running in the container list. If it stops again or repeatedly restarts, use the troubleshooting steps below before proceeding.
In Container Manager → Container, select filebrowser-trial and open Details → Log. Find the generated password for user admin. Save it privately immediately; the initial password is printed only during database creation. The log may contain this secret, so do not post it publicly.
On your computer, open http://192.168.1.50:8147, using your actual NAS IP. 8147 selects this app; DSM's 5000 or 5001 port opens DSM instead. Sign in as admin with the generated password, not admin/admin. Use the account password control in File Browser's settings to replace the generated secret with a unique password, then sign out and confirm the new password works. File Browser credentials are separate from your DSM login.
4. Check where a file goes and whether it stays
Create a harmless file on your computer called filebrowser-check.txt, with the illustrative contents Local trial file. Upload it through File Browser. Then look in File Station → your shared folder → filebrowser-trial → files and confirm the same file is there.
In Container Manager → Project, select this project and choose Action → Restart. After it starts, sign in again and confirm that the file is still present and your new password still works. These are checks for you to perform, not results we have observed. If either fails, stop and check the mount paths before uploading anything else.
If something goes wrong
- The image cannot be downloaded: check NAS internet access and the exact image name. An unavailable architecture or registry error is a reason to stop and inspect the error; this guide does not establish compatibility with every model.
- “Address already in use”: another service may have port
8147. Change only the middle number inNAS-IP:8147:80, for example to8148, redeploy the edited project configuration, and use that number in your browser. - “Cannot assign requested address”: verify the address before the first colon is currently assigned to this NAS. If the NAS address changes later, update the binding and browser URL; do not fix it by publishing on every interface.
- “Permission denied” or a restart loop: read the container log and check that all three source folders exist and match the intended locations. Do not grant everyone write access to an entire share. Folder access rules (ACLs) can require NAS-specific attention beyond this untested recipe. If the error remains after checking the paths, stop here.
- The browser cannot connect: confirm the container is running, the address/port is correct, and the computer is on the trusted LAN. Check your network's access rules without disabling protection globally. Binding the app to one NAS address is not a substitute for network isolation; do not rely on DSM's firewall alone as proof a Docker port is private.
- The initial password is missing: inspect the original container's logs, not only Container Manager's activity log. For a fresh disposable trial only, stop the project, back up its folders, rename
database/filebrowser.dbtofilebrowser.db.savedin File Station, then start it again and retrieve the newly generated password. This resets File Browser accounts/settings; it is not password recovery for an established installation. Leavefilesuntouched.
Stop, back up, or remove the trial
To pause the experiment, use Project → Action → Stop. This leaves the project available to start later.
Before removing it, stop it and copy the entire filebrowser-trial folder to a separate backup location using File Station. Include files, database, config, and the Compose file. Also download the sample upload and open the copy on your computer. Do not treat a container export as a backup of your mounted files.
For removal, keep that separate copy before using the project's deletion option. Synology describes Delete as deleting containers and project data; do not assume the dialog preserves everything. Read it carefully, retain the original trial folders if offered, and confirm the independent backup remains accessible afterward. Delete the trial files manually only when you intend to erase them.
Do not turn on automatic image updates for this exercise or switch image families to chase a newer version. Upstream promises no further fixes. If evaluating a maintained alternative later, treat it as a new application: retain this backup and follow that project's own paths and migration instructions. To recover this trial, recreate the same project with the same version and restored three folders. This recovery plan has not been tested on a NAS.
For package and DSM issues, use Synology support. For application behavior, consult the archived official installation documentation; do not expect the archived project to provide new fixes.
Sources
- File Browser final release and maintenance notice
- Versioned File Browser installation instructions
- Versioned Docker image definition
- Versioned default settings and image initializer
- Synology Container Manager release notes and Project help
- Docker bind mounts, Compose service settings, published ports, and container runtime