

How to install PrivateBin on a Synology NAS and share your first paste
Install PrivateBin with Synology Container Manager, connect a prepared HTTPS hostname, and check a sample paste after restart. Includes backup and safe removal.
Eugene Gavrilov
11 min read- NAS & storage
You want to share a short note as a link instead of copying the text into a conversation. PrivateBin runs on your NAS and lets you save a piece of text, called a paste, and create a link to it in a browser. This guide walks through installing it, creating a harmless sample and reopening that sample after a container restart.
The setup below is for access within your home network. It requires an existing HTTPS hostname that works on that network. It follows documented PrivateBin image and DSM features; the installation and recovery procedure have not been tested on a physical NAS.
Understand the address before installing
PrivateBin encrypts a paste in your browser. The complete paste link includes its decryption key after the # character. Someone with an unprotected complete link can read the paste, and a recipient can keep a copy. Treat that link as private; encryption does not remove the need to trust whoever operates the installation.
Your NAS has a local IP address, such as 192.168.1.50, which identifies it on your home network. A hostname is its readable name. A hostname can sit within a domain you control: notes.your-domain.com is an illustrative hostname throughout this guide, not an address to use. Replace it with your real prepared hostname. A port identifies a particular service at an address.
HTTPS encrypts the browser connection and uses a certificate to establish that the hostname matches the service. PrivateBin requires HTTPS with a trusted certificate covering the name you use. Opening an ordinary HTTP NAS IP address is not a suitable alternative.
In this setup, DSM's reverse proxy receives the HTTPS connection and passes it to PrivateBin on the NAS. The app's port is available only to the NAS itself. Recipients must be able to reach your HTTPS hostname on the local network; installing this app does not give people outside your home access.
Have these prerequisites ready
Before making changes, check the following:
- You have an administrator account on a Synology NAS running DSM 7.2 or later, with Container Manager available in Package Center. Install that package. If it is unavailable for your model, stop: this procedure does not apply.
- You know your NAS's stable local address and have arranged for it to remain stable.
- DNS translates a readable hostname into an IP address. Your real hostname must resolve to the NAS's local address on every device you plan to use.
- DSM already has a trusted certificate covering that exact hostname. You will assign it to the reverse-proxy service later.
- File Station has an existing
dockershared folder in which you can create the app's folders.
Hostname registration, certificate acquisition and router or client DNS configuration are prerequisites, outside this installation procedure. Synology DDNS alone does not establish local access: its name normally points to a public address. If local resolution or the matching certificate is missing, finish that setup before continuing. No router port forwarding is required by these instructions.
Give PrivateBin a data folder
An image is the packaged app; a container is a running instance of it. Container Manager's Project records how to run that container in a YAML settings file. A separate NAS data folder keeps saved paste files outside the container so that replacing the app does not mean replacing those files.
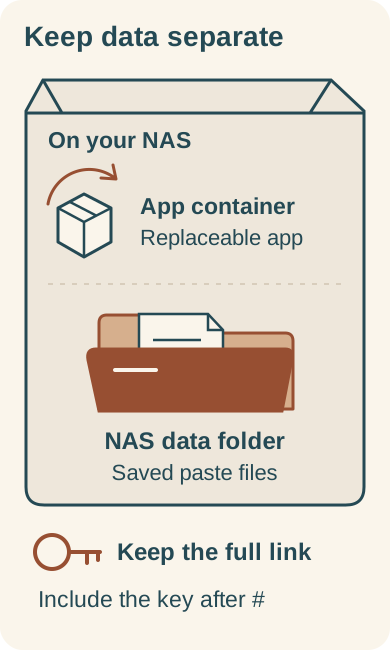
The app container and NAS data folder have different jobs. Keep the complete paste link as well.
The container runs the app; the mapped NAS folder holds saved paste files outside it. Keep complete paste links privately, including their decryption keys after #. Preserving files does not replace a missing key.
- In File Station, open the existing
dockershared folder. - Create a folder named
privatebin. - Inside it, create a folder named
data. - Open the folder's Properties → General → Location to determine its actual volume path. The examples below use
/volume1/docker/privatebin/data. If your volume differs, replace that path in both the commands and the YAML. Use this new folder, not a folder containing unrelated files.
The app saves files using user ID 65534 and group ID 82. The following one-time administrative task gives that app identity ownership of the data folder. These commands affect only the named folder; they do not recursively change the shared folder. They assume ordinary Docker user IDs without user-namespace remapping.
- Open Control Panel → Task Scheduler → Create → Scheduled Task → User-defined script.
- Name the task
Prepare PrivateBin data, select userroot, and leave Enabled unchecked. Set a one-time schedule without repetition. - Under Task Settings, paste the following, using the folder path you verified:
chown 65534:82 /volume1/docker/privatebin/data && chmod 750 /volume1/docker/privatebin/data
- Save and acknowledge DSM's administrative confirmation.
- Before running it, open Task Scheduler Settings, enable Save output results and choose an output folder. Select the task and click Run, then use Action → View Result to inspect the output and status. Resolve any error before continuing, then delete the task so it cannot run accidentally later.
DSM access-control rules can still restrict this folder. Do not respond to a later permission error by giving everyone access or using chmod 777; check the app log and the folder's permissions first.
Create and start the project
The configuration below maps NAS port 8092 to the image's internal port 8080. Its 127.0.0.1 address means only the NAS itself can reach port 8092. The reverse proxy will provide the browser-facing connection.
- Open Container Manager → Project → Create.
- Set Project Name to
privatebinand Path to yourdocker/privatebinfolder. - For Source, choose to create a
docker-compose.ymlwith the editor. - Enter this YAML, changing the NAS data path if necessary. Keep the indentation.
services:
  privatebin:
    image: privatebin/nginx-fpm-alpine:2.1.0
    restart: unless-stopped
    read_only: true
    ports:
      - "127.0.0.1:8092:8080"
    volumes:
      - /volume1/docker/privatebin/data:/srv/data
    tmpfs:
      - /tmp:nodev,noexec,mode=1777
      - /run:nodev,exec,mode=1777
- Skip the optional Web Station portal. Review the summary, finish and select the option to start the project. DSM labels may vary.
The image tag selects PrivateBin 2.1.0, the current official release with a published image tag when checked on November 4, 2026. A numeric tag selects the app version but is not immutable: its publisher can change the underlying image.
The volumes line connects your NAS folder to /srv/data inside the container. The tmpfs entries provide temporary working locations. read_only makes the main container filesystem read-only, while the data and temporary locations remain writable. unless-stopped requests automatic restarts unless you deliberately stop the container. This baseline needs no custom configuration file or environment variables.
Check: the project should show as running. If it stops immediately, inspect the container's Log view and resolve the reported error before setting up access.
Connect your HTTPS hostname
Use your prepared real hostname in this rule. The source is the connection browsers make; the destination is the app listening on the NAS.
- Open Control Panel → Login Portal → Advanced → Reverse Proxy → Create.
- Name the rule
PrivateBinand enter these values.
| Setting | Value |
|---|---|
| Source protocol | HTTPS |
| Source hostname | Your prepared real hostname |
| Source port | 443 |
| Destination protocol | HTTP |
| Destination hostname | 127.0.0.1 |
| Destination port | 8092 |
- Save the rule.
- Open Control Panel → Security → Certificate → Settings → Configure. Assign the certificate covering your hostname to the new reverse-proxy service, then save.
- If DSM's firewall is enabled, allow LAN clients to reach NAS port 443. This is local access; do not add router port forwarding for this guide.
From a device on the same local network, open https:// followed by your actual hostname. For example, https://notes.your-domain.com illustrates the format only; substitute your name.
Check: you should see the PrivateBin editor over a trusted HTTPS connection without a certificate warning. If you see a warning, stop and fix the certificate or name. Bypassing it or switching to HTTP is not a successful connection check.
Create a sample, then check it after a restart
Expiration controls how long a paste remains available. Burn after reading can consume a paste when it is read. Leave that option off for this check so an ordinary read does not look like a storage failure. Expiration and burn after reading do not prevent recipients from retaining copies.
- Type
PrivateBin restart checkin the editor. Use this harmless sample, not a password or other secret. - Choose a one-day expiration and leave burn after reading disabled.
- Create the paste, then copy its entire generated URL, including everything after
#, somewhere private. - Open that exact URL in a second browser tab and confirm that the sample appears.
Next, open Container Manager → Project, select privatebin and choose Action → Restart. Wait until it is running again, then reopen the same saved link before the sample expires.
Check: the sample should remain readable. This checks that your installation can reopen that paste across a restart; it does not verify a backup, prove recovery or establish the security of the installation. Saved paste files belong in the NAS folder you mapped to /srv/data. If the sample is missing, check its expiration and complete link before investigating the folder mapping and logs.
Keep a backup and prepare for changes
Back up and recover
Keep a separate backup of both the data folder and docker-compose.yml. Stop the project before copying the folder so the app cannot change its files during the copy, then start it again. Store the hostname, complete paste links and any paste passwords securely: a copy of encrypted data cannot replace a missing decryption key.
For recovery, keep the project stopped while restoring the data folder and YAML. Restore with a method that preserves ownership and permissions of the data folder and everything inside it. If your restore did not preserve them, keep the project stopped and resolve ownership of all restored files and subfolders for user ID 65534 and group ID 82 before starting it; the earlier nonrecursive preparation commands fix only the top folder. Once ownership and permissions are resolved, recreate or start the project using the same data mapping. Retain the original hostname so existing links still address your installation, and reopen a nonexpired sample as a check.
This is a source-grounded recovery procedure, not a verified restore result. Expired or deleted pastes, missing keys and missing passwords are not guaranteed recoverable. An old backup may also retain encrypted data for a paste removed from the live installation; expiration does not erase previous backups or recipients' copies.
Update deliberately
Before updating, read the official PrivateBin release notes and back up the stopped data folder and current YAML. In Project → Details → YAML Configurations, change the image version and deploy or rebuild with the revised settings. Check the logs and reopen your sample afterward. Keep the previous YAML and backup: switching to an older image does not guarantee compatibility with data changed by a newer release.
Stop or undo the installation
To withdraw access while preserving files, stop the project and remove its reverse-proxy rule. Keep the data folder and separate backup. Avoid Project Delete or Clean until you have checked what DSM will remove and have a usable separate backup. Delete the data folder only when you intend to lose the stored paste data.
If a step fails
Container Manager is missing
Check Package Center on your NAS. If Container Manager is unavailable for the model, stop rather than attempting these project steps with a different tool.
The container stops or reports permission denied
Open its Log view. For a permission error, compare the data path in YAML with the folder you prepared and check ownership and DSM permissions. The narrow ownership commands do not override every DSM access-control rule. For an image download error, resolve the download failure before troubleshooting HTTPS. Share relevant error text if you need help, never a private paste link or password.
Port 8092 is already in use
Check the startup log for a port conflict and identify the existing service before changing anything. If you choose another unused NAS port, change both the 127.0.0.1 port mapping in YAML and the reverse proxy's destination port to match, then start the project again. Keep the container's internal port at 8080.
The HTTPS address does not open, or opens another service
Check that your hostname resolves locally to the NAS's LAN IP and that the client can reach NAS port 443. If another service opens, compare the hostname with the reverse-proxy rule and check for an existing conflicting rule. A certificate warning calls for checking the assigned certificate and its covered names, not bypassing the warning.
The editor reports an encryption or browser error
Confirm that you opened the prepared HTTPS hostname with a trusted certificate. An ordinary http:// NAS IP address does not meet this guide's access requirement.
The sample disappears
First check that the one-day expiration has not passed, burn after reading was disabled, and the saved URL includes its complete fragment after #. Then inspect the data mapping and log. Do not assume the paste can be recovered from a backup if its key is missing or it has expired.